Q1:ÎȘÊČĂŽÒȘŚÔ¶šÒćviewŁżAŁșÓÉÓÚșܶàÏ”ÍłŚÔŽű”ÄviewÂúŚăČ»ÁË”±Ç°ÉèŒÆĐèÇó»òŐßÎȘÁˎžüÁŒșĂ”ÄÓĂ»§ÌćŃ飏ÔöŒÓUI”ÄĂÀ»ŻĐ§čûŁŹŸÍĐèÒȘŚÔ¶šviewQ2:ŚÔ¶šÒćviewÓĐÄÇŒžžöČœÖèŁżA:>ÓĂ»§żÉžùŸĘĐèÒȘextends ViewŐâžöžžÀàŁŹÈ»șóÖŰĐŽžžÀà”Ä·œ·šŁ»ÈçŁșonDraw();onMeasure()”ÈŁ» >ÈçčûÓĂ»§ÔÚŚÔ¶šÒćViewÊÂĐèÒȘÌíŒÓÊôĐÔŁŹÔò±ŰĐëÔÚvaluesÎÄŒțŒĐÏÂĐÂœš"attrs.xml"ÎÄŒțŁŹÔÚÆäÖĐÌíŒÓŚÔ¶šÒćÊôĐÔĄŁ ÏÂĂæÀŽœűĐĐŚÔ¶šÒćview”ÄŃ§Ï°ĄŁÒ»ĄąŚî»ù±Ÿ”ÄŚÔ¶šÒćviewŁ»ÀęÈçŁșĐÂœšÒ»žöÀàCustomEditText ŒÌłĐEditTextÆäÌŰ”ăŁșÓ”ÓĐEditText”ÄÈ«Čż·œ·šŁŹŸÍșÍEditTextÒ»ÄŁÒ»ŃùŁŹÖ»ÊÇĂûŚÖȻ͏Á˶űÒŃĄŁÊčÓĂ·œ·šÓĐÁœÖÖŁș>ÔÚŽúÂëÖĐ”śÓĂŁŹCustomEditText cet=new CustomEditText(context);>ÔÚxmlÖĐ”śÓĂŁŹĐèÒȘĐŽÈ«°üĂûŒ°ÀàĂûŁŹ·ńÔò»á±šThe following classes could not be foundŁ»čŰŒüŽúÂëÈçÏÂŁșŚÔ¶šÒćviewŁșpublic class CustomEditText extends EditText { public CustomEditText(Context context) { super(context); // TODO Auto-generated constructor stub } public CustomEditText(Context context, AttributeSet attrs) { super(context, attrs); // TODO Auto-generated constructor stub } public CustomEditText(Context context, AttributeSet attrs, int defStyle) { super(context, attrs, defStyle); // TODO Auto-generated constructor stub }}xmlÖĐÊčÓĂŁș<! -- com.anqiansong.viewsÎȘCustomEditTextËùÔÚλÖÔİüĂû--><com.anqiansong.views.CustomEditText android:layout_width="wrap_content" android:layout_height="wrap_content" android:text="ŚÔ¶šÒćEditText" />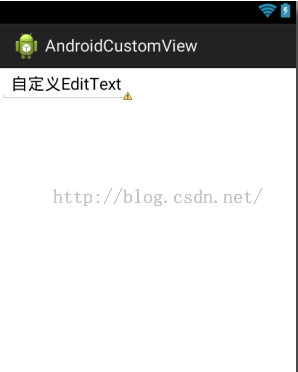
¶țĄąÔÚÉÏĂæ”ÄCustomEditTextÖĐÖŰĐŽonDraw()·œ·šÊ”ÏÖÉŸłęÏßtextЧčûŁ»@Overrideprotected void onDraw(Canvas canvas) { // TODO Auto-generated method stub super.onDraw(canvas); Paint paint=new Paint();//ĐÂœš»±Ê¶ÔÏó paint.setColor(Color.BLACK);//ÉèÖĂ»±ÊŃŐÉ« paint.setAntiAlias(true);//ÉèÖĂÊÇ·ńżčŸâłĘ paint.setStrokeWidth(2);//ÉèÖĂ»±Ê”ÄŽÖÏž //ÉèÖĂÏßÌő”ÄxÖá·œÏò”ÄÆđÊŒ”㣏yÖá·œÏò”ÄÆđÊŒ”ă canvas.drawLine(this.getLeft(), (this.getBottom()-this.getTop())/2, this.getRight(), (this.getBottom()-this.getTop())/2, paint);}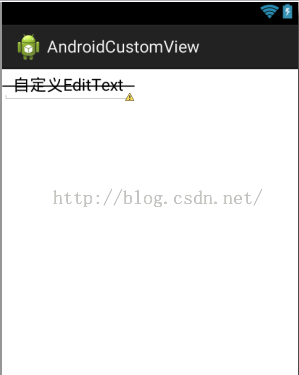
Èꥹ±ÈÈçÎÒĂÇÏÖÔÚÔÚxmlÖĐÊčÓĂʱÌíŒÓÒ»žölineColorÊôĐÔŁšÉŸłęÏß”ÄŃŐÉ«Ł©,žĂÔőĂŽÊ”ÏÖÄŰŁż>ÊŚÏÈĐèÒȘÔÚvaluesÏÂĐÂœšattrs.xmlÎÄŒțŁ»>È»șóžùŸĘĐèÒȘÌíŒÓÏàÓŠ”ÄÊôĐÔŒ°ÊôĐÔËùÊôÀàĐÍ>ÊčÓĂčŰŒüŽúÂëŁș<?xml version="1.0" encoding="utf-8"?><resources> <!--declare-styleable:ÉùĂśŃùÊœÀàĐÍ;attr name=""ÉùĂśÊôĐÔĂû;format="ÊôĐÔ”ÄÀàĐÍ" --> <declare-styleable name="CustomEditText"> <attr name="lineColor" format="color" /> </declare-styleable></resources>±žŚąŁșformat”ÄÊôĐÔÖ”Œû*žœÂŒÒ»ÔÚxmlÖĐ”śÓĂŁșÒÔÏÂŽúÂë±ŰĐëÉùĂśŁŹ·ńÔòŐÒČ»”œÖźÇ°¶šÒć”ÄÊôĐÔĂûŁŹÔòČ»ÄÜÓĂŁŹżÉÒÔÉùĂśÔÚžùČŒŸÖÖĐŁŹÒČżÉÒÔÔÚ”śÓĂʱÉùĂśxmlns:CustomEditText="http://schemas.android.com/apk/res/com.anqiansong.androidcustomview"ŁšÈçčûĂ»ÓĐÉùĂśŁŹÔÚÒęÓĂÊôĐÔÊ±Ï”ÍłÒČ»áÌáÊŸÈ»șóžùŸĘÌáÊŸŚÔ¶ŻÉúłÉœ«ÊÇÒŃxmlns:app=.....ŐâÖÖÄŁÊœŁ©Ë”ĂśŁșxmlns:***="http://schemas.android.com/apk/res/packagename"***ÖśÒȘÊÇÔÚ”śÓĂʱĐèÒȘŁŹÈçandroidŁștextColor="#ffffff";ŐâÀï”ÄĄ°androidĄ±·œÊœ1ÖĐ”ÄCustomEditText:lineColor="#ff0000"”ÄCustomEditTextŁŹ·œÊœ2ÖĐ”Ämylinecolor¶űpackagenameÔòÎȘ”±Ç°č€łÌ°üĂûÈçčûŐâÁœžöČ»ÊÇŐâÖÖžńÊœŁŹÔòÒČÒęÓĂČ»ÁËŚÔ¶šÒć”ÄÊôĐÔŽËÍ⣏ŒÈÈ»ÔÚxmlÖĐÉèÖĂ”ÄlineColor”ÄÖ”ŁŹÔÚŚÔ¶šÒćviewÖĐ”ÄččÔì·œ·šÖĐŸÍÒȘÈ„»ńÈĄŐâžöÊôĐÔ”ÄŃŐÉ«Ö”Ł»ÈçŽúÂëŁșpublic class CustomEditText extends EditText { private int lineColor;//ÉŸłęÏßŃŐÉ«È«ŸÖ±äÁż public CustomEditText(Context context) { super(context); // TODO Auto-generated constructor stub } public CustomEditText(Context context, AttributeSet attrs) { super(context, attrs); Paint paint=new Paint(); TypedArray array = context.obtainStyledAttributes(attrs, R.styleable.CustomEditText); lineColor=array.getColor(R.styleable.CustomEditText_lineColor, Color.BLACK);//»ńÈĄxmlÖĐÉèÖĂ”ÄÉŸłęÏß”ÄŃŐÉ«Ö”ŁŹŐâÀï”ÄCustomEditText_lineColorÊÇÓÉattrsÖĐ”ÄstyleableÖĐ”ÄĂûŚÖșÍÊôĐÔĂûŒÓ"_"Śéș϶űłÉ array.recycle(); } public CustomEditText(Context context, AttributeSet attrs, int defStyle) { super(context, attrs, defStyle); // TODO Auto-generated constructor stub } @Override protected void onDraw(Canvas canvas) { // TODO Auto-generated method stub super.onDraw(canvas); Paint paint=new Paint();//ĐÂœš»±Ê¶ÔÏó paint.setColor(lineColor);//ÉèÖĂ»±ÊŃŐÉ« paint.setAntiAlias(true);//ÉèÖĂÊÇ·ńżčŸâłĘ paint.setStrokeWidth(2);//ÉèÖĂ»±Ê”ÄŽÖÏž //ÉèÖĂÏßÌő”ÄxÖá·œÏò”ÄÆđÊŒ”㣏yÖá·œÏò”ÄÆđÊŒ”ă canvas.drawLine(this.getLeft(), (this.getBottom()-this.getTop())/2, this.getRight(), (this.getBottom()-this.getTop())/2, paint); }}·œÊœ1Łș<RelativeLayout xmlns:android="http://schemas.android.com/apk/res/android" xmlns:CustomEditText="http://schemas.android.com/apk/res/com.anqiansong.androidcustomview" xmlns:tools="http://schemas.android.com/tools" android:layout_width="match_parent" android:layout_height="match_parent" > <com.anqiansong.views.CustomEditText android:layout_width="wrap_content" android:layout_height="wrap_content" android:text="ŚÔ¶šÒćEditText" CustomEditText:lineColor="#ff0000" /></RelativeLayout>·œÊœ2Łș<com.anqiansong.views.CustomEditText xmlns:mylinecolor="http://schemas.android.com/apk/res/com.anqiansong.androidcustomview" android:layout_width="wrap_content" android:layout_height="wrap_content" android:text="ŚÔ¶šÒćEditText" mylinecolor:lineColor="#ff0000" />ÍŹŃù”ÄÔÀíŁŹÎÒĂÇżÉÒÔ¶ÔÉŸłęÏߔĎÖÏžÌíŒÓÒ»žöÊôĐÔlineHeightŁŹŽúÂëÈçÏÂŁșÌíŒÓÊôĐÔŁș<attr name="lineHeight" format="dimension"/>ÒęÓĂÊôĐÔŁșmylinecolor:lineHeight="5dp"ŚÔ¶šÒćviewÖĐ»ńÈĄlineHeightČąÉèÖĂŽÖÏžŁșlineHeight=array.getDimension(R.styleable.CustomEditText_lineHeight, 2);ÔÚondraw()·œ·šÖĐpaint.setStrokeWidth(lineHeight);//ÉèÖĂ»±Ê”ÄŽÖÏž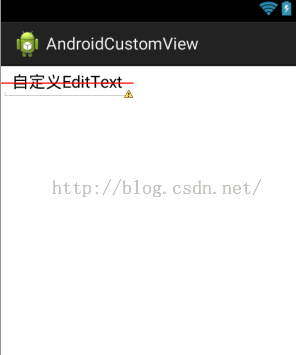
žœÂŒÒ»ŁșžœŁșAndroidÖĐŚÔ¶šÒćÊôĐԔĞńÊœÏêœâŁšÒęŚÔŁșhttp://www.cnblogs.com/zhangs1986/p/3243040.htmlŁŹŚśŐߣș»¶ŚíŁŹÇëŚđÖŰÔŽŽŁ©1. referenceŁșČÎżŒÄłÒ»ŚÊÔŽIDĄŁ Łš1Ł©ÊôĐÔ¶šÒćŁș <declare-styleable name = "ĂûłÆ"> <attr name = "background" format = "reference" /> </declare-styleable> Łš2Ł©ÊôĐÔÊčÓĂŁș <ImageView android:layout_width = "42dip" android:layout_height = "42dip" android:background = "@drawable/ÍŒÆŹID" />2. colorŁșŃŐÉ«Ö”ĄŁ Łš1Ł©ÊôĐÔ¶šÒćŁș <declare-styleable name = "ĂûłÆ"> <attr name = "textColor" format = "color" /> </declare-styleable> Łš2Ł©ÊôĐÔÊčÓĂŁș <TextView android:layout_width = "42dip" android:layout_height = "42dip" android:textColor = "#00FF00" />3. booleanŁșČŒ¶ûÖ”ĄŁ Łš1Ł©ÊôĐÔ¶šÒćŁș <declare-styleable name = "ĂûłÆ"> <attr name = "focusable" format = "boolean" /> </declare-styleable> Łš2Ł©ÊôĐÔÊčÓĂŁș <Button android:layout_width = "42dip" android:layout_height = "42dip" android:focusable = "true" />4. dimensionŁșłßŽçÖ”ĄŁ Łš1Ł©ÊôĐÔ¶šÒćŁș <declare-styleable name = "ĂûłÆ"> <attr name = "layout_width" format = "dimension" /> </declare-styleable> Łš2Ł©ÊôĐÔÊčÓĂŁș <Button android:layout_width = "42dip" android:layout_height = "42dip" />5. floatŁșžĄ”ăÖ”ĄŁ Łš1Ł©ÊôĐÔ¶šÒćŁș <declare-styleable name = "AlphaAnimation"> <attr name = "fromAlpha" format = "float" /> <attr name = "toAlpha" format = "float" /> </declare-styleable> Łš2Ł©ÊôĐÔÊčÓĂŁș <alpha android:fromAlpha = "1.0" android:toAlpha = "0.7" />6. integerŁșŐûĐÍÖ”ĄŁ Łš1Ł©ÊôĐÔ¶šÒćŁș <declare-styleable name = "AnimatedRotateDrawable"> <attr name = "visible" /> <attr name = "frameDuration" format="integer" /> <attr name = "framesCount" format="integer" /> <attr name = "pivotX" /> <attr name = "pivotY" /> <attr name = "drawable" /> </declare-styleable> Łš2Ł©ÊôĐÔÊčÓĂŁș <animated-rotate xmlns:android = "http://schemas.android.com/apk/res/android" android:drawable = "@drawable/ÍŒÆŹID" android:pivotX = "50%" android:pivotY = "50%" android:framesCount = "12" android:frameDuration = "100" />7. stringŁșŚÖ·ûŽźĄŁ Łš1Ł©ÊôĐÔ¶šÒćŁș <declare-styleable name = "MapView"> <attr name = "apiKey" format = "string" /> </declare-styleable> Łš2Ł©ÊôĐÔÊčÓĂŁș <com.google.android.maps.MapView android:layout_width = "fill_parent" android:layout_height = "fill_parent" android:apiKey = "0jOkQ80oD1JL9C6HAja99uGXCRiS2CGjKO_bc_g" />8. fractionŁș°Ù·ÖÊꥣ Łš1Ł©ÊôĐÔ¶šÒćŁș <declare-styleable name="RotateDrawable"> <attr name = "visible" /> <attr name = "fromDegrees" format = "float" /> <attr name = "toDegrees" format = "float" /> <attr name = "pivotX" format = "fraction" /> <attr name = "pivotY" format = "fraction" /> <attr name = "drawable" /> </declare-styleable> Łš2Ł©ÊôĐÔÊčÓĂŁș <rotate xmlns:android = "http://schemas.android.com/apk/res/android"ĄĄĄĄ android:interpolator = "@anim/¶Ż»ID" android:fromDegrees = "0"ĄĄĄĄ android:toDegrees = "360" android:pivotX = "200%" android:pivotY = "300%"ĄĄĄĄ android:duration = "5000" android:repeatMode = "restart" android:repeatCount = "infinite" />9. enumŁșöŸÙÖ”ĄŁ Łš1Ł©ÊôĐÔ¶šÒćŁș <declare-styleable name="ĂûłÆ"> <attr name="orientation"> <enum name="horizontal" value="0" /> <enum name="vertical" value="1" /> </attr> </declare-styleable> Łš2Ł©ÊôĐÔÊčÓĂŁș <LinearLayout xmlns:android = "http://schemas.android.com/apk/res/android" android:orientation = "vertical" android:layout_width = "fill_parent" android:layout_height = "fill_parent" > </LinearLayout>10. flagŁșλ»òÔËË㥣 Łš1Ł©ÊôĐÔ¶šÒćŁș <declare-styleable name="ĂûłÆ"> <attr name="windowSoftInputMode"> <flag name = "stateUnspecified" value = "0" /> <flag name = "stateUnchanged" value = "1" /> <flag name = "stateHidden" value = "2" /> <flag name = "stateAlwaysHidden" value = "3" /> <flag name = "stateVisible" value = "4" /> <flag name = "stateAlwaysVisible" value = "5" /> <flag name = "adjustUnspecified" value = "0x00" /> <flag name = "adjustResize" value = "0x10" /> <flag name = "adjustPan" value = "0x20" /> <flag name = "adjustNothing" value = "0x30" /> </attr> </declare-styleable> Łš2Ł©ÊôĐÔÊčÓĂŁș <activity android:name = ".StyleAndThemeActivity" android:label = "@string/app_name" android:windowSoftInputMode = "stateUnspecified | stateUnchangedĄĄ|ĄĄstateHidden"> <intent-filter> <action android:name = "android.intent.action.MAIN" /> <category android:name = "android.intent.category.LAUNCHER" /> </intent-filter> </activity> ŚąÒâŁș ÊôĐÔ¶šÒćʱżÉÒÔÖž¶š¶àÖÖÀàĐÍÖ”ĄŁ Łš1Ł©ÊôĐÔ¶šÒćŁș <declare-styleable name = "ĂûłÆ"> <attr name = "background" format = "reference|color" /> </declare-styleable> Łš2Ł©ÊôĐÔÊčÓĂŁș <ImageView android:layout_width = "42dip" android:layout_height = "42dip" android:background = "@drawable/ÍŒÆŹID|#00FF00" />
°æÈšÉùĂśŁș±ŸÎÄÎȘČ©ÖśÔŽŽÎÄŐÂŁŹÎŽŸČ©ÖśÔÊĐíČ»”ĂŚȘÔŰĄŁ