几天前在慕课网上看到鸿洋老师的 自定义卫星菜单,感觉很有意思,于是看完视频以后,自己也尝试写了一遍,并且添加了可拖拽效果(光看视频是不管用的,一定要自己动手做!切记不要照着抄代码)。
有兴趣的同学可以去慕课网看看(并非广告):http://www.imooc.com/learn/300
自定义控件这个玩意呢,就得考多练,于是又写了一个抽屉效果的菜单,也是比较简单的。
老规矩,先上效果图:
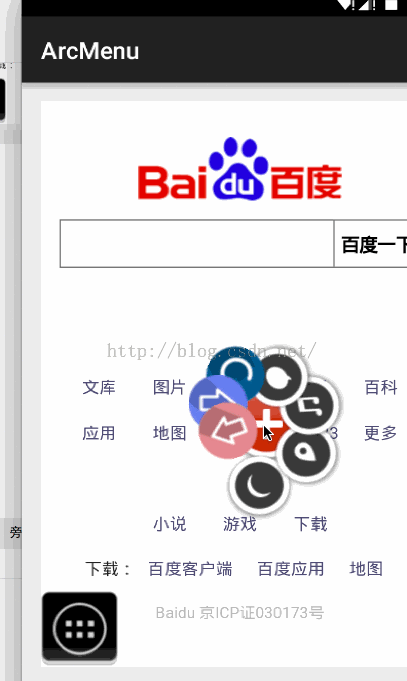
那么中间的圆圈就是卫星菜单拉,而左下角的呢,是抽屉菜单。
下面进入正题:
自定义Viewgroup的一般步骤:
写构造器,重写onMeasure(),重写onLayout();
由于本篇博客是viewgroup初步,故全部从最简单的开始。 我们来讲抽屉菜单。
首先创建DrawerMenu类,使他继承于ViewGroup
public class DrawerMenu extends ViewGroup
然后添加三个构造器,使用一般的方法,少参数的调用多参数的:
public DrawerMenu(Context context) { this(context, null); } public DrawerMenu(Context context, AttributeSet attrs) { this(context, attrs, 0); } public DrawerMenu(Context context, AttributeSet attrs, int defStyleAttr) { super(context, attrs, defStyleAttr); }一般在第三个构造器里,我们会使用TypedArray来获得他对应attr.xml里面的属性,这里为了简单,不给这个viewgroup添加任何自定义属性,所以构造器这样就可以。接下来是重写onMeasure()方法。所谓Measure为测量view的大小
protected void onMeasure(int widthMeasureSpec, int heightMeasureSpec) { int count = getChildCount(); for (int i = 0; i < count; i++) { measureChild(getChildAt(i), widthMeasureSpec, heightMeasureSpec); } super.onMeasure(widthMeasureSpec, heightMeasureSpec); }测量模式一共分三种,这里也不多介绍了。因为我们的子view都是wrap_content的,所以我们只要简单测量一下即可。
接下来是关键的地方,onLayout(), 此方法是为子view进行布局。告诉子view他应该在什么位置,首先,我们要布局主按钮,这里我们将它固定在左下角:
protected void onLayout(boolean changed, int l, int t, int r, int b) { layoutBottom();} private void layoutBottom() { mButton_buttom = getChildAt(0); mButton_buttom.setOnClickListener(this); mWidth_button_buttom = mButton_buttom.getMeasuredWidth(); mHeight_button_buttom = mButton_buttom.getMeasuredHeight(); mButtonX = 0; mButtonY = getMeasuredHeight() - mHeight_button_buttom; mButton_buttom.layout(mButtonX, mButtonY, mWidth_button_buttom, getMeasuredHeight()); }主要的button 是第一个子view 。我们用getChildAt(index=0)来获得, 然后获取得到的测量好的宽和高.
最后将主按钮layout到合适的位置,如图:
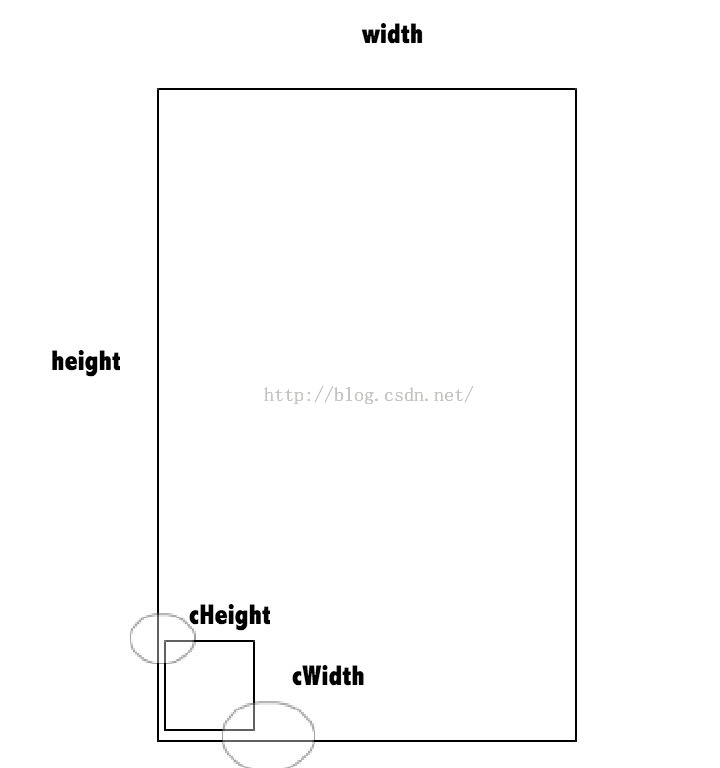
layout里面四个参数为画出圆圈地方的x,y
所以 左上角一点的位置为: 0,height - cHeight 右下角的坐标为 cWidth,height
这样我们便确定了主button的位置。
那么接下来当然是去layout 子view的位置了。相信大家也明白了,子view的位置只要找出坐标就好。所以我们这里继续确定子view的位置。
protected void onLayout(boolean changed, int l, int t, int r, int b) { Log.i("wing", mIsChanged + ""); if (mIsChanged) { layoutBottom(); int count = getChildCount(); for (int i = 0; i < count - 1; i++) { View child = getChildAt(i + 1); int childWidth = child.getMeasuredWidth(); int childHeight = child.getMeasuredHeight(); child.layout(0, mButtonY - mHeight_button_buttom * (i + 1) * 2, childWidth, getMeasuredHeight()); child.setVisibility(GONE); } } }然后我们为主按钮添加监听: 来切换菜单的状态,如果菜单为关闭,那么按下的时候显示按钮,如果为开启,那么将按钮都GONE。
这里为按钮添加了动画效果,如果你还不了解安卓动画,那么看看这里:http://blog.csdn.net/wingichoy/article/details/47104433
为了好看呢,我们给每个动画的duration加了 i*100的延迟来有渐变的效果
public void onClick(View v) { toggleMenu(); } private void toggleMenu() { if (mIsChanged) { int count = getChildCount(); for (int i = 0; i < count - 1; i++) { View child = getChildAt(i + 1); TranslateAnimation ta = new TranslateAnimation(-child.getMeasuredWidth(), 0, 0, 0); ta.setDuration(1000 + i * 100); child.startAnimation(ta); child.setVisibility(VISIBLE); mIsChanged = false; } } else { int count = getChildCount(); for (int i = 0; i < count - 1; i++) { View child = getChildAt(i + 1); TranslateAnimation ta = new TranslateAnimation(0, -child.getMeasuredWidth(), 0, 0); ta.setDuration(1000 + i * 100); child.startAnimation(ta); child.setVisibility(GONE); mIsChanged = true; } }这下我们的viewgroup基本大功告成了。添加到mainactivity的xml上来试试
<com.wingsoft.arcmenu.DrawerMenu android:layout_width="match_parent" android:layout_height="match_parent"> <ImageView android:layout_width="wrap_content" android:layout_height="wrap_content" android:src="@drawable/drawer"/> <ImageView android:layout_width="wrap_content" android:layout_height="wrap_content" android:src="@drawable/drawer"/> <ImageView android:layout_width="wrap_content" android:layout_height="wrap_content" android:src="@drawable/drawer"/> <ImageView android:layout_width="wrap_content" android:layout_height="wrap_content" android:src="@drawable/drawer"/> <ImageView android:layout_width="wrap_content" android:layout_height="wrap_content" android:src="@drawable/drawer"/> </com.wingsoft.arcmenu.DrawerMenu>
嗯。不错。 样子也实现了。 那么接下来大家动动脑筋,自己写个监听器吧~ 今天就到这里。
如果肯努力,技术很快就赶上来了~~
版权声明:本文为博主原创文章,欢迎注明出处后转载。
- 4楼lmj6235657916小时前
- 赞一个~
- 3楼luzhenyuxfcy昨天 16:41
- 哟 不错哟
- 2楼qinjuning昨天 14:38
- 挺不错,继续加油。
- Re: wingichoy昨天 14:39
- 回复qinjuningn多谢军哥
- 1楼ApkCore昨天 14:09
- 通俗易懂,讲得深入一点就好了
- Re: wingichoy昨天 14:22
- 回复ApkCoren恩恩 正在学习 以后会有的