Android-优化UI性能(4)-使用ViewStub
ViewStub概念:
ViewStub是一个看不见的,轻量级的View。它没有尺寸,也不会绘制以及以某种形式参与到布局中来。只有当调用了inflate的之后其中的view才会被实例化,
这意味着ViewStub保留View层次的结构的代价是很低的
1,延时加载不常用的UI控件
当某些控件只在很多好的情况下才会使用,我们可以抵用ViewStub来延迟加载
以提高UI加载的速度及减少内存的消耗
下面是一个Demo:
主Activity类:
public class MainActivity extends Activity{ @Override protected void onCreate(Bundle savedInstanceState) { super.onCreate(savedInstanceState); //加载按钮布局 setContentView(R.layout.layout_delay); //建立按钮对象和点击事件 Button _button = (Button)findViewById(R.id.buttonLoad); _button.setOnClickListener(new OnClickListener() { @Override public void onClick(View arg0) { // TODO Auto-generated method stub //使得按钮不可见 arg0.setEnabled(false); //得到Stub对象 ViewStub _viewStub = (ViewStub)findViewById(R.id.viewStubLoad); //压入当前布局 View inflate = _viewStub.inflate(); } }); }两个布局文件:
1,layout_delay.xml
<?xml version="1.0" encoding="utf-8"?><LinearLayout xmlns:android="http://schemas.android.com/apk/res/android" android:layout_width="match_parent" android:layout_height="match_parent" android:orientation="vertical" > <ViewStub android:id="@+id/viewStubLoad" android:layout_width="wrap_content" android:layout_height="wrap_content" android:inflatedId="@+id/viewStub" //应用activity_main.xml android:layout="@layout/activity_main"/> <Button android:id="@+id/buttonLoad" android:layout_width="wrap_content" android:layout_height="wrap_content" android:text="load" /></LinearLayout>2,activity.xml
<RelativeLayout xmlns:android="http://schemas.android.com/apk/res/android" xmlns:tools="http://schemas.android.com/tools" android:layout_width="match_parent" android:layout_height="match_parent" android:paddingBottom="@dimen/activity_vertical_margin" android:paddingLeft="@dimen/activity_horizontal_margin" android:paddingRight="@dimen/activity_horizontal_margin" android:paddingTop="@dimen/activity_vertical_margin" tools:context=".MainActivity" > <TextView android:layout_width="wrap_content" android:layout_height="wrap_content" android:text="@string/hello_world" /></RelativeLayout>结果如下: 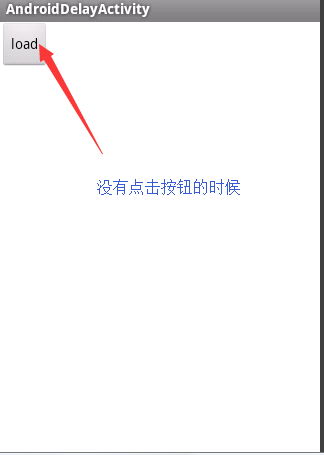

2,提高改变布局的速度
需要的使用场景:界面需要频繁的切换,提高切换速度
使用的方法:以频繁改变横竖屏Demo来解释
1,设置Activity
android:configChanged=”keyboardHidden|orientation”
<activity android:name=".MyConfigureChangedActivity" android:configChanges="keyboardHidden|orientation"> <intent-filter> <action android:name="android.intent.action.MAIN" /> <category android:name="android.intent.category.LAUNCHER" /> </intent-filter> </activity>2,为横竖屏编写不同的layout
land:
<?xml version="1.0" encoding="utf-8"?><LinearLayout xmlns:android="http://schemas.android.com/apk/res/android" android:layout_width="match_parent" android:layout_height="match_parent" android:orientation="horizontal" > <TextView android:id="@+id/textViewLand" android:layout_width="wrap_content" android:layout_height="wrap_content" android:text="TextView" /> <SeekBar android:id="@+id/seekBarLand" android:layout_width="match_parent" android:layout_height="wrap_content" android:layout_weight="1" /></LinearLayout>如下图: 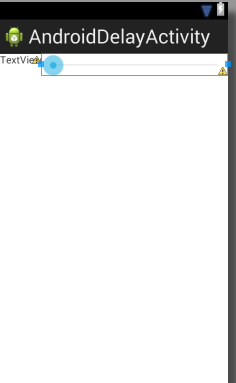
port:
<?xml version="1.0" encoding="utf-8"?><LinearLayout xmlns:android="http://schemas.android.com/apk/res/android" android:layout_width="match_parent" android:layout_height="match_parent" android:orientation="vertical" > <TextView android:id="@+id/textViewPort" android:layout_width="wrap_content" android:layout_height="wrap_content" android:text="TextViewPort" /> <SeekBar android:id="@+id/seekBarPort" android:layout_width="match_parent" android:layout_height="wrap_content" /></LinearLayout>如下图: 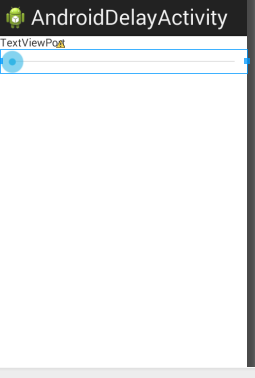
3,创建一个layout,并且只包含两个View Stub分别对应横竖屏
<?xml version="1.0" encoding="utf-8"?><LinearLayout xmlns:android="http://schemas.android.com/apk/res/android" android:layout_width="match_parent" android:layout_height="match_parent" android:orientation="vertical" > <ViewStub android:id="@+id/StubLand" android:layout_width="wrap_content" android:layout_height="wrap_content" android:inflatedId="@+id/inflateStubLand" android:layout="@layout/layout_land"/> <ViewStub android:id="@+id/StubPort" android:layout_width="wrap_content" android:layout_height="wrap_content" android:inflatedId="@+id/inflateStubPort" android:layout="@layout/layout_port"/></LinearLayout>4,在横竖屏的时候,通过调用ViewStub.inflate创建当前的View并将另外一个设为GONE
private void setOrientationlayout(int orientation) { //如果系统状态为水平方向 if (orientation == Configuration.ORIENTATION_LANDSCAPE) { //水平方向没有布局,就创建布局 if (null == mLanderView) { ViewStub _viewStub = (ViewStub)findViewById(R.id.StubLand); mLanderView = _viewStub.inflate(); } //如果当前布局低竖直布局的话就设置为不可见 if (null != mPortView) { mPortView.setVisibility(View.GONE); } //绑定界面布局 bindView(mLanderView); } else { //如果系统状态为竖直方向 //当前布局为水平布局,就设置为不可见 if (null != mLanderView) { mLanderView.setVisibility(View.GONE); } //竖直布局为空,就压入竖直布局 if (null == mPortView) { ViewStub _viewStub = (ViewStub)findViewById(R.id.StubPort); mPortView = _viewStub.inflate(); } //绑定界面 bindView(mPortView); } }5,绑定并设置控件的状态
//绑定函数 private void bindView(View p_v) { //要绑定的View设置为可见 p_v.setVisibility(View.VISIBLE); //两个控件采用系统的布局 mSeekBar = (SeekBar)findViewById(android.R.id.progress); mTextView = (TextView)findViewById(android.R.id.text1); }onCreate
//onCreate protected void onCreate(Bundle savedInstanceState) { // TODO Auto-generated method stub super.onCreate(savedInstanceState); setContentView(R.layout.layout_land); Display _disPlay = ((WindowManager)getSystemService(WINDOW_SERVICE)).getDefaultDisplay(); //得到布局的方向 setOrientationlayout(_disPlay.getOrientation()); }版权声明:欢迎交流指正文章的错误,必定虚心接受,QQ872785786