有时候,可能觉得系统提供的控件太丑,就会需要自定义控件来实现自己想要的效果。
以下主要参考《第一行代码》
1.自定义一个标题栏:
系统自带的标题栏很丑,且没什么大的作用,所以我们之前会在onCreate()中调用requestWindowFeature(Window.FEATURE_NO_TITLE);设置不显示标题栏。
下面自定义一个标题栏,中间显示标题,左右各有一个按钮:
title.xml:
1 <?xml version="1.0" encoding="utf-8"?> 2 3 <LinearLayout xmlns:android="http://schemas.android.com/apk/res/android" 4 5 android:layout_width="match_parent" 6 7 android:layout_height="wrap_content" 8 9 android:orientation="horizontal"10 11 android:background="#bbbbbb" >12 13 <Button14 15 android:id="@+id/btn_back"16 17 android:text="@string/back"18 19 android:layout_width="wrap_content"20 21 android:layout_height="wrap_content"22 23 android:layout_margin="5dp"24 25 android:layout_gravity="left|center_vertical"26 27 android:textColor="#0099cc"28 29 android:layout_weight="1"/>30 31 <TextView32 33 android:id="@+id/title"34 35 android:layout_width="wrap_content"36 37 android:layout_height="wrap_content"38 39 android:textSize="20sp"40 41 android:textColor="#0099cc"42 43 android:text="@string/this_is_title"44 45 android:layout_gravity="center"46 47 android:gravity="center"48 49 android:layout_weight="2"/>50 51 <Button52 53 android:id="@+id/btn_edit"54 55 android:layout_width="wrap_content"56 57 android:layout_height="wrap_content"58 59 android:text="@string/edit"60 61 android:layout_margin="5dp"62 63 android:layout_gravity="right|center_vertical"64 65 android:textColor="#0099cc"66 67 android:layout_weight="1"/>68 69 </LinearLayout>
Activity代码:
1 protected void onCreate(Bundle savedInstanceState) {2 3 super.onCreate(savedInstanceState); 4 5 requestWindowFeature(Window.FEATURE_NO_TITLE);6 7 setContentView(R.layout.title);8 9 }
运行结果:

(⊙o⊙)…有点丑哈,不过仔细看,还是有点像标题栏的。
2.复用布局代码:
想让这个标题栏应用在以后的每个布局文件,要怎么做呢?
总不能每次都把这些xml代码重写一遍吧。
android布局中提供了类似于c预处理指令#include的<include>标签,可以实现布局代码的复用。
下面新建一个first_layout.xml:
1 <?xml version="1.0" encoding="utf-8"?> 2 3 <LinearLayout xmlns:android="http://schemas.android.com/apk/res/android" 4 5 android:layout_width="match_parent" 6 7 android:layout_height="match_parent" 8 9 android:orientation="vertical" >10 11 <include layout="@layout/title"/>12 13 <Button android:id="@+id/btn"14 15 android:text="@string/i_m_a_button"16 17 android:layout_width="wrap_content"18 19 android:layout_height="wrap_content"20 21 android:layout_gravity="center_horizontal"/>22 23 </LinearLayout>
修改setContentView(R.layout.first_layout);
显示结果:
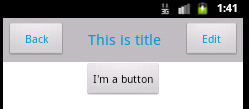
现在Back和Edit按钮都没有任何事件处理的,怎样实现点击Back按钮就结束当前Activity呢?方法跟之前的做法完全一样,使用findViewById()根据id找到Back按钮,然后设置click事件监听即可。
代码如下:
1 public class FirstActivity extends Activity { 2 3 @Override 4 5 protected void onCreate(Bundle savedInstanceState) { 6 7 super.onCreate(savedInstanceState); 8 9 requestWindowFeature(Window.FEATURE_NO_TITLE);10 11 setContentView(R.layout.first_layout);12 13 Button btn = (Button) findViewById(R.id.btn_back);14 15 btn.setOnClickListener(new OnClickListener() {16 17 @Override18 19 public void onClick(View v) {20 21 // TODO Auto-generated method stub22 23 FirstActivity.this.finish();24 25 }26 27 });28 29 }30 31 }
布局文件的复用已然通过<include>实现了,但是每次都要重新写事件监听,还是觉得麻烦……到这里一般就会想到抽象出一个自定义类,每次需要的时候,直接使用该自定义类不就行了,其实就是自定义控件的做法了。
3.自定义控件,复用功能代码
TitleLinearLayout.java代码:
1 public class TitleLinearLayout extends LinearLayout { 2 3 public TitleLinearLayout(Context context, AttributeSet attrs) { 4 5 super(context, attrs); 6 7 LayoutInflater.from(context).inflate(R.layout.title, this); 8 9 Button btn_back = (Button) findViewById(R.id.btn_back);10 11 btn_back.setOnClickListener(new OnClickListener() {12 13 @Override14 15 public void onClick(View v) {16 17 // TODO Auto-generated method stub18 19 Log.i("clicked","back");20 21 ((Activity)getContext()).finish();22 23 }24 25 });26 27 }28 29 }
继承自LinearLayout,实现带两个参数的构造方法。在构造方法中,加载布局文件,并对其中的Back按钮进行事件监听设置。
LayoutInflater.from(context).inflate(R.layout.title, this);用于动态加载布局文件。
注意到,Activity中有一个获取LayoutInflater的方法,所以,也可以使用下面一行代码加载布局文件:
((Activity)context).getLayoutInflater().inflate(R.layout.title, this);这种方法,在Activity代码中比较常用,而这里需要进行类型强转,反倒麻烦点,而且不如第一个方法安全。
如何使用自定义的控件呢?
first_layout代码如下:
1 <?xml version="1.0" encoding="utf-8"?> 2 3 <LinearLayout xmlns:android="http://schemas.android.com/apk/res/android" 4 5 android:layout_width="match_parent" 6 7 android:layout_height="match_parent" 8 9 android:orientation="vertical" >10 11 <cn.csc.custom_ui.TitleLinearLayout12 13 android:layout_width="match_parent"14 15 android:layout_height="wrap_content">16 17 </cn.csc.custom_ui.TitleLinearLayout>18 19 <Button android:id="@+id/btn"20 21 android:text="@string/i_m_a_button"22 23 android:layout_width="wrap_content"24 25 android:layout_height="wrap_content"26 27 android:layout_gravity="center_horizontal"/>28 29 </LinearLayout>
说明:
1)在布局文件中,引用自定义的控件,需要使用完整的类限定名,即包名.类名的方式;
2)在定义控件中,设置属性时,使用alt+/进行代码提示补全功能将经常不可用,标签名可以先设置为内置控件,然后进行属性的设置,之后再把标签名改回到自定义的控件的完整限定名即可。
- 1楼AnyMore.
- 哥,你这个是自定义控件?
- Re: 某人的喵星人
- @AnyMore.,算是吧,自定义标题栏,虽然只是两个Button和一个TextView简单组合下,但原理差不多吧