上一篇讲了基础入门 OpenGL (一) ,这一次主要学习OpenGL 纹理基本学习总结
要是做复杂的OpenGL应用程序,一定会用到纹理技术。纹理说白了就是把图片或者视频图像绘制到OpenGL空间中。
因此纹理也有坐标系,称ST坐标,或者UV
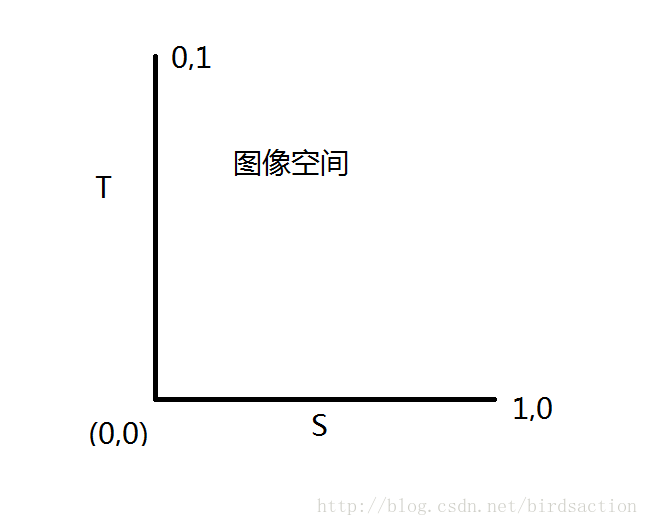
上面是纹理坐标空间,但没有固定的方向
下面演示加载一张image作为纹理贴图。
public class TextureUtils { public static int createTexture(InputStream ins) { int[] textures = new int[1]; GLES20.glGenTextures(1, textures, 0);//生成一个纹理 int textureId = textures[0]; GLES20.glBindTexture(GLES20.GL_TEXTURE_2D, textureId); GLES20.glTexParameterf(GLES20.GL_TEXTURE_2D, GLES20.GL_TEXTURE_MIN_FILTER,GLES20.GL_NEAREST); GLES20.glTexParameterf(GLES20.GL_TEXTURE_2D,GLES20.GL_TEXTURE_MAG_FILTER,GLES20.GL_LINEAR); GLES20.glTexParameterf(GLES20.GL_TEXTURE_2D, GLES20.GL_TEXTURE_WRAP_S,GLES20.GL_CLAMP_TO_EDGE); GLES20.glTexParameterf(GLES20.GL_TEXTURE_2D, GLES20.GL_TEXTURE_WRAP_T,GLES20.GL_CLAMP_TO_EDGE); //上面是纹理贴图的取样方式,包括拉伸方式,取临近值和线性值 Bitmap bitmap = BitmapFactory.decodeStream(ins); GLUtils.texImage2D(GLES20.GL_TEXTURE_2D, 0, bitmap, 0);//让图片和纹理关联起来,加载到OpenGl空间中 Log.d("OPENGL","bitmap:" + bitmap); bitmap.recycle();//不需要,可以释放 return textureId; }}public class MyRenderer implements Renderer { public static float[] projMatrix = new float[16];// 投影 public static float[] viewMatrix = new float[16];// 相机 public static float[] mViewPjMatrix;// 总变换矩阵 public static float[] matrixs = new float[16]; public static int textureId = -1; Context context; MyDrawModel drawModel; public MyRenderer(Context context) { this.context = context; } @Override public void onDrawFrame(GL10 arg0) { GLES20.glClear( GLES20.GL_DEPTH_BUFFER_BIT | GLES20.GL_COLOR_BUFFER_BIT); Log.e("", "textureId:" + textureId); drawModel.drawFrame(textureId); } @Override public void onSurfaceChanged(GL10 arg0, int w, int h) { GLES20.glViewport(0, 0, w, h); float ratio = (float) w / h; Matrix.frustumM(projMatrix, 0, -ratio, ratio, -1, 1, 1, 10);//投影矩阵设置 Matrix.setLookAtM(viewMatrix, 0, 0, 0, 3, 0, 0, 0, 0.0f, 1.0f, 0.0f);//摄像机坐标设置 } @Override public void onSurfaceCreated(GL10 g, EGLConfig eglConfig) { GLES20.glClearColor(0.5f,0.5f,0.5f, 1.0f); GLES20.glEnable(GLES20.GL_DEPTH_TEST); InputStream ins = null; drawModel = new MyDrawModel(); drawModel.init(); try { ins = context.getAssets().open("house.jpg"); textureId = TextureUtils.createTexture(ins); Log.e("", "textureId:" + textureId); } catch (IOException e) { e.printStackTrace(); } finally { try { ins.close(); } catch (IOException e) { e.printStackTrace(); } } GLES20.glDisable(GLES20.GL_CULL_FACE); }}public class MyDrawModel { private int programId; private int mVPMatrixHandle; // 总变换矩阵引用id private int positionHandle; // 顶点位置id private int texCoorHandle; // 顶点纹理坐标id private FloatBuffer vertexBuffer; private FloatBuffer texCoorBuffer; public MyDrawModel() { } public void init() { initData(); int vertexsharder = GLHelper.compileScript(GLES20.GL_VERTEX_SHADER, GLScript.vertex2); int fragmentsharder = GLHelper.compileScript(GLES20.GL_FRAGMENT_SHADER, GLScript.fragment2); programId = GLHelper.linkAttach(vertexsharder, fragmentsharder); boolean isOK = GLHelper.checkProgram(programId); positionHandle = GLES20.glGetAttribLocation(programId, "aPosition"); texCoorHandle = GLES20.glGetAttribLocation(programId, "aTexCoor"); mVPMatrixHandle = GLES20.glGetUniformLocation(programId, "uMVPMatrix"); Log.d("OPENGL", "positionHandle:" + positionHandle + ";texCoorHandle:" + texCoorHandle + ";mVPMatrixHandle:" + mVPMatrixHandle + ";" + isOK); } private void initData() { //X,Y,Z,绘画的顶点 float vertices[] = new float[] { 0, 0, 0, -1.8f, -1f, 0, 1.8f, -1f, 0, 1.8f, 1f, 0, -1.8f, 1f, 0, -1.8f, -1f, 0 }; ByteBuffer vb = ByteBuffer.allocateDirect(vertices.length * 4); vb.order(ByteOrder.nativeOrder()); vertexBuffer = vb.asFloatBuffer(); vertexBuffer.put(vertices); vertexBuffer.position(0); //纹理空间坐标 S,T float texCoor[] = new float[] { 0.5f, 0.5f, 0f, 1f, 1f, 1f, 1f, 0f, 0f, 0f, 0f, 1f }; ByteBuffer cb = ByteBuffer.allocateDirect(texCoor.length * 4); cb.order(ByteOrder.nativeOrder()); texCoorBuffer = cb.asFloatBuffer(); texCoorBuffer.put(texCoor); texCoorBuffer.position(0); } public void drawFrame(int textureId) { GLES20.glUseProgram(programId); // // 初始化矩阵 Matrix.setRotateM(MyRenderer.matrixs, 0, 0, 1, 0, 0); Matrix.translateM(MyRenderer.matrixs, 0, 0, 0, 1); //矩阵转换 ,投影矩阵,摄像机矩阵,模型矩阵 MyRenderer.mViewPjMatrix = new float[16]; Matrix.multiplyMM(MyRenderer.mViewPjMatrix, 0, MyRenderer.viewMatrix,0, MyRenderer.matrixs, 0); Matrix.multiplyMM(MyRenderer.mViewPjMatrix, 0, MyRenderer.projMatrix,0, MyRenderer.mViewPjMatrix, 0); GLES20.glUniformMatrix4fv(mVPMatrixHandle, 1, false, MyRenderer.mViewPjMatrix, 0); GLES20.glVertexAttribPointer(positionHandle, 3, GLES20.GL_FLOAT, false, 3 * 4, vertexBuffer); GLES20.glVertexAttribPointer(texCoorHandle, 2, GLES20.GL_FLOAT, false, 2 * 4, texCoorBuffer); GLES20.glEnableVertexAttribArray(positionHandle); GLES20.glEnableVertexAttribArray(texCoorHandle); GLES20.glActiveTexture(GLES20.GL_TEXTURE0); GLES20.glBindTexture(GLES20.GL_TEXTURE_2D, textureId); GLES20.glDrawArrays(GLES20.GL_TRIANGLE_FAN, 0, 6);//六个定点,绘制三角形 }}OpenGL需要把设备的坐标归一化到[-1,-1]空间中,所以这里涉及到矩阵相乘的理论,包括世界坐标,物体坐标,摄像机坐标的转换,以后会详细介绍。
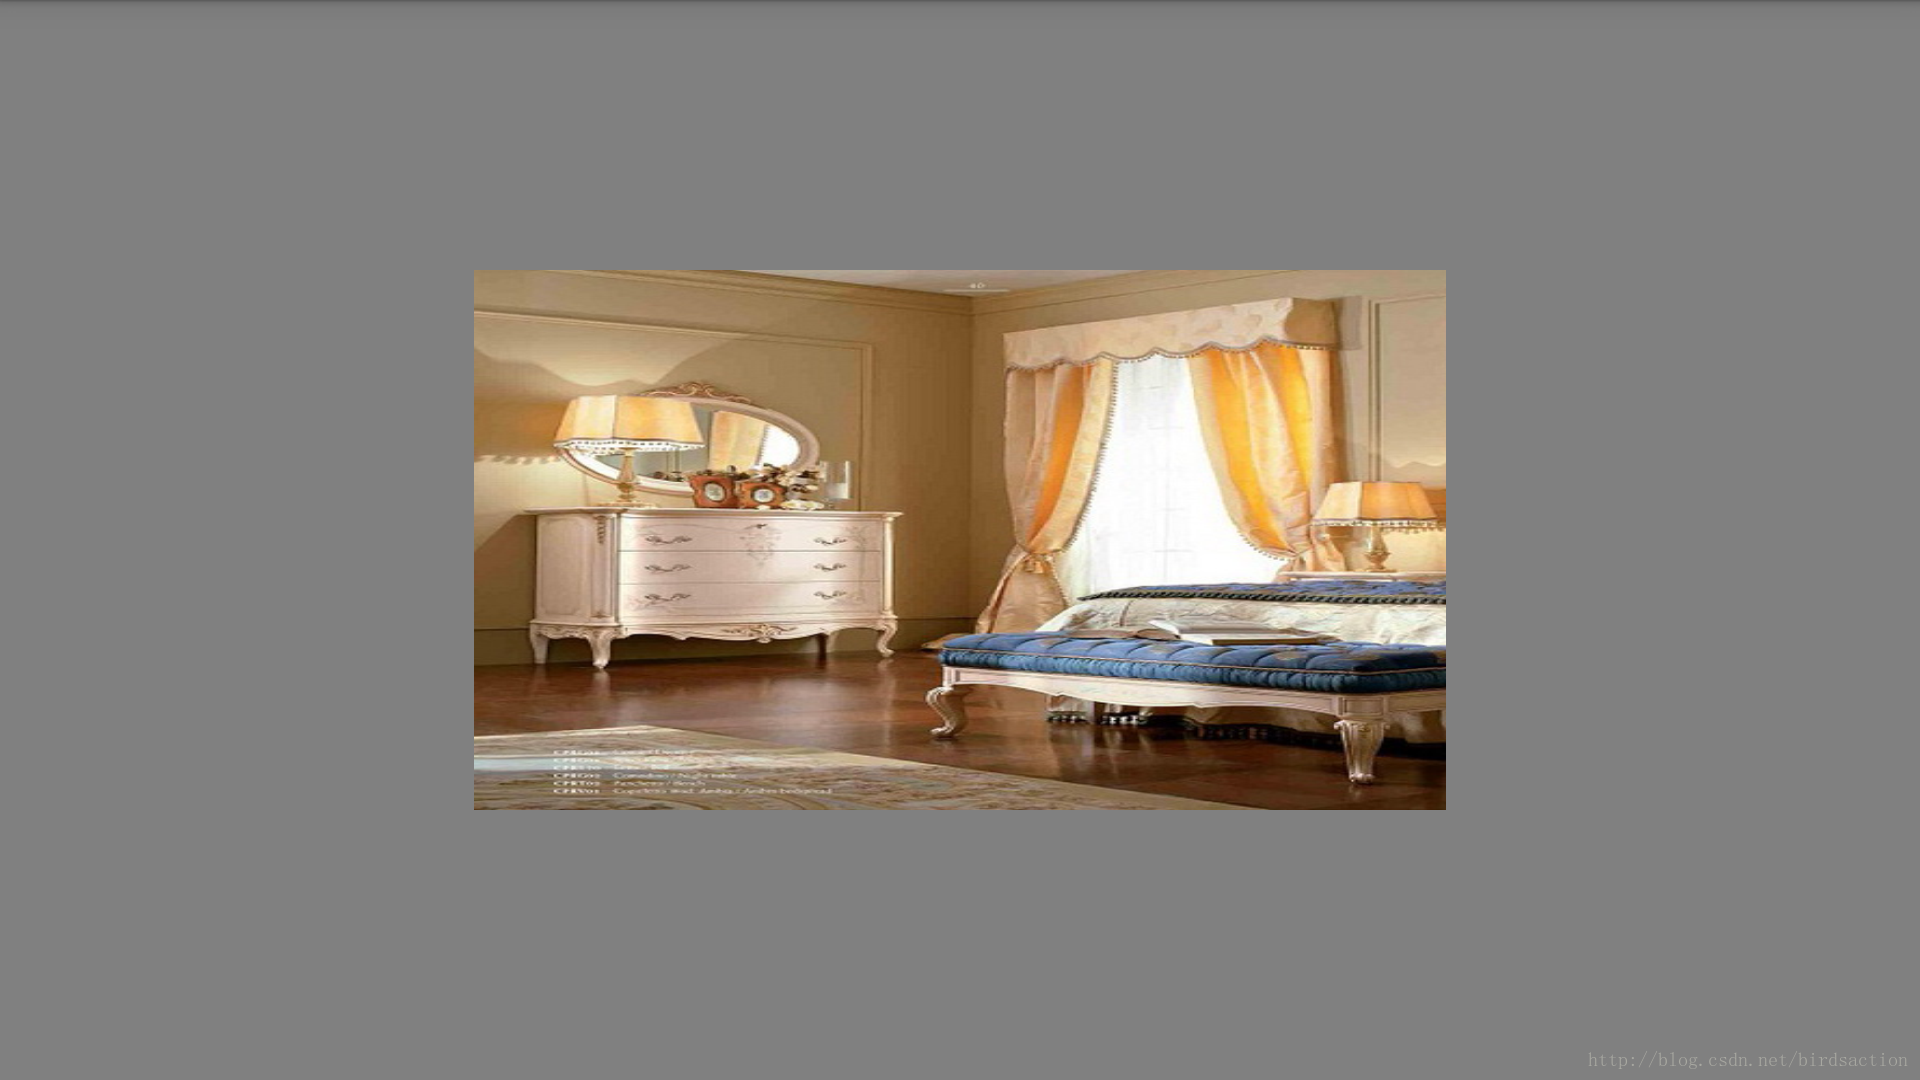
public class GLScript { public GLScript() { } public static final String vertex1 = "attribute vec4 mPosition;\n" + "void main()\n" + "{\n" + "gl_Position=mPosition;\n " + "}\n"; public static final String fragment1 = "precision mediump float;\n" + "uniform vec4 mColor;\n" + "void main(){ gl_FragColor=mColor;\n}"; public static final String vertex2 = "uniform mat4 uMVPMatrix;\n" + "attribute vec3 aPosition;\n" + "attribute vec2 aTexCoor;\n" + "varying vec2 vTextureCoord;\n" + "void main() { \n" + "gl_Position = uMVPMatrix * vec4(aPosition,1);\n" + "vTextureCoord = aTexCoor;\n" + "}\n" ; public static final String fragment2 = "precision mediump float;\n" + "varying vec2 vTextureCoord;\n" + "uniform sampler2D sTexture;\n" + "void main() { \n" + "vec2 coord = vTextureCoord;\n" + "coord.s = coord.s * 0.5;\n" //其实是去图像的一半,向量缩小了 + "gl_FragColor = texture2D(sTexture, coord); \n" + "}\n" ;}coord.s = coord.s * 0.5;这样是取纹理图像的一半,显示到界面上也就是图片的前半部分内容
其它的工具类和上一篇文章一样。
内容显示
原图: