Fragment相当于一个小型activity,因为Fragment可以实现activity中所有的功能,不同的是Fragment可以嵌入activity,一个activity可以有多个Fragment,而且可以运行时根据需要切换Fragment,达到可以适应不同屏幕大小等目的需要。
本章来看看如何在activity中嵌入Fragment的方法,有静态和动态方法的。
静态方法就是使用xml直接嵌入,动态就是在Java代码中嵌入。
方法:
1 按照默认设置新建项目
2 新建一个类命名为Fragment1.java
代码如下:
package bill.su.fragment;import android.app.Fragment;import android.os.Bundle;import android.view.LayoutInflater;import android.view.View;import android.view.ViewGroup;public class Fragment1 extends Fragment { @Override public View onCreateView(LayoutInflater inflater, ViewGroup container, Bundle savedInstanceState) { return inflater.inflate(R.layout.fragment1, container, false); }}3 新建layout的xml文件,输入代码如下:<?xml version="1.0" encoding="utf-8"?><LinearLayout xmlns:android="http://schemas.android.com/apk/res/android" android:layout_width="match_parent" android:layout_height="match_parent" android:orientation="vertical" android:background="#00FF00" > <TextView android:layout_width="match_parent" android:layout_height="wrap_content" android:text="@string/fragment_one" android:textSize="25sp" android:textColor="#FF0000" /></LinearLayout>
4 同理新建第二个类:
package bill.su.fragment;import android.app.Fragment;import android.os.Bundle;import android.view.LayoutInflater;import android.view.View;import android.view.ViewGroup;public class Fragment2 extends Fragment { @Override public View onCreateView(LayoutInflater inflater, ViewGroup container, Bundle savedInstanceState) { return inflater.inflate(R.layout.fragment2, container, false); }}5 新建第二个类的对应layout的xml文件:
<?xml version="1.0" encoding="utf-8"?><LinearLayout xmlns:android="http://schemas.android.com/apk/res/android" android:layout_width="match_parent" android:layout_height="match_parent" android:orientation="vertical" android:background="#FFFE00" > <TextView android:layout_width="match_parent" android:layout_height="wrap_content" android:text="@string/fragment_two" android:textColor="#000000" android:textSize="25sp" /> </LinearLayout>
6 只需要在主activity的xml文件中直接嵌入Fragment就可以了:
<LinearLayout xmlns:android="http://schemas.android.com/apk/res/android" xmlns:tools="http://schemas.android.com/tools" android:layout_width="match_parent" android:layout_height="match_parent" tools:context="bill.su.fragment.MainActivity" android:orientation="horizontal" > <fragment android:name="bill.su.fragment.Fragment1" android:id="@+id/fragment1" android:layout_height="match_parent" android:layout_weight="1" android:layout_width="0dp" /> <fragment android:name="bill.su.fragment.Fragment2" android:id="@+id/fragment2" android:layout_weight="1" android:layout_width="0sp" android:layout_height="match_parent" /></LinearLayout>
运行得到如下效果:
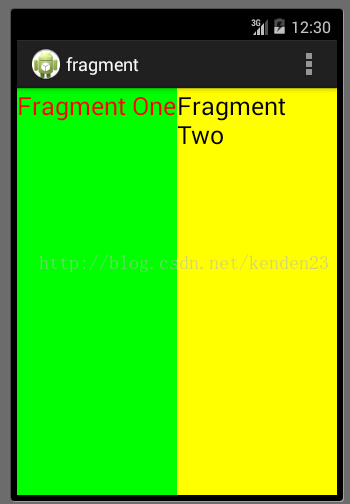
这样同一个activity中嵌入了两个不同的Fragment了。
这样基本上不用写Java代码。
如果在activity的Java代码中实现的话,就只需要修改onCreate函数就可以:
@Override protected void onCreate(Bundle savedInstanceState) { super.onCreate(savedInstanceState); FragmentManager fragManager = getFragmentManager(); FragmentTransaction fragTrans = fragManager.beginTransaction(); // get the current display info WindowManager wm = getWindowManager(); Display d = wm.getDefaultDisplay(); if (d.getWidth() < d.getHeight()) { Fragment1 frag1 = new Fragment1(); fragTrans.replace(android.R.id.content, frag1); } else { Fragment2 frag2 = new Fragment2(); fragTrans.replace(android.R.id.content, frag2); } fragTrans.commit(); }知识点:
使用FragmentManager和FragmentTransaction两个类实现动态载入Fragment。
其中的WindowManager是为了得到当前屏幕的长和宽,判断是横屏韩式竖屏,并根据这判断载入不同的Fragment,得到不同的效果。
最后一句FragTrans.commit()是必须的,这样才能使得Fragment载入成功。
到达一定境界了,这些全部都成为很容易很简单的东西了,学一些新知识点并不难,难是在于记忆,更难的是在于灵活运用,还有更加更加难的是如何运用这些知识创造价值,最难的是创造别人无法创造的价值。