表格布局(TableLayout)
前言
表格布局采用行和列的方式来管理UI组件,但不像Android 4.0 新增的网格布局,直接设置行列数
如果我们直接向TableLayout添加组件的话,那么这个组件将独占一行
如果要让多个组件在同一行的话,那么我们要添加一个TableRow的容器,用于存储这些组件
而这些组件的数目也决定了该行有多少列
列的宽度由该列中最宽的单元格决定
整个表格布局的宽度则取决于父容器的宽度(占满父容器本身)
三个常用的属性
android:collapseColumns:设置需要被隐藏的列的序号
android:shrinkColumns:设置允许被收缩的列的列序号
android:stretchColumns:设置运行被拉伸的列的列序号
注意:
!!!!!!!!序号是从0开始的,可以同时设置多个列,用逗号","分隔即可
这些属性要写在TableLayout中哦!
下面依次演示下每个属性设置以后的效果:
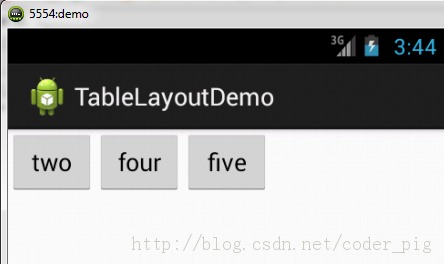
①collapseColumns(隐藏列)
步骤:在TableRow中先定义了5个按钮,接着在最外层的TableLayout中添加以下属性:
android:collapseColumns = "0,2"
隐藏第一和第三列
代码如下:
<TableLayout android:id="@+id/TableLayout2" android:layout_width="fill_parent" android:layout_height="wrap_content" android:collapseColumns="0,2" > <TableRow android:layout_width="fill_parent" android:layout_height="wrap_content" > <Button android:layout_width="wrap_content" android:layout_height="wrap_content" android:text="one" /> <Button android:layout_width="wrap_content" android:layout_height="wrap_content" android:text="two" /> <Button android:layout_width="wrap_content" android:layout_height="wrap_content" android:text="three" /> <Button android:layout_width="wrap_content" android:layout_height="wrap_content" android:text="four" /> <Button android:layout_width="wrap_content" android:layout_height="wrap_content" android:text="five" /> </TableRow> </TableLayout>
效果图:
代码解释:
如图,第一和第三列不见了,其实仅仅是被隐藏了而已,还是可以在代码中进行调用的
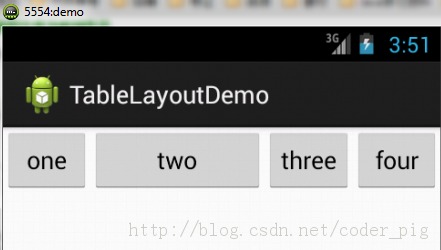
②stretchColumns(拉伸列)
步骤:在TableLayout中设置了四个按钮,接着在最外层的TableLayout中添加以下属性:
android:stretchColumns = “1”
设置第二列为可拉伸列,让该列填满这一行所有的剩余空间
代码如下:
<TableLayout android:id="@+id/TableLayout2" android:layout_width="fill_parent" android:layout_height="wrap_content" android:stretchColumns="1" > <TableRow android:layout_width="fill_parent" android:layout_height="wrap_content" > <Button android:layout_width="wrap_content" android:layout_height="wrap_content" android:text="one" /> <Button android:layout_width="wrap_content" android:layout_height="wrap_content" android:text="two" /> <Button android:layout_width="wrap_content" android:layout_height="wrap_content" android:text="three" /> <Button android:layout_width="wrap_content" android:layout_height="wrap_content" android:text="four" /> </TableRow> </TableLayout>
效果图:
代码解释:
如图,第二列填满了这行剩下的所有空间
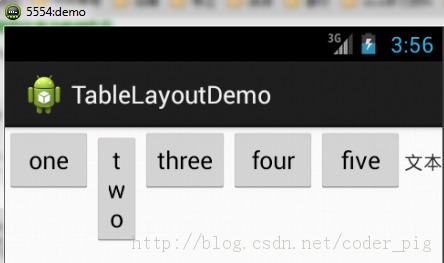
③shrinkColumns(收缩列)
步骤:这里为了演示出效果,设置了5个按钮和一个文本框,在最外层的TableLayout中添加以下属性:
android:shrinkColumns = "1"
设置第二个列为可收缩列
代码如下:
<TableLayout android:id="@+id/TableLayout2" android:layout_width="fill_parent" android:layout_height="wrap_content" android:shrinkColumns="1" > <TableRow android:layout_width="fill_parent" android:layout_height="wrap_content" > <Button android:layout_width="wrap_content" android:layout_height="wrap_content" android:text="one" /> <Button android:layout_width="wrap_content" android:layout_height="wrap_content" android:text="two" /> <Button android:layout_width="wrap_content" android:layout_height="wrap_content" android:text="three" /> <Button android:layout_width="wrap_content" android:layout_height="wrap_content" android:text="four" /> <Button android:layout_width="wrap_content" android:layout_height="wrap_content" android:text="five" /> <TextView android:layout_height="wrap_content" android:layout_width="wrap_content" android:text="文本" /> </TableRow> </TableLayout>
效果图:
代码解释:
第二列,明显给压得不成人样= =,这个就是收缩,为了保证表格能够适应父容器的宽度
以上就是TableLayout表格布局比较常用的三个属性了
应用实例:
下面演示下用TableLayout布局实现用户登陆界面的布局
效果图:
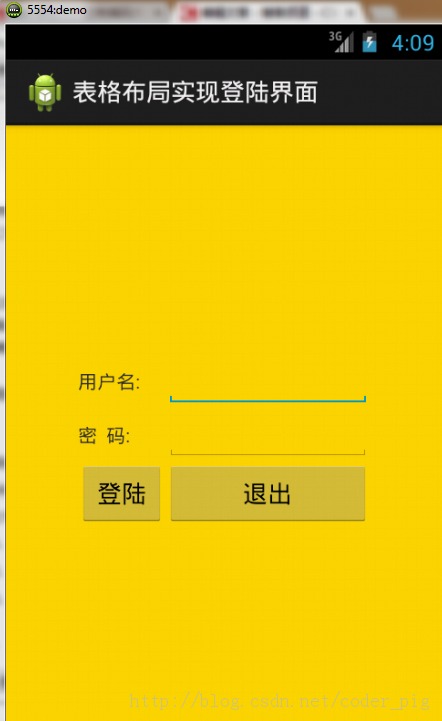
流程解释:
①调用gravity属性,设置为center_vertical,让布局里面的组件在竖直方向上居中
②将TableLayout中的第一和第四列设置为可拉伸
③在每个TableRow中添加两个TextView,用于拉伸填满该行,这样可以让表格水平居中
自己想想为什么= =,很简单呢
代码如下:
<TableLayout xmlns:android="http://schemas.android.com/apk/res/android" xmlns:tools="http://schemas.android.com/tools" android:id="@+id/TableLayout1" android:layout_width="match_parent" android:layout_height="match_parent" tools:context=".MainActivity" android:stretchColumns="0,3" android:gravity="center_vertical" android:background="#FFD700" > <TableRow> <TextView /> <TextView android:layout_width="wrap_content" android:layout_height="wrap_content" android:text="用户名:" /> <EditText android:layout_width="wrap_content" android:layout_height="wrap_content" android:minWidth="150dp" /> <TextView /> </TableRow> <TableRow> <TextView /> <TextView android:layout_width="wrap_content" android:layout_height="wrap_content" android:text="密 码:" /> <EditText android:layout_width="wrap_content" android:layout_height="wrap_content" android:minWidth="150dp" /> <TextView /> </TableRow> <TableRow> <TextView /> <Button android:layout_width="wrap_content" android:layout_height="wrap_content" android:text="登陆" /> <Button android:layout_width="wrap_content" android:layout_height="wrap_content" android:text="退出" /> <TextView /> </TableRow> </TableLayout>
好吧,TableLayout的相关属性的应用就介绍到这里,如果有什么遗漏或者错误的话,
读者可以指出,O(∩_∩)O谢谢!