Android JAR组件安装打包教程
本篇为您介绍如何将Android开发的组件打包成JAR安装包,通过封闭成JAR包,可以重复利用,非常有利于扩展和减少工作重复性,下面开始:
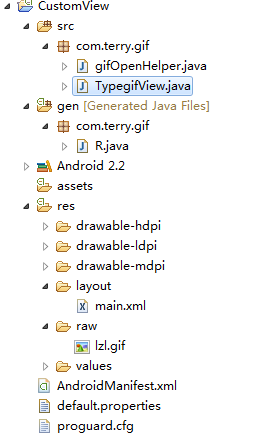
首先Android 工程的基本面貌是这样的:
 ?
?
当然对应的Activity 文件被我删除了,因为当编译成jar 包我们并不需要Activity 文件。
以上面这个工程为例,我们将它打包成JAR包步骤为:
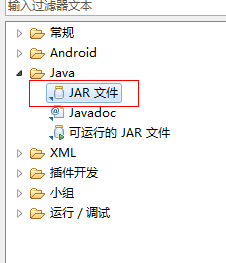
右键工程选择导出:
 ?
?
?
选择导出目标为:java->JAR文件:
 ?
?
?
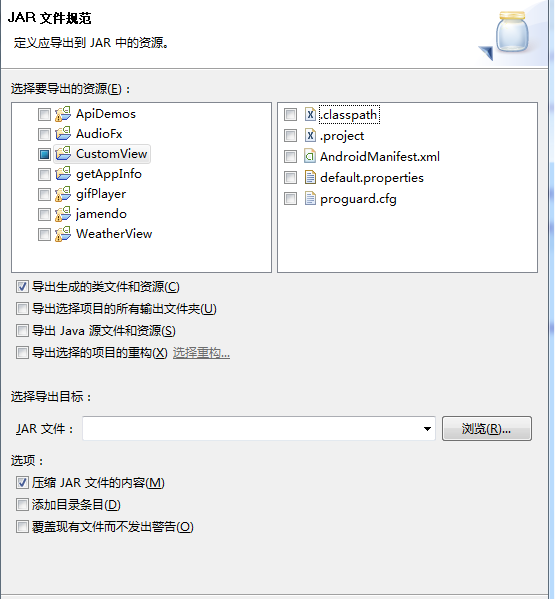
把一些不必要的文件勾选掉,如下图:
 ?
?
到了这一步,己经基本完成,浏览选择jar 文件导出路径即可。
?
导出完成后,我们就可以像使用其他JAR文件一样使用我们自己的自定义控件包了。下面给出一个小DEMO介绍如何使用这个JAR包。
?
步骤一:
新建文件夹lib,将jar 包放入。
步骤二:
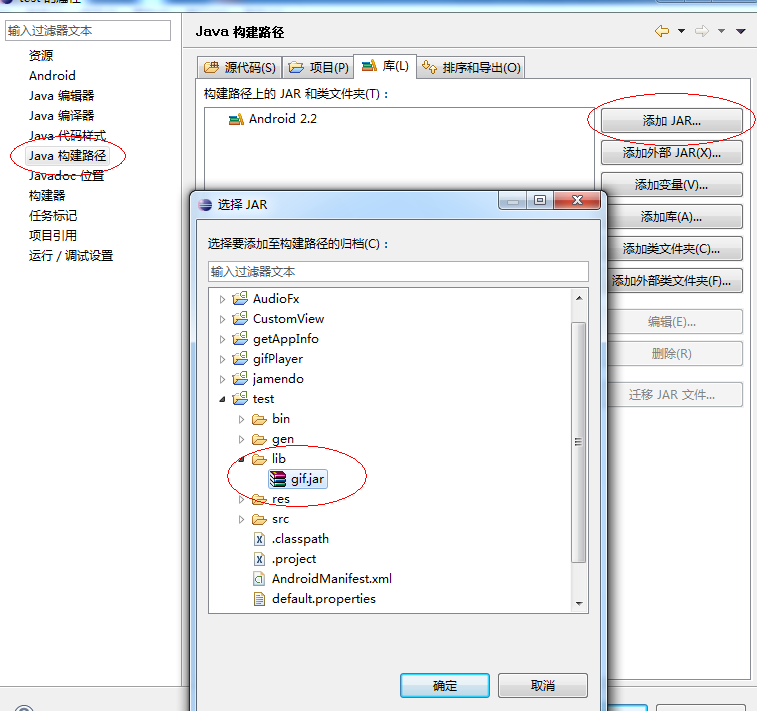
关联JAR包,如下图:
 ?
?
?
步骤三,使用JAR包:?
如下代码:
?<LinearLayout?xmlns:android="http://schemas.android.com/apk/res/android"
????xmlns:gif="http://schemas.android.com/apk/res/com.terry.jarTest"?
????android:id="@+id/layout"?android:orientation="vertical"
????android:layout_width="fill_parent"?android:layout_height="fill_parent">
????<Button?android:text="停止"?android:id="@+id/Button01"
????????android:layout_width="wrap_content"?android:layout_height="wrap_content"></Button>
????<Button?android:text="开始"?android:id="@+id/Button02"
????????android:layout_width="wrap_content"?android:layout_height="wrap_content"></Button>
????<com.terry.gif.TypegifView
????????android:layout_width="fill_parent"?android:id="@+id/gifView1"
????????gif:stop="true"?android:layout_height="wrap_content"?
????????gif:delay="1"></com.terry.gif.TypegifView>
</LinearLayout>
有一个不好的就是如果你项目中存在使用属性,必须也把属性一起复制到你要使用的项目中,要不然会识别不了。
所以大伙自己在使用时,要多善于思考!!!