博客出自:http://blog.csdn.net/liuxian13183,转载注明出处! All Rights Reserved !
前段时间在弄GPRS定位的问题,使用google的地图定位,大家也都知道,google现在在中国境内有很多限制,而且国外刷机严重,难免将google的各种服务给刷掉,所以最终采用百度的定位系统,完美实现。现在有时间了,给大家讲一讲,代码并不多。
我还是先说说google的定位吧,说不定有些仁兄需要的呢!
首先判断机器的GPRS模块是否正常,如果不正常,那没办法了,哪家的定位系统都不能用。
LocationManager alm = (LocationManager) this .getSystemService(Context.LOCATION_SERVICE); if (alm.isProviderEnabled(android.location.LocationManager.GPS_PROVIDER)) { Toast.makeText(this, "GPS模块正常", Toast.LENGTH_SHORT).show(); return; }设置开启GPRS页面Toast.makeText(this, "请开启GPS!", Toast.LENGTH_SHORT).show(); Intent intent = new Intent(Settings.ACTION_SECURITY_SETTINGS); startActivityForResult(intent, 0); // 此为设置完成后返回到获取界面
设置省电模式,获得最好的定位方式
locationManager = (LocationManager) getSystemService(Context.LOCATION_SERVICE); gprs_view = (TextView) findViewById(R.id.gprs_view); Criteria criteria = new Criteria(); // 获得最好的定位效果 criteria.setAccuracy(Criteria.ACCURACY_COARSE); criteria.setAltitudeRequired(false); criteria.setBearingRequired(false); criteria.setCostAllowed(false); // 使用省电模式 criteria.setPowerRequirement(Criteria.POWER_LOW); // 获得当前的位置提供者 provider = locationManager.getBestProvider(criteria, false); ser.append(provider); locationManager.requestLocationUpdates(provider, 2000, 10, this);
获得上次location对象
// 使用网络定位,获得上次定位的location对象 if (location == null) { location = locationManager .getLastKnownLocation(LocationManager.NETWORK_PROVIDER); provider = LocationManager.NETWORK_PROVIDER; }然后定位
String latLongString; if (location != null) { double lat = location.getLatitude(); double lng = location.getLongitude(); latLongString = "纬度:" + lat + "\n经度:" + lng; Geocoder gc = new Geocoder(context); List<Address> addresses = null; try { addresses = gc.getFromLocation(location.getLatitude(), location.getLongitude(), 1); } catch (IOException e) { // TODO Auto-generated catch block e.printStackTrace(); } ser.append("\n" + addresses.get(0).getCountryName()); } else { latLongString = "无法获取地理信息"; } ser.append("\n" + "您当前的位置是:\n" + latLongString);实现LocationListener接口,并在onLocationChanged和onProviderDisabled方法中实现updateWithNewLocation方法
以期待在未获得location对象时,不断获取直到取到为止
private void updateWithNewLocation(Location location) { // TODO Auto-generated method stub if (location == null) { locationManager.requestLocationUpdates(provider, 2000, (float) 0.1, this); } }以上是我弄到的关于用google开发服务的资料,实际上次定位的位置很难得到,实现定位,比较困难,也许是笔者使用的是水货,刷过机的原因吧。
下面是百度的定位,可以说都能实现吧
首先请大家看效果图,是实现了的!PS:朝鲜金胖子,看到我的经纬度乱来啊!
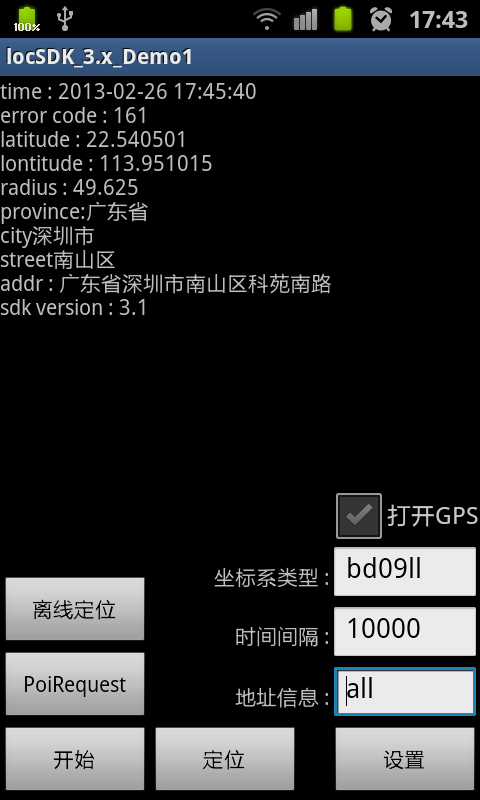
百度的定位相对来说要简单的多,为什么呢,因为它只有两三个方法,一般国内的手机GPS功能有被“阉割”的可能,所以一般GPS定位取不到位置,通用的还是GPRS网络定位功能。
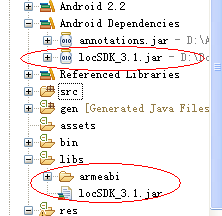
如图,导入项目所需包
然后在manifest.xml中加入权限,以及定义Service
<application android:name="com.baidu.locSDK.test.Location" android:icon="@drawable/icon" android:label="@string/app_name" > <activity android:name="mainActivity" android:configChanges="orientation|keyboardHidden" android:label="@string/app_name" > <intent-filter> <action android:name="android.intent.action.MAIN" /> <category android:name="android.intent.category.LAUNCHER" /> </intent-filter> </activity> <service android:name="com.baidu.location.f" android:enabled="true" android:process=":remote" > </service> </application> <uses-permission android:name="android.permission.ACCESS_COARSE_LOCATION" /> <uses-permission android:name="android.permission.ACCESS_FINE_LOCATION" /> <uses-permission android:name="android.permission.ACCESS_WIFI_STATE" /> <uses-permission android:name="android.permission.ACCESS_NETWORK_STATE" /> <uses-permission android:name="android.permission.CHANGE_WIFI_STATE" /> <uses-permission android:name="android.permission.READ_PHONE_STATE" /> <uses-permission android:name="android.permission.WRITE_EXTERNAL_STORAGE" /> <uses-permission android:name="android.permission.INTERNET" /> <uses-permission android:name="android.permission.MOUNT_UNMOUNT_FILESYSTEMS" /> <uses-permission android:name="android.permission.READ_LOGS" /> <uses-permission android:name="android.permission.VIBRATE" />主要代码如下,但要先打开网络
mStartBtn.setOnClickListener(new OnClickListener() { @Override public void onClick(View v) { if (!mIsStart) { setLocationOption(); mLocClient.start(); mStartBtn.setText("开始"); mIsStart = true; } else { mLocClient.stop(); mIsStart = false; mStartBtn.setText("结束"); } Log.d("locSDK_Demo1", "... mStartBtn onClick... pid=" + Process.myPid() + " count=" + count++); } }); private void setLocationOption() { LocationClientOption option = new LocationClientOption(); option.setOpenGps(mGpsCheck.isChecked()); // gps option.setCoorType(mCoorEdit.getText().toString()); option.setAddrType(mAddrEdit.getText().toString()); option.setScanSpan(Integer.parseInt(mSpanEdit.getText().toString())); mLocClient.setLocOption(option); }最终展示出来
public void logMsg(String str) { try { mData = str; if ( mTv != null ) mTv.setText(mData); } catch (Exception e) { e.printStackTrace(); } } public class MyLocationListenner implements BDLocationListener { @Override public void onReceiveLocation(BDLocation location) { if (location == null) return ; StringBuffer sb = new StringBuffer(256); sb.append("time : "); sb.append(location.getTime()); sb.append("\nerror code : "); sb.append(location.getLocType()); sb.append("\nlatitude : "); sb.append(location.getLatitude()); sb.append("\nlontitude : "); sb.append(location.getLongitude()); sb.append("\nradius : "); sb.append(location.getRadius()); if (location.getLocType() == BDLocation.TypeGpsLocation){ sb.append("\nspeed : "); sb.append(location.getSpeed()); sb.append("\nsatellite : "); sb.append(location.getSatelliteNumber()); } else if (location.getLocType() == BDLocation.TypeNetWorkLocation){ sb.append("\nprovince:"); sb.append(location.getProvince()); sb.append("\ncity"); sb.append(location.getCity()); sb.append("\nstreet"); sb.append(location.getDistrict()); sb.append("\naddr : "); sb.append(location.getAddrStr()); } sb.append("\nsdk version : "); sb.append(mLocationClient.getVersion()); logMsg(sb.toString()); } public void onReceivePoi(BDLocation poiLocation) { if (poiLocation == null){ return ; } StringBuffer sb = new StringBuffer(256); sb.append("Poi time : "); sb.append(poiLocation.getTime()); sb.append("\nerror code : "); sb.append(poiLocation.getLocType()); sb.append("\nlatitude : "); sb.append(poiLocation.getLatitude()); sb.append("\nlontitude : "); sb.append(poiLocation.getLongitude()); sb.append("\nradius : "); sb.append(poiLocation.getRadius()); if (poiLocation.getLocType() == BDLocation.TypeNetWorkLocation){ sb.append("\naddr : "); sb.append(poiLocation.getAddrStr()); } if(poiLocation.hasPoi()){ sb.append("\nPoi:"); sb.append(poiLocation.getPoi()); }else{ sb.append("noPoi information"); } logMsg(sb.toString()); } }就是这样,一个麻烦至极的定位功能完成了!源码下载地址:http://download.csdn.net/detail/liuxian13183/5088512