在实际开发中,我们时常要用到上方的两个按钮,通俗的我们可以叫做导航,等等.还是先看今天需要要实现的一个最的效果:
其实实现这样的效果有多种方式,今天我要给大家要介绍的就是如何的去定制自己的控件,也就是自定义控件,自定义控件分为多种,有组合控件,有重写在原来已有的控件上做基础的修改,也有自己重写写一个类继承于View对象,这方面的知识在实际开发当中也会常碰到,当然像我们这种菜鸟在这方面也是最欠缺的一个知识点,我希望通过我的一些讲解或者分享能帮助到大家吧。今天我给大家讲的就是组合控件的自定义,在后续的博文中我也希望自己能发现更多的这种自定义控件的能力然后再与大家分享,同样如果大家有好的分享的东西也可以与我一起分享。就拿今天的一个效果如何去实现自定义控件,我会采用两种方式去实现,一种就是纯粹的代码方式实现,一种就是用LayoyutInfalter去实现。
先说XML方式的实现方式:
先定义一个XML布局文件:
<?xml version="1.0" encoding="utf-8"?><LinearLayout xmlns:android="http://schemas.android.com/apk/res/android" android:layout_width="fill_parent" android:layout_height="45dip" android:background="@drawable/navigation_bg" android:gravity="center_vertical" android:orientation="horizontal" > <Button android:id="@+id/btn_left" android:layout_width="wrap_content" android:layout_height="wrap_content" android:layout_marginLeft="10.0dip" android:background="@drawable/backbg" android:text="返回" android:textColor="@android:color/white" /> <TextView android:id="@+id/tv_title" android:layout_width="wrap_content" android:layout_height="wrap_content" android:layout_weight="1" android:gravity="center" android:singleLine="true" android:text="标题" android:textColor="@android:color/white" /> <Button android:id="@+id/btn_right" android:layout_width="wrap_content" android:layout_height="wrap_content" android:layout_marginRight="10.0dip" android:background="@drawable/buttonbg" android:text="新增" android:textColor="@android:color/white" /></LinearLayout>
然后我们再重新写一个类继承于LineaLayour。通过在构造方法中去加载这个布局文件,这样就能实现一个组合控件的定义了,这样的方式是不是特别简单。
public class UINavigationView2 extends LinearLayout { private Button btn_left; private Button btn_right; private TextView tv_title; public UINavigationView2(Context context) { super(context); // TODO Auto-generated constructor stub } public UINavigationView2(Context context, AttributeSet attrs) { super(context, attrs); LayoutInflater layoutInflater = (LayoutInflater) context .getSystemService(Context.LAYOUT_INFLATER_SERVICE); layoutInflater.inflate(R.layout.title_bar, null); btn_left = (Button) findViewById(R.id.btn_left); btn_right = (Button) findViewById(R.id.btn_right); tv_title = (Button) findViewById(R.id.tv_title); } public void setBtnLeftBacground(int resId) { if (btn_left != null) { btn_left.setBackgroundResource(resId); } } public void setBtnRightBacground(int resId) { if (btn_right != null) { btn_right.setBackgroundResource(resId); } } public void setTvTitle(int resId) { if (tv_title != null) { tv_title.setText(resId); } } public Button getBtn_left() { return btn_left; } public Button getBtn_right() { return btn_right; } public TextView getTv_title() { return tv_title; }}接下来我们再按如果通过代码来定义控件,这里需要了解的一个知识点,如果我们需要在我们的自定义控件如果新添属于我们自己的属性呢?这里我就们就需要attr.xml文件中自己定义,关于这方面的知识大家可以参考这篇文章:http://huangbo-2020.iteye.com/blog/1477611
我们先看我们自己定义的控件定义新增的如下几个属性:
<?xml version="1.0" encoding="utf-8"?><resources> <declare-styleable name="navigation"> <attr name="btn_leftText" format="string" /> <attr name="btn_rightText" format="string" /> <attr name="tv_title" format="string" /> <attr name="left_drawable" format="reference"></attr> <attr name="right_drawable" format="reference"></attr> </declare-styleable></resources>
再看我们的自定义控件的代码中如何写的:
public class UINavigationView extends LinearLayout { private Button btn_left; private Button btn_right; private TextView tv_title; private String strBtnLeft; private String strBtnRight; private String strTitle; private int left_drawable; private int right_drawable; public UINavigationView(Context context) { super(context); initContent(); } public UINavigationView(Context context, AttributeSet attrs) { super(context, attrs); initAttributes(attrs); initContent(); } private void initAttributes(AttributeSet attributeSet) { if (null != attributeSet) { final int attrIds[] = new int[] { R.attr.btn_leftText, R.attr.btn_rightText, R.attr.tv_title, R.attr.left_drawable, R.attr.right_drawable }; Context context = getContext(); TypedArray array = context.obtainStyledAttributes(attributeSet, attrIds); CharSequence t1 = array.getText(0); CharSequence t2 = array.getText(1); CharSequence t3 = array.getText(2); left_drawable = array.getResourceId(3, 0); right_drawable = array.getResourceId(4, 0); array.recycle(); if (null != t1) { strBtnLeft = t1.toString(); } if (null != t2) { strBtnRight = t2.toString(); } if (null != t3) { strTitle = t3.toString(); } Log.i("coder", "t1 = " + t1); Log.i("coder", "t2 = " + t2); Log.i("coder", "t3 = " + t3); Log.i("coder", "left_res = " + left_drawable); } } private void initContent() { Log.i("coder", "-----initContent----"); // 设置水平方向 setOrientation(HORIZONTAL); setGravity(Gravity.CENTER_VERTICAL); // 设置背景 setBackgroundResource(R.drawable.navigation_bg); Context context = getContext(); btn_left = new Button(context); btn_left.setVisibility(View.INVISIBLE);// 设置设置不可见 if (left_drawable != 0) { btn_left.setBackgroundResource(left_drawable); } else { btn_left.setBackgroundResource(R.drawable.backbg);// 设置背景 } btn_left.setTextColor(Color.WHITE);// 字体颜色 if (null != strBtnLeft) { LayoutParams btnLeftParams = new LayoutParams( LayoutParams.WRAP_CONTENT, LayoutParams.WRAP_CONTENT); btnLeftParams.setMargins(10, 0, 0, 0); btn_left.setLayoutParams(btnLeftParams); btn_left.setText(strBtnLeft); btn_left.setVisibility(View.VISIBLE); } else { btn_left.setLayoutParams(new LayoutParams(50, 50)); } // 添加这个按钮 addView(btn_left); // tv_title = new TextView(context); LayoutParams centerParam = new LayoutParams(LayoutParams.FILL_PARENT, LayoutParams.FILL_PARENT); centerParam.weight = 1; tv_title.setLayoutParams(centerParam); tv_title.setTextColor(Color.WHITE); if (null != strTitle) { tv_title.setText(strTitle); } tv_title.setGravity(Gravity.CENTER); btn_left.setVisibility(View.VISIBLE); // 添加这个标题 addView(tv_title); btn_right = new Button(context); btn_right.setVisibility(View.INVISIBLE);// 设置设置不可见 btn_right.setBackgroundResource(R.drawable.buttonbg);// 设置背景 btn_right.setTextColor(Color.WHITE);// 字体颜色 if (right_drawable != 0) { btn_right.setBackgroundResource(right_drawable); } else { btn_right.setBackgroundResource(R.drawable.backbg);// 设置背景 } if (null != strBtnRight) { LayoutParams btnRightParams = new LayoutParams( LayoutParams.WRAP_CONTENT, LayoutParams.WRAP_CONTENT); btnRightParams.setMargins(0, 0, 10, 0); btn_right.setLayoutParams(btnRightParams); btn_right.setText(strBtnRight); btn_right.setVisibility(View.VISIBLE); } else { btn_right.setLayoutParams(new LayoutParams(50, 50)); } // 添加这个按钮 addView(btn_right); } public Button getBtn_left() { return btn_left; } public Button getBtn_right() { return btn_right; } public TextView getTv_title() { return tv_title; } public String getStrBtnLeft() { return strBtnLeft; } public void setStrBtnLeft(String strBtnLeft) { this.strBtnLeft = strBtnLeft; } public String getStrBtnRight() { return strBtnRight; } public void setStrBtnRight(String strBtnRight) { this.strBtnRight = strBtnRight; } public String getStrTitle() { return strTitle; } public void setStrTitle(String strTitle) { this.strTitle = strTitle; } public int getLeft_drawable() { return left_drawable; } public void setLeft_drawable(int left_drawable) { this.left_drawable = left_drawable; } public int getRight_drawable() { return right_drawable; } public void setRight_drawable(int right_drawable) { this.right_drawable = right_drawable; }}如何去引用或者使用我们的那个新添加的属性呢?首先要引入那个命名空间[我这是引用C#使用自定义控件的说法,暂时也通俗的这样理解吧]:
xmlns:navigation="http://schemas.android.com/apk/res/com.jiahui.titlebar"
然后再使用我们自定义的属性: navigation:btn_rightText, navigation:btn_leftText等等 .
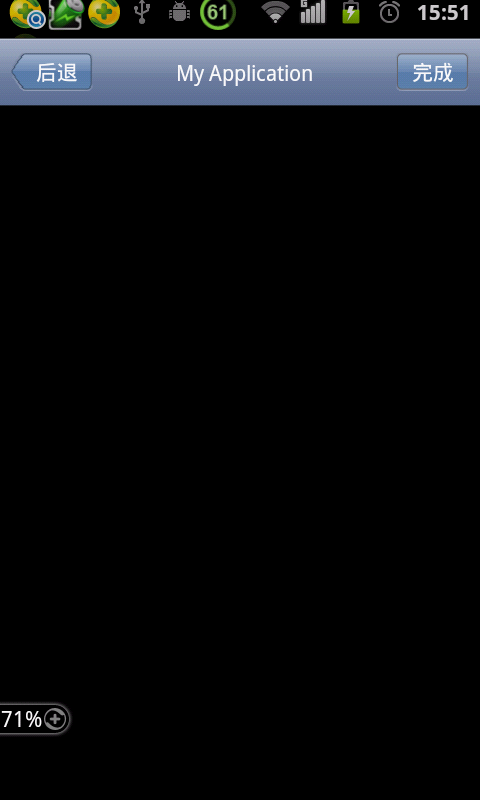
<?xml version="1.0" encoding="utf-8"?><LinearLayout xmlns:android="http://schemas.android.com/apk/res/android" xmlns:navigation="http://schemas.android.com/apk/res/com.jiahui.titlebar" android:layout_width="fill_parent" android:layout_height="fill_parent" android:orientation="vertical" > <com.jiahui.titlebar.UINavigationView android:id="@+id/uinavigationView" android:layout_width="fill_parent" android:layout_height="45dip" navigation:btn_leftText="@string/back" navigation:btn_rightText="@string/done" navigation:left_drawable="@drawable/backbg" navigation:right_drawable="@drawable/buttonbg" navigation:tv_title="My Application" /></LinearLayout>
好了,以上就是我要和大家分享的这点东西,有什么不懂的,可以看代码里的注释,代码基本上全贴上了,还有需要代码参考的可以留下方式.欢迎加入Android菜鸟联盟:252773976
如需转载引用请注明出处:http://blog.csdn.net/jiahui524