??? 在编写android应用程序的过程中,经常会使用到导航控件。如果每一个activity都需要用到导航控件,可以将这个导航控件独立出来,方便程序开发。
?? 写一个导航的代码类:
??
public class NavigationBar extends RelativeLayout implements OnClickListener { public static final int NAVIGATION_BUTTON_LEFT = 0; public static final int NAVIGATION_BUTTON_RIGHT = 1; private Context mContext; private NavigationBarListener mListener; public NavigationBar(Context context, AttributeSet attrs, int defStyle) { super(context, attrs, defStyle); init(context); } public NavigationBar(Context context, AttributeSet attrs) { super(context, attrs); init(context); } public NavigationBar(Context context) { super(context); init(context); } private void init(Context context) { mContext = context; RelativeLayout.LayoutParams lp = new RelativeLayout.LayoutParams(-1, -2); this.setLayoutParams(lp); this.setBackgroundResource(R.drawable.navigation_bar_bg); } public void setLeftBarButton(String title) { setButton(title, NAVIGATION_BUTTON_LEFT); } public void setRightBarButton(String title) { setButton(title, NAVIGATION_BUTTON_RIGHT); } private void setButton(String title, int which) { // remove the old button (if there is one) Button oldButton = (Button) this.findViewWithTag(new Integer(which)); if (oldButton != null) this.removeView(oldButton); Button newButton = new Button(mContext); newButton.setTag(new Integer(which)); // used to determine which button is pressed and to remove old buttons // set OnClickListener newButton.setOnClickListener(this); // set LayoutParams RelativeLayout.LayoutParams lp = new RelativeLayout.LayoutParams(-2, -2); if (which == NAVIGATION_BUTTON_LEFT) lp.addRule(RelativeLayout.ALIGN_PARENT_LEFT); else if (which == NAVIGATION_BUTTON_RIGHT) lp.addRule(RelativeLayout.ALIGN_PARENT_RIGHT); else throw new IllegalArgumentException("Parameter 'which' must be 0 or 1"); lp.addRule(RelativeLayout.CENTER_VERTICAL); lp.setMargins(10, 0, 10, 0); newButton.setLayoutParams(lp); // set button text newButton.setText(title); newButton.setTextSize(12); newButton.setTextColor(Color.WHITE); // set button drawable newButton.setBackgroundResource(R.drawable.navigation_bar_btn); // add button this.addView(newButton); } public void setBarTitle(String title) { // remove old title (if exists) TextView oldTitle = (TextView) this.findViewWithTag("title"); if (oldTitle != null) this.removeView(oldTitle); TextView newTitle = new TextView(mContext); newTitle.setTag("title"); // set LayoutParams RelativeLayout.LayoutParams lp = new RelativeLayout.LayoutParams(-2, -2); lp.addRule(RelativeLayout.CENTER_IN_PARENT); lp.setMargins(0, 30, 0, 30); newTitle.setLayoutParams(lp); // set text newTitle.setText(title); newTitle.setTextSize(22); newTitle.setTextColor(Color.WHITE); // add title to NavigationBar this.addView(newTitle); } public void setNavigationBarListener(NavigationBarListener listener) { mListener = listener; } @Override public void onClick(View v) { int which = ((Integer) v.getTag()).intValue(); if (mListener != null) { mListener.OnNavigationButtonClick(which); } } /** * Listener for NavigationBar. */ public interface NavigationBarListener { /** * Called when the user presses either of the buttons on the NavigationBar. * * @param which - indicates which button was pressed, ie: NavigationBar.NAVIGATION_BUTTON_LEFT */ public void OnNavigationButtonClick(int which); }}?背景样式定义navigation_bar_bg.xml:
??
<?xml version="1.0" encoding="utf-8"?><selector xmlns:android="http://schemas.android.com/apk/res/android"> <item> <shape> <gradient android:angle="270" android:endColor="#ff050708" android:startColor="#ff595959" android:type="linear" /> </shape> </item></selector>
?导航按钮样式定义navigation_bar_btn.xml
<?xml version="1.0" encoding="utf-8"?><selector xmlns:android="http://schemas.android.com/apk/res/android"> <item android:state_pressed="true"> <shape> <gradient android:angle="270" android:endColor="#ff495a95" android:startColor="#ff7684c1" /> <stroke android:width="1px" android:color="#FF000000" /> <corners android:radius="6dp" /> <padding android:bottom="10dp" android:left="10dp" android:right="10dp" android:top="10dp" /> </shape> </item> <item> <shape> <gradient android:angle="270" android:endColor="#ff999999" android:startColor="#ff333333" /> <stroke android:width="1px" android:color="#FF000000" /> <corners android:radius="6dp" /> <padding android:bottom="10dp" android:left="10dp" android:right="10dp" android:top="10dp" /> </shape> </item></selector>
?那么在activity怎么使用呢?
activity调用代码如下:
??
protected void onCreate(Bundle savedInstanceState) { super.onCreate(savedInstanceState); setContentView(R.layout.change_device); NavigationBar nb = (NavigationBar)findViewById(R.id.detailNavBar); nb.setLeftBarButton(getString(R.string.cancel)); nb.setRightBarButton(getString(R.string.save)); nb.setBarTitle(getString(R.string.details)); NavigationBar.NavigationBarListener nbl = new NavigationBar.NavigationBarListener() { @Override public void OnNavigationButtonClick(int which) { if (which == NavigationBar.NAVIGATION_BUTTON_LEFT) { finish(); } else { } } }; nb.setNavigationBarListener(nbl);}?在layout里面定义我们的导航控件
??
<?xml version="1.0" encoding="utf-8"?><LinearLayout xmlns:android="http://schemas.android.com/apk/res/android" android:layout_width="match_parent" android:layout_height="match_parent" android:background="@android:color/white" android:orientation="vertical" > <com.NavigationBar android:id="@+id/detailNavBar" android:layout_width="match_parent" android:layout_height="wrap_content" /> <EditText android:id="@+id/deviceName" android:layout_width="match_parent" android:layout_height="wrap_content" > <requestFocus /> </EditText> <Button android:id="@+id/removeBtn" android:layout_width="260dp" android:background="@drawable/btn_red" android:layout_height="wrap_content" style="@style/ButtonText" android:layout_gravity="center_horizontal" android:text="@string/remove" /></LinearLayout>?现在看看效果图:
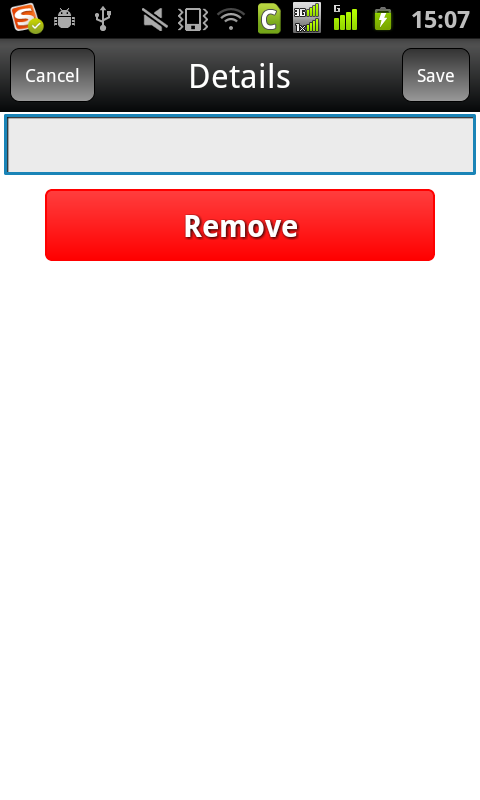
那么在你以后想使用这个控件的时候,就可以直接调用了。