前边有篇博客《Eclipse 报 "The builder launch configuration could not be found" 错误的解决办法》介绍了 Eclipse 报错 "The builder launch configuration could not be found" 的解决办法,按那个办法处理之后,发现不报错了,但 ant 的自动构建没了。这样没法接受。
看来逃避是解决不了问题呢。所以觉得《Eclipse 报 "The builder launch configuration could not be found" 错误的解决办法》介绍的方法并不是很好。
本文将介绍在 Wowza 插件开发时,如何在不去掉 ant 的自动构建的前提下(因为 Wowza Eclipse 插件开发是基于 ant 构建的!),解决 Eclipse Wowza 插件报 "The builder launch configuration could not be found" 的错误。关于 Wowza Eclipse IDE 支持请参考《Eclipse 安装/更新 Wowza IDE 插件的步骤》,关于 Wowza 插件的开发可以参考博客《使用 Wowza IDE 开发第一个 Wowza 服务器扩展应用 -- 监控直播频道》。
1. 按照《Eclipse 报 "The builder launch configuration could not be found" 错误的解决办法》所述步骤执行,执行完后项目 Builders 如下图:
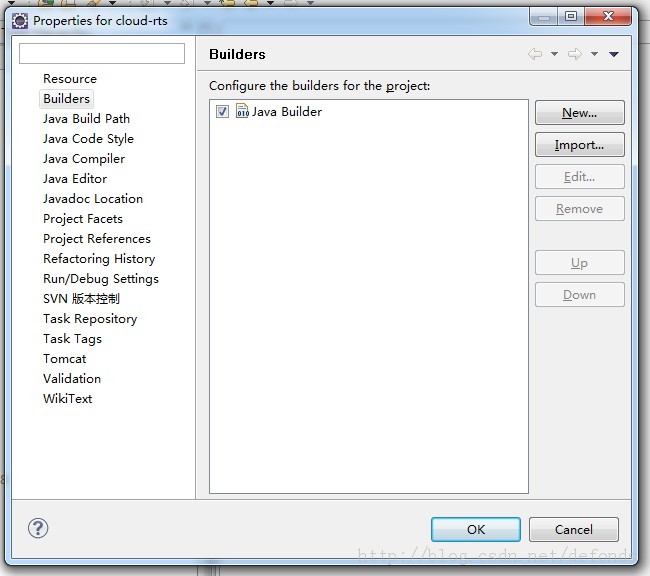
这时 Eclipse Wowza 项目已经没有了自动构建功能。
2. Navigator 视图下,编辑项目下的 .project 文件,projectDescription 标签下添加以下内容:
<natures> <nature>com.wowza.wms.eclipse.sdk.WowzaMediaServerProNature</nature> <nature>org.eclipse.jdt.core.javanature</nature> </natures>
然后保存。.project 如果原有 natures 定义,删除 —— 既然报了 "The builder launch configuration could not be found" 错误,肯定不对。保存后的 .project 文件如下:
<?xml version="1.0" encoding="UTF-8"?><projectDescription> <name>cloud-rts</name> <comment></comment> <projects> </projects> <buildSpec> <buildCommand> <name>org.eclipse.jdt.core.javabuilder</name> <arguments> </arguments> </buildCommand> </buildSpec> <natures> <nature>com.wowza.wms.eclipse.sdk.WowzaMediaServerProNature</nature> <nature>org.eclipse.jdt.core.javanature</nature> </natures></projectDescription>
3. Package Explorer 视图下右击项目名 -> 选择 Properties 菜单 -> 左侧菜单树点击 Builders -> 点击 New... 按钮,弹出 Choose configuration type 对话框
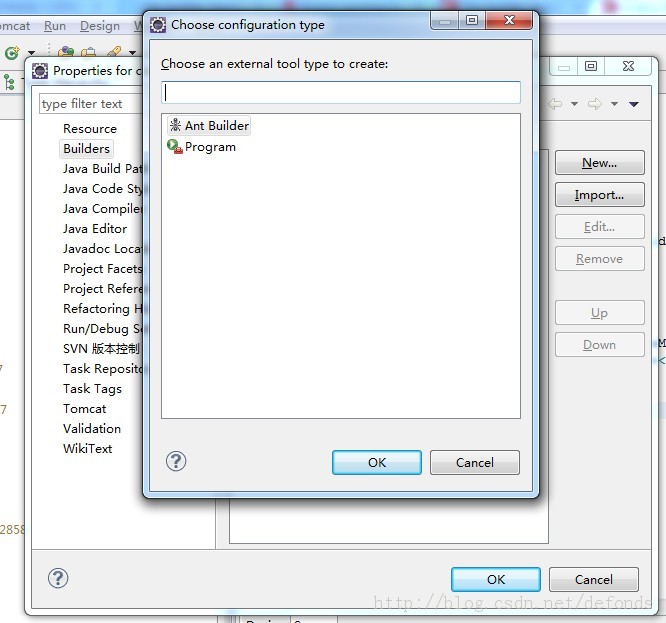
4. 选择 Ant Builder,然后点击 OK 按钮,弹出 Edit Configuration 对话框

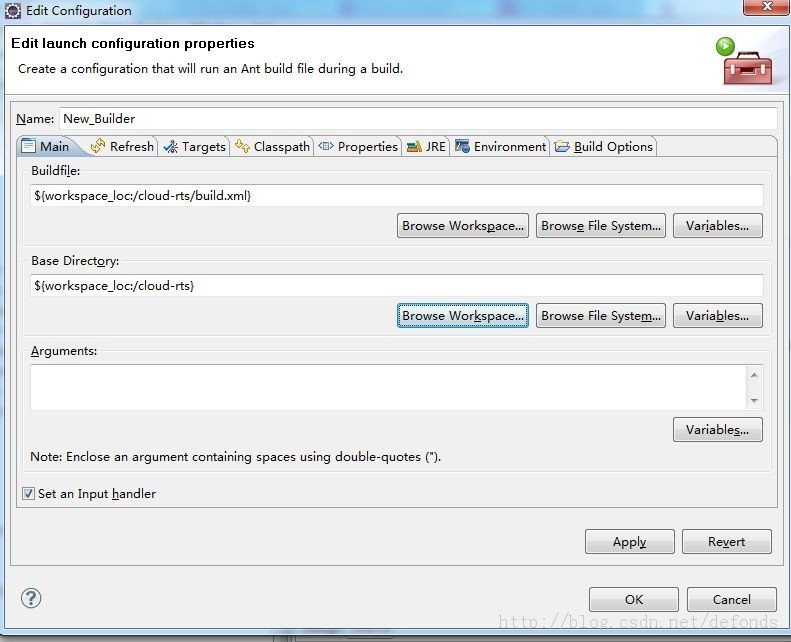
5. Name 就用 Eclipse 给的默认的 New_Builder(当然你也可以自定义其他),Main 页项下的 Buildfile 点击 Browse Workspace... 按钮,选择你项目下的 build.xml 然后点 OK 按钮
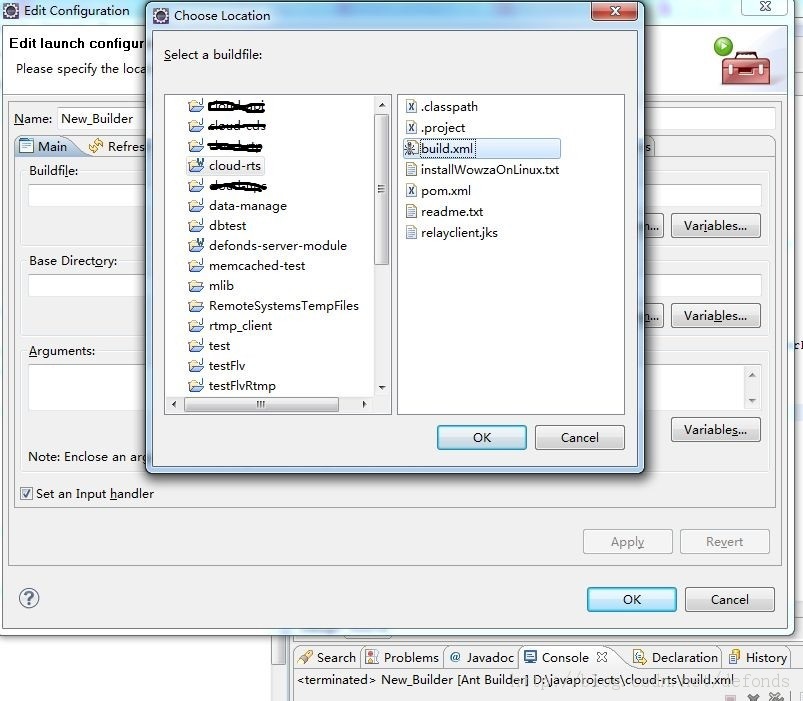
Main 页项下的 Base Directory 点击 Browse Workspace... 按钮,选择你的项目名,然后点击 OK 按钮

最后点击 Edit Configuration 对话框的 Apply 和 OK 按钮进行保存
发现 Ant 的构建功能又回来了,已经成功解决掉 "The builder launch configuration could not be found" 错误:
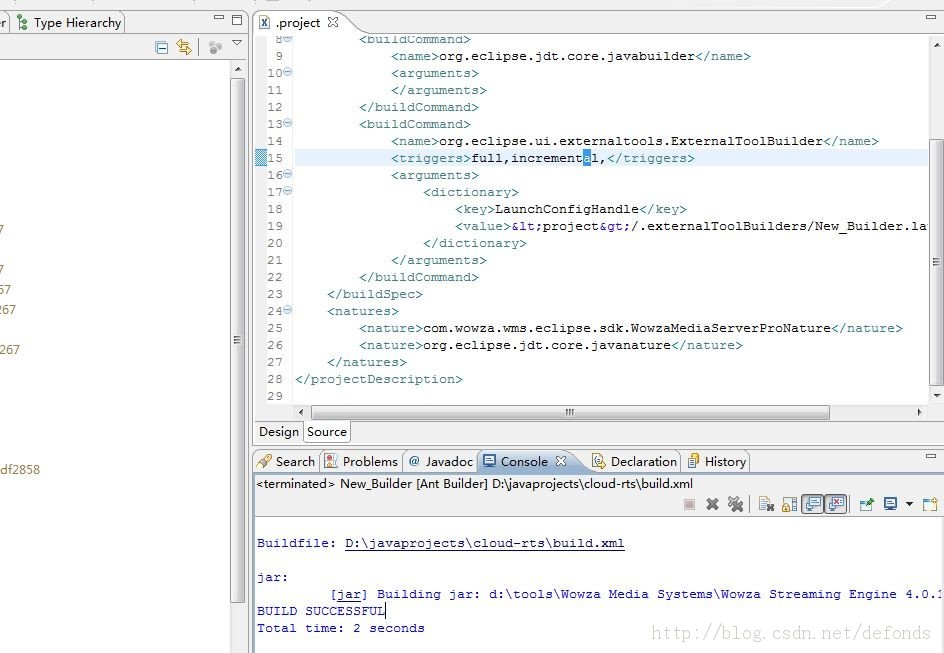
6. 在 .project 文件的 ant 的 triggers 中加入 auto,这样 Ant 的自动构建就回来啦,也就是说每次修改项目下的文件之后,会自动将项目打 jar 包部署到 Wowza。作者的 .project 文件最终如下所示:
<?xml version="1.0" encoding="UTF-8"?><projectDescription> <name>cloud-rts</name> <comment></comment> <projects> </projects> <buildSpec> <buildCommand> <name>org.eclipse.jdt.core.javabuilder</name> <arguments> </arguments> </buildCommand> <buildCommand> <name>org.eclipse.ui.externaltools.ExternalToolBuilder</name> <triggers>auto,full,incremental,</triggers> <arguments> <dictionary> <key>LaunchConfigHandle</key> <value><project>/.externalToolBuilders/New_Builder.launch</value> </dictionary> </arguments> </buildCommand> </buildSpec> <natures> <nature>com.wowza.wms.eclipse.sdk.WowzaMediaServerProNature</nature> <nature>org.eclipse.jdt.core.javanature</nature> </natures></projectDescription>