整合hibernate4+spring4+struts2
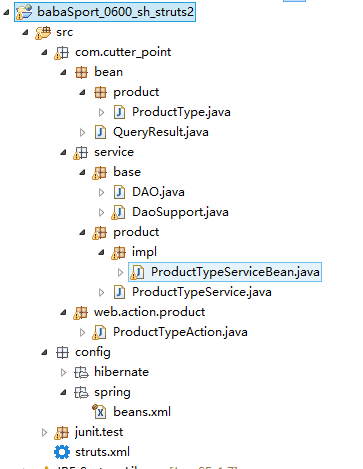
1、项目图解
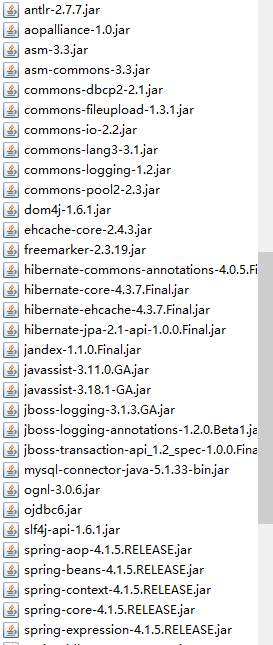
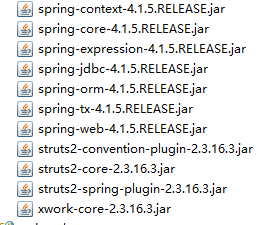
2、首先我们引入相应的jar包
3、我们配置对应的web.xml
当我们整合struts2的时候,就要扯到web方面的东西,那么就必须得配置web.xml的东西
<web-app xmlns="http://java.sun.com/xml/ns/javaee" xmlns:xsi="http://www.w3.org/2001/XMLSchema-instance" xsi:schemaLocation=" http://java.sun.com/xml/ns/javaee http://java.sun.com/xml/ns/javaee/web-app_3_0.xsd" version="3.0"> <!-- 在web容器中实例化spring容器 --> <context-param> <param-name>contextConfigLocation</param-name> <param-value>classpath:config/spring/beans.xml</param-value><!-- 这个指定spring的配置文件,默认从web根目录寻找配置文件,我们可以通过spring提供的classpath:前缀指定从类路径下寻找 --> </context-param> <!-- 实例化spring容器 --> <listener> <listener-class>org.springframework.web.context.ContextLoaderListener</listener-class> </listener> <filter> <filter-name>struts2</filter-name> <filter-class>org.apache.struts2.dispatcher.ng.filter.StrutsPrepareAndExecuteFilter</filter-class><!-- <init-param> <param-name>config</param-name> <param-value>struts-default.xml,struts-plugin.xml,classpath:config/struts/struts.xml</param-value>struts放置的目录 </init-param> --> </filter> <filter-mapping> <filter-name>struts2</filter-name> <url-pattern>/*</url-pattern> </filter-mapping> <welcome-file-list> <welcome-file>index.jsp</welcome-file> </welcome-file-list></web-app>
其中
<!-- 在web容器中实例化spring容器 --> <context-param> <param-name>contextConfigLocation</param-name> <param-value>classpath:config/spring/beans.xml</param-value><!-- 这个指定spring的配置文件,默认从web根目录寻找配置文件,我们可以通过spring提供的classpath:前缀指定从类路径下寻找 --> </context-param>
为了web配置spring的位置
实现一个监听
<!-- 实例化spring容器 --> <listener> <listener-class>org.springframework.web.context.ContextLoaderListener</listener-class> </listener>
配置struts2
<filter> <filter-name>struts2</filter-name> <filter-class>org.apache.struts2.dispatcher.ng.filter.StrutsPrepareAndExecuteFilter</filter-class><!-- <init-param> <param-name>config</param-name> <param-value>struts-default.xml,struts-plugin.xml,classpath:config/struts/struts.xml</param-value>struts放置的目录 </init-param> --> </filter>
不论是以什么结尾的页面到要经过struts2
<filter-mapping> <filter-name>struts2</filter-name> <url-pattern>/*</url-pattern> </filter-mapping>
4、我们配置一下spring的配置文件beans.xml
<?xml version="1.0"encoding="UTF-8"?><beans xmlns="http://www.springframework.org/schema/beans" xmlns:xsi="http://www.w3.org/2001/XMLSchema-instance" xmlns:context="http://www.springframework.org/schema/context" xmlns:aop="http://www.springframework.org/schema/aop" xmlns:tx="http://www.springframework.org/schema/tx" xsi:schemaLocation="http://www.springframework.org/schema/beanshttp://www.springframework.org/schema/beans/spring-beans-4.1.xsd http://www.springframework.org/schema/context http://www.springframework.org/schema/context/spring-context-4.1.xsd http://www.springframework.org/schema/aophttp://www.springframework.org/schema/aop/spring-aop-4.1.xsd http://www.springframework.org/schema/txhttp://www.springframework.org/schema/tx/spring-tx-4.1.xsd"> <!-- 扫描带有spring特殊机制的类,这是把这些包下面所有的类都添加到spring中进行管理 --> <context:component-scan base-package="com.cutter_point" /> <!-- 属性遍历器 --> <!-- <context:property-placeholderlocation="classpath:jdbc.properties" /> --> <!-- 连接数据库属性配置,destroy-method="close"就是说在这个bean被摧毁的情况下可以调用这个bean默认的close方法--> <bean id="myDataSource" class="org.apache.commons.dbcp2.BasicDataSource"destroy-method="close"> <property name="driverClassName" value="oracle.jdbc.driver.OracleDriver"/> <property name="url"value="jdbc:oracle:thin:@localhost:1522:orcl"/> <property name="username"value="xf1205020116"/> <property name="password"value="xf1205020116"/> <!-- 连接池启动时的初始值 --> <property name="initialSize" value="1"/> <!-- 连接池的最大值 dbcp2里面似乎没有--> <!-- <property name="maxActive"value="500"/> --> <!-- 最大空闲值.当经过一个高峰时间后,连接池可以慢慢将已经用不到的连接慢慢释放一部分,一直减少到maxIdle为止 --> <property name="maxIdle" value="2"/> <!-- 最小空闲值.当空闲的连接数少于阀值时,连接池就会预申请去一些连接,以免洪峰来时来不及申请 --> <property name="minIdle" value="1"/> </bean> <!-- hibernate二级缓存的配置 --> <bean id="sessionFactory" class="org.springframework.orm.hibernate4.LocalSessionFactoryBean"> <!-- configuration elided for brevity --> <property name="dataSource" ref="myDataSource" /> <!-- <propertyname="mappingResources"> <list> 映射文件 <value>com/cutter_point/bean/product/ProductType.hbm.xml</value> </list> </property>--> <property name="hibernateProperties"> <!-- 用来配置hibernate的属性配置 --> <value> hibernate.dialect=org.hibernate.dialect.OracleDialect hibernate.hbm2ddl.auto=update <!--其他取值 create、create-drop、update、validate none--> hibernate.show_sql=true hibernate.format_sql=true <!-- 开启二级缓存功能 --> hibernate.cache.use_second_level_cache= true hibernate.cache.use_query_cache= false hibernate.cache.region.factory_class= org.hibernate.cache.ehcache.EhCacheRegionFactory <!-- hibernate3的二级缓存配置 --> <!-- <property name="hibernate.cache.provider_class">org.hibernate.cache.EhCacheProvider</property>--> </value> </property> <property name="packagesToScan" value="com.cutter_point.bean" /> </bean> <!-- 事务管理器,吧上面配置的bean注入到这个里面 --> <bean id="txManager" class="org.springframework.orm.hibernate4.HibernateTransactionManager"> <property name="sessionFactory" ref="sessionFactory" /> </bean> <!-- 我们采用注解的方式来使用这个事务,首先我们开启事务 --> <tx:annotation-driven transaction-manager="txManager" /> <!-- Action交给spring托管 --> <!-- <bean id="productTypeAction"class="com.cutter_point.web.action.product.ProductTypeAction"scope="prototype"/> --> </beans>
注意我们的spring配置文件里面也不必再写对应的xml文件在哪了
我们可以这样吧action交给spring托管,也就是我们的控制器,java web中是servlet,这里用一个类继承actionsupport的一个类作为action
<!-- <beanid="productTypeAction"class="com.cutter_point.web.action.product.ProductTypeAction"scope="prototype"/> -->
5、创建控制器,我们的页面交互的类
ProductTypeAction.java
/** * 功能:这个是实现产品类和web层的交互 * 时间:2015年5月16日10:50:36 * 文件:ProductTypeAction.java * 作者:cutter_point */packagecom.cutter_point.web.action.product; import java.util.Map; import javax.annotation.Resource; importorg.springframework.context.annotation.Scope;importorg.springframework.stereotype.Component; importcom.cutter_point.bean.product.ProductType;importcom.cutter_point.service.product.ProductTypeService;importcom.opensymphony.xwork2.ActionContext;importcom.opensymphony.xwork2.ActionSupport; //@Namespace("/product")@Component@Scope("prototype")public class ProductTypeAction extendsActionSupport{ @Resource //依赖注入 privateProductTypeService productTypeService; @Override publicString execute() throws Exception { Maprequest = (Map)ActionContext.getContext().get("request"); if(productTypeService== null) { System.out.println("???"); } ProductTypept = productTypeService.find(ProductType.class, 88); request.put("productType",pt);// System.out.println(pt); return"list"; } publicProductTypeService getProductTypeService() { returnproductTypeService; } publicvoid setProductTypeService(ProductTypeService productTypeService) { this.productTypeService= productTypeService; }}
6、我们的jsp页面
<%@ page isELIgnored="false"language="java" import="java.util.*"pageEncoding="utf-8"%><%String path =request.getContextPath();String basePath =request.getScheme()+"://"+request.getServerName()+":"+request.getServerPort()+path+"/"; System.out.println(basePath); //ProductType pt = (ProductType) request.getAttribute("productType"); %> <!DOCTYPE HTML PUBLIC "-//W3C//DTDHTML 4.01 Transitional//EN"><html> <head> <base href="<%=basePath%>"> <title>产品列表</title> <meta http-equiv="pragma" content="no-cache"> <meta http-equiv="cache-control" content="no-cache"> <meta http-equiv="expires" content="0"> <meta http-equiv="keywords" content="keyword1,keyword2,keyword3"> <meta http-equiv="description" content="This is my page"> <!-- <linkrel="stylesheet" type="text/css" href="styles.css"> --> </head> <body> ${productType.name } </body></html>7、接下来我们测试一下struts2是否整合成功
我们访问这个网站
http://localhost:8080/babaSport_0600_sh_struts2/product/type
注意我们为什么要这样写网址
因为我们在struts2里面配置的时候是这样的
<package name="product"namespace="/product" extends="struts-default">
注意到那个namespace了吧,那么就是我们的命名空间,关于命名空间
命名空间
namespace决定了action的访问路径,默认为"",可以接受所有路径的action
amespace可以写为/,或者/xxx,或者/xxx/yyy,对应的action访问路径为/index.action,/xxx/index.action,或
者/xxx/yyy/index.action
namespace最好也用模块来进行命名
注解:
package:用来区分重名的情况
namespace:必须用"/"开头,如:/front,在url中我们就要输入:http://localhost:8080/babaSport_0600_sh_struts2/product/type
package和namespace在开发的时候都以模块来命名。
result:凡是name="success"的result,都可以不写:name="success"即:<result>/Namespace.jsp</result>
还有返回不一样的值的
<result name="list">/test.jsp</result>
6、总结
整合struts2的要点就是引入struts2的jar包,上面已经贴图,然后就是struts2的配置格式是什么,整合spring如何加入,最后一定要注意:要记得配置web.xml,博主有N次都把web.xml给忘了,结果报各种bug,莫名其妙,到最后恍然大悟原来是web.xml的问题,新手一般都会有这个毛病,特别是喜欢用myeclipse的同学,以前的javaweb写servlet的时候myeclipse会自动帮我们吧servlet加到web.xml里面,用了框架之后我们虽然不用配置servlet了,但是如上的那么点还是要写进web,xml。