巴巴运动网-整合hibernate4(1)
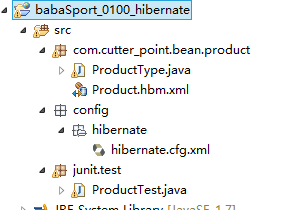
1、项目图解
2、首先我们引入相应的jar包
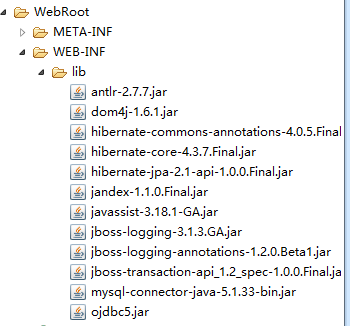
这里用的是oracle 11g,所以我们使用的数据库连接jar包是ojdbc5
3、我们配置一下数据库中相应的实体对象
ProductType.java
/** * 功能:这是产品类别的 * 文件:ProductType.java * 时间:2015年5月12日10:16:21 * 作者:cutter_point */package com.cutter_point.bean.product; publicclassProductType{ private Integer typeid; public Integer getTypeid() { returntypeid; } publicvoid setTypeid(Integertypeid) { this.typeid = typeid; }}
Product.hbm.xml
<?xml version="1.0"?><!DOCTYPE hibernate-mapping PUBLIC "-//Hibernate/Hibernate Mapping DTD 3.0//EN" "http://www.hibernate.org/dtd/hibernate-mapping-3.0.dtd"> <hibernate-mapping package="com.cutter_point.bean.product"> <class name="ProductType" table="ProductType"> <id name="typeid"column="typeid"> <generator class="sequence" /> </id> </class></hibernate-mapping>
4、我们配置一下hibernate的连接文件
<?xml version='1.0' encoding='utf-8'?><!DOCTYPE hibernate-configuration PUBLIC "-//Hibernate/Hibernate Configuration DTD 3.0//EN" "http://www.hibernate.org/dtd/hibernate-configuration-3.0.dtd"> <hibernate-configuration> <session-factory> <!-- Database connectionsettings --> <property name="connection.driver_class">oracle.jdbc.driver.OracleDriver</property> <property name="connection.url">jdbc:oracle:thin:@localhost:1522:ORCL</property> <property name="connection.username">这里填账号</property> <property name="connection.password">你的密码</property> <!-- JDBC connection pool (usethe built-in) --> <property name="connection.pool_size">1</property> <!-- SQL dialect --> <property name="dialect">org.hibernate.dialect.OracleDialect</property> <!-- Enable Hibernate'sautomatic session context management --> <property name="current_session_context_class">thread</property> <!-- Disable the second-levelcache --> <property name="cache.provider_class">org.hibernate.cache.internal.NoCacheProvider</property> <!-- Echo all executed SQL to stdout --> <property name="show_sql">true</property> <!-- Drop and re-create thedatabase schema on startup --> <property name="hbm2ddl.auto">update</property> <mapping resource="com/cutter_point/bean/product/Product.hbm.xml"/> <!--这个是你刚刚陪的java类的路径对象 --> </session-factory> </hibernate-configuration>
5、接下来我们测试一下hibernate是否配置成功
/** * 功能:这是产品类别的单元测试 * 文件:ProductTest.java * 时间:2015年5月12日10:27:24 * 作者:cutter_point */package junit.test; import org.hibernate.Session;import org.hibernate.SessionFactory;import org.hibernate.cfg.Configuration;import org.junit.BeforeClass;import org.junit.Test; import com.cutter_point.bean.product.ProductType; publicclassProductTest{ @BeforeClass publicstaticvoid setUpBeforeClass() throws Exception { } @SuppressWarnings("deprecation") @Test publicvoid test() { ProductTypept = newProductType(); //new一个对象 pt.setTypeid(78); //设置id号码 Configurationcfg = newConfiguration(); //得到Configuration SessionFactorysf = cfg.configure("/config/hibernate/hibernate.cfg.xml").buildSessionFactory(); //取得session工厂 Sessionsession = sf.openSession(); session.beginTransaction(); session.save(pt); session.getTransaction().commit(); session.close(); sf.close(); } }
6、总结
这个配置hibernate还是很简单的,但是这里注意一点,如果你的数据库里面没有建立相应的表的话,又或者你sql语句不太会写,又或者你觉得自己写的sql语句不准,那么这里还有一个方法,吧hibernate配置文件hibernate.cfg.xml里面的
<property name="hbm2ddl.auto">update</property>中的update改为create,那么hibernate就会自动帮你创建相应的表