目录
1.课堂主题及知识点
2.ES5的Object.defineProperty()实现数据劫持
2.1Object.defineProperty()下的配置
2.2使用Object.defineProperty()方式模拟Vue数据劫持,并更新视图(数据双向绑定)
3.ES6中new Proxy()实现数据劫持
4.es6模块化
4.1导出方式
4.1.1导出 方式一 :
4.1.2导出方式二 关键字 "as"
4.1.3导出方式三
4.1.4导出方式四
4.2导入方式
4.2.1export 使用对象导出的,命名要保持一致方式
4.2.2export导出的,命名可以自定义方式;
4.2.3通配符 "*"方式导入
5.AMD require.js的使用
5.1引入require.js
5.2加载模块
5.3定义模块
5.3.1无依赖定义
5.3.2模块有依赖
5.3.3函数式写法
6.模块化优点
7.总结
1.课堂主题及知识点
##课堂主题
- 利用defineProperty实现数据劫持;
- 利用ES6中proxy实现数据劫持
- 数据劫持实现mvvm里的表达式
- 利用自定义事件实现数据动态更新;
- 通过es6模块化改造自己的mvvm框架;
- AMD模块化require.js介绍;
##知识点
- defineProperty;
- Proxy代理
- 数据劫持
- es6模块化、exports 和 import
- AMD /CMD模块化;
- MVVM框架:数据驱动,数据优先(数据变化,视图也跟着变化)
数据在前端使用得最多的即对象数组,如[{},{},{}]形式。
数据劫持:拦截数据变化,再将变化的数据更新到视图。
2.ES5的Object.defineProperty()实现数据劫持
- 参数一:被劫持的对象数据;
- 参数二:要劫持的对象数据中的属性;
- 参数三:对象,里面的get()/set()方法在数据改变时会自动监听并执行(即数据劫持)
- 每个属性劫持都需要单独使用Object.defineProperty()进行设置劫持,劫持后的数据都有自己的get()/set()方法(如obj.name会自动调用get()方法,obj.name = 'zs'时会自动调用set()方法),其返回值仍然会被劫持。
Object.defineProperty(obj,'name',{configurable:true,enumerable:true,get(){return value;},set(newValue){console.log("set...");value = newValue;}})2.1Object.defineProperty()下的配置
- configurable:true,表示可配置,即是否可更改,默认为true。如果设置了false,则delete Object.key(name)则不会生效;
- enumeable:true,表示可枚举,默认为true。如果设置为false,则会影响for in循环,Object.keys(),JSON.stringfy(),Object.assign()等方法的使用。
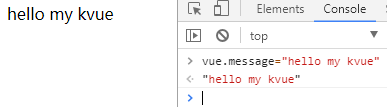
2.2使用Object.defineProperty()方式模拟Vue数据劫持,并更新视图(数据双向绑定)
Vue案例:更改数据vue.message= "hello my vue"时,视图也会随之更改
<!DOCTYPE html>
<html lang="en"><head><meta charset="UTF-8"><meta name="viewport" content="width=device-width, initial-scale=1.0"><title>Document</title>
</head><body><div id="app">{
   {message}}</div><script src="https://cdn.jsdelivr.net/npm/vue/dist/vue.js"></script><script>let vue = new Vue({el: "#app",data:{message:"hello vue"}})</script>
</body></html>
效果:
![]()
Object.defineProperty()方式模拟Vue数据劫持使用及步骤解析:
- 通过document.querySelect(el)找到被数据劫持范围内所有节点(nodes = eles.childNodes)。并进行初次视图渲染;
- 通过node.nodeType===3或node.nodeType===1判断节点为文本还是节点,如果是文本节点直接使用正则let reg = /\{\{\s*(\S+)\s*\}\}/g 将正则中的组(\S+)替换为要替换的数据(组内内容使用$1获取)。node.textContent().replace(reg,value);
- 判断node.childNodes.length大于0则表示还有 子节点,需要使用递归实现多层节点替换message;不大于0则表示不再有子节点;
- 使用Object.defineProperty()方法实现数据劫持并改变数据;
- 使用自定义事件(继承TargetEvent,并使用CustomEvent类)实现视图的再次渲染,通过let event = new CustomEvent(key,value);this.dispatchEvent(event)监听数据变化(注意此处this和自定义事件this的使用),并将设置的值获取并替换上一次的值即let oldValue = this.options.dada[$1]; let reg = new RegExt(oldValue,"g"); node.textContent = node.textContent.replace(reg,newValue);
- 问题:不支持多层数据劫持更新,且多次更新也有问题
- 输入框中使用属性v-html = "htmldata"指令进行更新。获取节点中所有属性node.attributes ,然后循环所有属性attr.name attr.value ,使用let attrName = attr.name.substr(2)去掉v-html的‘v-’;然后判断attrName = "html"时 node.innerHTML = this.options.data[attrValue];attrName = "model" 时node.value = this.options.data[attrValue];
- 因为使用的数据双绑定,所以在input输入框中输入时也需要将值绑定并更新到视图中。在CustomEvent中通过e.detail获取input的值,然后直接赋值,因为已经对数据进行劫持,并且进行了二次渲染,所以赋值后会直接进行数据劫持和视图更新
- 通过new Proxy()方法同样实现数据劫持和视图更新
- 无论是ES5中Object.defineProperty()还是ES6中new Proxy()都需要使用自定义事件或者发布订阅监听数据变化并更新视图
案例实现Vue模拟:
- 因为传入的el是#app所以用document.querySelect(el)而不是document.querySelectAll(el);
- 自定义事件的使用:增加监听事件;使用CustomEvent获取监听事件及传递的数据;dipatchEvent(event)触发事件;触发自定义事件时的this指向问题;
- v-html和v-model指令更新时,是获取v-html和v-model所在节点的属性值,且此处做input输入框数据双向绑定时,监听事件是加在node节点上,而不是this上(因为继承了TargetEvent,所以此处this指向TargetEvent,所以不能使用)
Kvue.html:
<!DOCTYPE html>
<html lang="en"><head><meta charset="UTF-8"><meta name="viewport" content="width=device-width, initial-scale=1.0"><script src="Kvue-new-Proxy.js"></script><title>Document</title>
</head><body><div id="app">{
{message}}外层<div><span>{
{message}}</span></div>{
{code}}<!-- 注意所有v-html或 v-model都必须在el属性范围内--><div v-html="htmlData"></div><!-- 数据双绑定――输入框输入内容的数据也会被劫持 --><input v-model="modelData"/> {
{modelData}}</div><script>let kVue = new Kvue({el: '#app',data: {message: "这是我的Kvue!",code: 303,// 注意此处属性值必须和布局中v-html 和v-model后面的属性值保持一致htmlData:"html数据",modelData:"数据双绑定"}});//监听获取数据// console.log(kVue.data);</script>
</body></html>Kvue.js:
/*** 模拟实现vue功能* 功能三:输入框中使用属性v-html = "htmldata"指令进行更新*/class Kvue extends EventTarget {//options表示constructor(options) {super();this.options = options;this.data = this.options.data;this.compile();// 数据劫持this.observe(this.options.data);}// 监听数据变化observe(data) {Object.keys(data).forEach(key => {//key即data中的属性名this.observeData(data, key, data[key]);});}// 通过Object.defineProperty劫持数据变化observeData(data, key, value) {let _this = this;Object.defineProperty(data, key, {configurable: true,enumerable: true,get() {console.log("get----");return value;},set(newValue) {console.log("set----", newValue);let event = new CustomEvent(key, { detail: newValue });//参数一时间名,参数二传递的数据// 需要触发事件_this.dispatchEvent(event);return value = newValue;//set()方法返回更新后的数据}});}//处理数据,渲染视图compile() {// 注意此处传入的为#app只有一个元素let eles = document.querySelector(this.options.el);this.compileNode(eles.childNodes);}compileNode(childNodes) {childNodes.forEach(node => {// 循环所有nodes,当nodeType为1时表示为节点,需找到下一个节点直到找到的是文本;为3表示为文本直接正则匹配显示if (node.nodeType === 1) {// 数据双绑定let attrs = node.attributes;//获取属性及属性值console.log(attrs);[...attrs].forEach(attr => {let attrName = attr.name;let attrValue = attr.value;// 获取v-html v-model的v-后面的内容attrName = attrName.substr(2);console.log(attrName,attrValue);// 为html时,通过innerHTML获取设置值if (attrName == "html") {node.innerHTML = this.data[attrValue];// 为model时,是input框 通过value获取设置值} else if (attrName == "model") {// 注意是给当前节点设置值和加监听,所以使用node,次此处this指向EventTarget// 给input数据框设置初始值node.value = this.data[attrValue];// 监听input更改后更新input视图node.addEventListener("input",e=>{console.log("attrValue设置了值;", e.target.value);//此处是input框,通过e.target.value获取值this.data.modelData = e.target.value;});}});// 判断nodes.length>0则表示还有子节点,需要递归找到下一个节点直到找到的是文本;nodes.length不大于0表示只有一个文本节点,直接匹配显示if (node.childNodes.length > 0) {this.compileNode(node.childNodes);}} else if (node.nodeType === 3) {let reg = /\{\{\s*(\S+)\s*\}\}/g;//\{ \}表示精确匹配{},\s*表示message前后可能会有任意个空格,(\S+)表示用组匹配messagelet textContent = node.textContent;let test = reg.test(textContent);//注意要使用test方法测试是否匹配再替换if (test) {// 初次渲染;let $1 = RegExp.$1;node.textContent = textContent.replace(reg, this.options.data[$1]);// 页面再次渲染//设置监听事件,监听$1即每个data中的key// 注意:自定义事件的用法,因为此处设置了监听,所以在observeData方法中,dispatchEvent(event)触发事件时会自动被监听// 所以此处的e即CustomEvent对象,所以有e.detail属性// console.log(this);//EventTarget {options: {…}, data: {…}}this.addEventListener($1, e => {console.log("设置了值;", e.detail);// 获取设置的值let newValue = e.detail;// 原来数据中的值key ,如messagelet oldValue = this.options.data[$1];// 全局匹配所有的原有数据let reg = new RegExp(oldValue, "g");// 将原有数据改为更改后的值node.textContent = node.textContent.replace(reg, newValue);});}}});}
}
3.ES6中new Proxy()实现数据劫持
-
定义 :对象用于定义基本操作的自定义行为(如属性查找,赋值,枚举,函数调用等)。
-
基本使用
let obj = new Proxy({name: "张三",age: 20},{
//target即传入的原始数据即第一个参数值get(target, name) {return target[name];},set(target,name,value){target[name] = value;}})-
相关配置参数
has(target, propKey):拦截propKey in proxy的操作,返回一个布尔值。
defineProperty(target, propKey, propDesc):拦截Object.defineProperty(proxy, propKey, propDesc)
Object.defineProperties(proxy, propDescs),返回一个布尔值。
使用new Proxy()实现模拟Vue:
Kvue.html同上;
Kvue-new-proxy.js:
- new Proxy()需要使用this.data进行接收;
- set()和get()中的target即new Proxy()时传入的第一个参数值(即原始数据);
- 仍然需要触发监听。
/*** 模拟实现vue功能* 功能四:通过new Proxy实现和Object.property()同样功能*/class Kvue extends EventTarget {//options表示constructor(options) {super();this.options = options;this.data = this.options.data;this.compile();// 数据劫持this.observe(this.options.data);}// 监听数据变化observe(data) {// Object.keys(data).forEach(key => {//key即data中的属性名//     this.observeData(data, key, data[key]);// });let _this = this;this.data = new Proxy(data, {// target即传入的data原始数据get(target, key) {return target[key];},// 此处newValue即传入的改变的数据set(target, key, newValue) {console.log(target);let event = new CustomEvent(key, { detail: newValue });//参数一时间名,参数二传递的数据// 需要触发事件_this.dispatchEvent(event);return target[key] = newValue;}});}// 通过Object.defineProperty劫持数据变化// observeData(data, key, value) {//     let _this = this;//     Object.defineProperty(data, key, {//         configurable: true,//         enumerable: true,// get() {//     console.log("get----");//     return value;// },// set(newValue) {//     console.log("set----", newValue);//     let event = new CustomEvent(key, { detail: newValue });//参数一时间名,参数二传递的数据//     // 需要触发事件//     _this.dispatchEvent(event);//     return value = newValue;//set()方法返回更新后的数据// }//     });// }//处理数据,渲染视图compile() {// 注意此处传入的为#app只有一个元素let eles = document.querySelector(this.options.el);this.compileNode(eles.childNodes);}compileNode(childNodes) {childNodes.forEach(node => {// 循环所有nodes,当nodeType为1时表示为节点,需找到下一个节点直到找到的是文本;为3表示为文本直接正则匹配显示if (node.nodeType === 1) {// 数据双绑定let attrs = node.attributes;//获取属性及属性值console.log(attrs);[...attrs].forEach(attr => {let attrName = attr.name;let attrValue = attr.value;// 获取v-html v-model的v-后面的内容attrName = attrName.substr(2);console.log(attrName, attrValue);// 为html时,通过innerHTML获取设置值if (attrName == "html") {node.innerHTML = this.data[attrValue];// 为model时,是input框 通过value获取设置值} else if (attrName == "model") {// 注意是给当前节点设置值和加监听,所以使用node,次此处this指向EventTarget// 给input数据框设置初始值node.value = this.data[attrValue];// 监听input更改后更新input视图node.addEventListener("input", e => {console.log("attrValue设置了值;", e.target.value);//此处是input框,通过e.target.value获取值this.data.modelData = e.target.value;});}});// 判断nodes.length>0则表示还有子节点,需要递归找到下一个节点直到找到的是文本;nodes.length不大于0表示只有一个文本节点,直接匹配显示if (node.childNodes.length > 0) {this.compileNode(node.childNodes);}} else if (node.nodeType === 3) {let reg = /\{\{\s*(\S+)\s*\}\}/g;//\{ \}表示精确匹配{},\s*表示message前后可能会有任意个空格,(\S+)表示用组匹配messagelet textContent = node.textContent;let test = reg.test(textContent);//注意要使用test方法测试是否匹配再替换if (test) {// 初次渲染;let $1 = RegExp.$1;node.textContent = textContent.replace(reg, this.options.data[$1]);// 页面再次渲染//设置监听事件,监听$1即每个data中的key// 注意:自定义事件的用法,因为此处设置了监听,所以在observeData方法中,dispatchEvent(event)触发事件时会自动被监听// 所以此处的e即CustomEvent对象,所以有e.detail属性// console.log(this);//EventTarget {options: {…}, data: {…}}this.addEventListener($1, e => {console.log("设置了值;", e.detail);// 获取设置的值let newValue = e.detail;// 原来数据中的值key ,如messagelet oldValue = this.options.data[$1];// 全局匹配所有的原有数据let reg = new RegExp(oldValue, "g");// 将原有数据改为更改后的值node.textContent = node.textContent.replace(reg, newValue);});}}});}
}
4.es6模块化
- 浏览器默认模块化 script 里加入 "type=module";
- 导出 关键字 export
- export 可以导出多个,export default 只能导出一个;
- 使用模块化时,需要在服务器环境打开页面,否则会报错
![]()
4.1导出方式
4.1.1导出 方式一 :
export.js文件中
export { a ,b , c}对应导入方式:
import {a,b,c} from './export.js';4.1.2导出方式二 关键字 "as"
export { a as aa ,b , c}对应导入方式:
import { aa, b, c } from './export.js';
console.log(aa, b, c);//10 20 30
4.1.3导出方式三
export let d = ()=>{console.log("I am d function...")}对应导入方式:
import {d} from './export.js';
console.log(d);
d();//I am d function...
4.1.4导出方式四
// export default a;//等同export {a as default};
export {b as default};
对应导入方式:
//  import a from './export.js';
// console.log(a);//10
import b from './export.js';
console.log(b);//20
4.2导入方式
导入方式:关键字 import,js文件名前必须加'./'
4.2.1export 使用对象导出的,命名要保持一致方式
import {aa , b , c} from './moduleb.js';4.2.2export导出的,命名可以自定义方式;
import myfn from './moduleb.js';4.2.3通配符 "*"方式导入
import * as obj from './moduleb.js';
ES6导入导出示例:
module.html:
<!DOCTYPE html>
<html lang="en"><head><meta charset="UTF-8"><meta name="viewport" content="width=device-width, initial-scale=1.0"><title>Document</title>
</head><body><script type="module">// 注意使用import模块化时需要运行在服务器上,否则会报错// 导出方式一对应导入方式一:// import {a,b,c} from './export.js';// console.log(a, b, c);//10 20 30// 导出方式二对应导入方式二:// import { aa, b, c } from './export.js';// console.log(aa, b, c);//10 20 30// 导出方式三对应导入方式三:// import {d} from './export.js';// console.log(d);// d();//I am d function...// 导出方式四对应导入方式四://  import a from './export.js';// console.log(a);//10//  import b from './export.js';//  console.log(b);//20// 导出方式五:可使用通配符*方式导入import * as obj from './export.js';console.log(obj);//得到的是整个模块,Module {Symbol(Symbol.toStringTag): "Module"}可通过obj.a,obj.b获取具体值</script>
</body></html>
export.js:
let a = 10;
let b = 20;
let c = 30;// 导出方式一:
export {a,b,c};// 导出方式二:
// export {a as aa,b,c};// 导出方式三:
// export let d = ()=>{console.log("I am d function...")}// 导出方式四:
// export default a;//等同export {a as default};
// export {b as default};
4.3使用ES6模块化修改模拟实现Kvue.js的代码
注意:因为传递过去的是this.options,不是this.options.data(直接传递data后,获取节点时获取不到el),所以Compile中在addEventListener也必须将数据加在this.options上,否则二次渲染失败
Kvue.html:
<!DOCTYPE html>
<html lang="en"><head><meta charset="UTF-8"><meta name="viewport" content="width=device-width, initial-scale=1.0"><!-- <script src="Kvue.js"></script> --><title>Document</title>
</head><body><div id="app">{
{message}}外层<div><span>{
{message}}</span></div>{
{code}}<!-- 注意所有v-html或 v-model都必须在el属性范围内--><div v-html="htmlData"></div><!-- 数据双绑定――输入框输入内容的数据也会被劫持 --><input v-model="modelData"/> {
{modelData}}</div><script type="module">import Kvue from './Kvue.js';let kVue = new Kvue({el: '#app',data: {message: "这是我的Kvue!",code: 303,// 注意此处属性值必须和布局中v-html 和v-model后面的属性值保持一致htmlData:"html数据",modelData:"数据双绑定"}});//监听获取数据kVue.options.data.code = "505"; </script>
</body></html>Kvue.js:
/*** 数据劫持模块*/
// 引入compile编译模块
import Compile from './Compile.js';
class Kvue {//options表示constructor(options) {this.options = options;// 因为使用到Compile模块,而Compile模块中需要使用到options数据,所以传入即可// 注意因为传递过去的是this.options,不是this.options.data(直接传递data后,获取节点时获取不到el),所以Compile中在addEventListener也必须将数据加在this.options上,否则二次渲染失败this.compile = new Compile(this.options);// 数据劫持this.observe(this.options.data);}// 监听数据变化observe(data) {//  new Proxy()方式时不需要再遍历通过key值劫持数据了// Object.keys(data).forEach(key => {//key即data中的属性名//     this.observeData(data, key, data[key]);// });let _this = this;// 注意因为传递过去的是this.options,所以此处触发监听时也必须针对的是this.options上的数据this.options.data = new Proxy(data, {// target即传入的data原始数据get(target, key) {return target[key];},// 此处newValue即传入的改变的数据set(target, key, newValue) {let event = new CustomEvent(key, { detail: newValue });//参数一时间名,参数二传递的数据// 需要触发事件// 因为EventTarget在监听及触发事件时都需要用到,所以Kvue.js和Compile.js都需要用到,而由于Kvue.js引入了Compile,所以可以使用到Compile中的监听进行触发_this.compile.dispatchEvent(event);return target[key] = newValue;}});}// 通过Object.defineProperty劫持数据变化// observeData(data, key, value) {//     let _this = this;//     Object.defineProperty(data, key, {//         configurable: true,//         enumerable: true,// get() {//     console.log("get----");//     return value;// },// set(newValue) {//     console.log("set----", newValue);//     let event = new CustomEvent(key, { detail: newValue });//参数一时间名,参数二传递的数据//     // 需要触发事件//     _this.dispatchEvent(event);//     return value = newValue;//set()方法返回更新后的数据// }//     });// }
}export default Kvue;
Compile.js:
/*** 编译模块* 注意因为传递过来的是this.options,不是this.options.data,* 所以Compile中在addEventListener也必须将数据更新到this.options上,否则二次渲染失败*/class Compile extends EventTarget{constructor(options){super();this.options = options;// 注意此处compile()方法必须挂载到Compile上this.compile();}//处理数据,渲染视图compile() {// 注意此处传入的为#app只有一个元素let eles = document.querySelector(this.options.el);this.compileNode(eles.childNodes);}compileNode(childNodes) {childNodes.forEach(node => {// 循环所有nodes,当nodeType为1时表示为节点,需找到下一个节点直到找到的是文本;为3表示为文本直接正则匹配显示if (node.nodeType === 1) {// 数据双绑定let attrs = node.attributes;//获取属性及属性值[...attrs].forEach(attr => {let attrName = attr.name;let attrValue = attr.value;// 获取v-html v-model的v-后面的内容attrName = attrName.substr(2);// 为html时,通过innerHTML获取设置值if (attrName == "html") {node.innerHTML = this.options.data[attrValue];// 为model时,是input框 通过value获取设置值} else if (attrName == "model") {// 注意是给当前节点设置值和加监听,所以使用node,次此处this指向EventTarget// 给input数据框设置初始值node.value = this.options.data[attrValue];// 监听input更改后更新input视图node.addEventListener("input", e => {console.log("attrValue设置了值;", e.target.value);//此处是input框,通过e.target.value获取值this.options.data[attrValue] = e.target.value;});}});// 判断nodes.length>0则表示还有子节点,需要递归找到下一个节点直到找到的是文本;nodes.length不大于0表示只有一个文本节点,直接匹配显示if (node.childNodes.length > 0) {this.compileNode(node.childNodes);}} else if (node.nodeType === 3) {let reg = /\{\{\s*(\S+)\s*\}\}/g;//\{ \}表示精确匹配{},\s*表示message前后可能会有任意个空格,(\S+)表示用组匹配messagelet textContent = node.textContent;let test = reg.test(textContent);//注意要使用test方法测试是否匹配再替换if (test) {// 初次渲染;let $1 = RegExp.$1;node.textContent = textContent.replace(reg, this.options.data[$1]);// 页面再次渲染//设置监听事件,监听$1即每个data中的key// 注意:自定义事件的用法,因为此处设置了监听,所以在observeData方法中,dispatchEvent(event)触发事件时会自动被监听// 所以此处的e即CustomEvent对象,所以有e.detail属性// console.log(this);//EventTarget {options: {…}, data: {…}}this.addEventListener($1, e => {console.log("设置了值;", e.detail);// 获取设置的值let newValue = e.detail;// 原来数据中的值key ,如messagelet oldValue = this.options.data[$1];// 全局匹配所有的原有数据let reg = new RegExp(oldValue, "g");// 将原有数据改为更改后的值node.textContent = node.textContent.replace(reg, newValue);});}}});}}export default Compile;
5.AMD require.js的使用
Node.js使用的是common.js规范
现在ES6模块化和common.js规范用得稍微多一点,AMD/CMD相对来说使用得少一点。
5.1引入require.js
https://cdn.bootcss.com/require.js/2.3.6/require.js
5.2加载模块
a.js:
console.log("a.js");
let b = 20;
amd.html: require(['a'])表示引入a.js文件,a.js文件中所有变量方法等必须在require()范围内使用
<!DOCTYPE html>
<html lang="en">
<head><meta charset="UTF-8"><meta name="viewport" content="width=device-width, initial-scale=1.0"><title>Document</title><!-- 引入AMD的require.js --><script src="https://cdn.bootcss.com/require.js/2.3.6/require.js"></script>
</head>
<body>
<script>// ["a"]表示引入 a.js文件require(["a"],function(){// 调用后直接可以执行a.js文件中的log打印// 要调用a.js中的变量直接调用即可console.log(b);//20});// 必须在require()方法模块范围中才能调用引入文件中的内容,否则报错console.log(b);//Uncaught ReferenceError: b is not defined
</script>
</body>
</html>
5.3定义模块
5.3.1无依赖定义
a.js:
// define定义无依赖模块
define({name: "LMF",age: 28,method1: function () {console.log("method1...");},method2: function () {console.log("method2...");}
});amd.html:define模块的参数,通过function的参数进行获取
// 定义无依赖模块的使用// define模块的参数,通过function的参数进行获取require(["a"], function (obj) {console.log(obj);//{name: "LMF", age: 28, method1: ?, method2: ?}obj.method1();//method1...obj.method2();//method2...});5.3.2模块有依赖
define(["c"],{method1:function(){console.log("a method...");},method2:function(){console.log("b method...");}
});
示例:
b.js:a.js和b.js,在a.js中引入后,b.js文件也可以拿到a.js文件中的变量。作用域是相互的
console.log("b.js");
function methodFn(){console.log("b.js 文件中的methodFn执行");
}
define({methodFn1:function(){console.log("b.js 文件中的methodFn1执行");}
});// a.js和b.js,在a.js中引入后,b.js文件也可以拿到a.js文件中的变量。作用域是相互的
console.log("b.js文件中也可以获得a.js中的变量b:"+b);//b.js文件中也可以获得a.js中的变量b:20
a.js:
// define定义有依赖模块
define(['b'], {method3: function () {console.log("a.js中的有依赖模块method3执行");// methodFn();//b.js 文件中的methodFn执行}
});
amd.html:注意如果b.js文件中methodFn()在define范围中,引入a.js文件后不能直接调用,如果不在define范围中可以直接调用
// 定义有依赖模块的使用require(["a"], function (obj) {// 会打印b.jsconsole.log(obj);//{method3: ?}obj.method3();//a.js中的有依赖模块method3执行// b.js文件中methodFn()方法没有在define范围内,由a.js文件引入后,a.js和amd.html中都可以使用methodFnmethodFn();//b.js 文件中的methodFn执行});// 如果b.js文件中methodFn1()方法在define范围内,必须引入b.js文件,才能使用methodFn1()方法require(['b'],function(obj){obj.methodFn1();//b.js 文件中的methodFn1执行})5.3.3函数式写法
define(["c"],function(){obj = {name:"张安",age:20}return obj;
});
6.模块化优点
- 防止作用域污染
- 提高代码的复用性
- 维护成本降低
7.总结
- defineProperty
- Proxy
- 数据劫持
- 自定义事件
- es6模块化
- AMD/CMD模块化