http://www.cnblogs.com/slider/archive/2011/11/10/2245017.html
?
android开发包preference提供了我们一些方面的设置工具,PreferenceActivity,Preference,PreferenceScreen,CheckBoxPreference等,利用他们可以方便的建立应用程序的属性设置。如图:
有些时候,我们并不需要系统给我们的这么单调的ui,我们通常会修改一些属性,比如view的背景,字体的属性等,那么这个时候有两种选择:
1.针对单个应用程序,定义一个cutom的layout,当然这个layout跟系统的layout元素要一致(否则你怎么改呢?),然后在preference.xml(文件名你自己随便取)android:layout添加你定一个 的layout就可以了。
2.针对整个android系统,修改preference相关的属性,那么所有的用到PreferenceActivity的界面都会相应的改变。这里只需要修改相应的系统layout文件(在framework/base/core/res/res/layout),比如preference_category.xml等。
1.先说说地一种吧,比较常用到的。
首先,定义你的layout文件,这个layoutn你直接到framework拷下来,这里标记为custom_preference.xml
<LinearLayout xmlns:android="http://schemas.android.com/apk/res/android" android:layout_width="match_parent" android:layout_height="wrap_content" android:minHeight="?android:attr/listPreferredItemHeight" android:gravity="center_vertical" android:paddingRight="?android:attr/scrollbarSize"> <RelativeLayout android:layout_width="wrap_content" android:layout_height="wrap_content" android:layout_marginLeft="15dip" android:layout_marginRight="6dip" android:layout_marginTop="6dip" android:layout_marginBottom="6dip" android:layout_weight="1"> <TextView android:id="@+android:id/title" android:layout_width="wrap_content" android:layout_height="wrap_content" android:singleLine="true" android:textAppearance="?android:attr/textAppearanceLarge" android:ellipsize="marquee" android:fadingEdge="horizontal" android:textColor="#475ad7"/> <TextView android:id="@+android:id/summary" android:layout_width="wrap_content" android:layout_height="wrap_content" android:layout_below="@android:id/title" android:layout_alignLeft="@android:id/title" android:textAppearance="?android:attr/textAppearanceSmall" android:textColor="#5ad747"/> </RelativeLayout> <!-- Preference should place its actual preference widget here. --> <LinearLayout android:id="@+android:id/widget_frame" android:layout_width="wrap_content" android:layout_height="match_parent" android:gravity="center_vertical" android:orientation="vertical"/> </LinearLayout>
?然后,你在些preference.xml文件的时候,应用到这个layout文件。
<?xml version="1.0" encoding="utf-8"?> <PreferenceScreen xmlns:android="http://schemas.android.com/apk/res/android"> <CheckBoxPreference android:key="checkbox_key" android:title="checkbox_title" android:summary="checkbox_summery" android:defaultValue="true" android:layout="@layout/custom_preference_layout"></CheckBoxPreference> </PreferenceScreen>
?
ok,到这里,你就像平时一样使用这个preference.xml文件就好了,你会发现字体的颜色成功改变了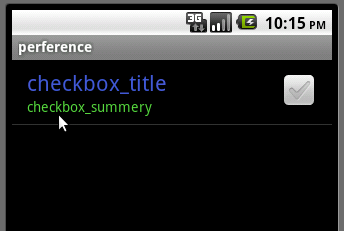
2.第二种情况,需要搭建android系统的编译环境,这个环境怎么搭建这里就不说了。
直接到系统layout文件(在framework/base/core/res/res/layout),修改preference.xml,这里只是针对上面那个例子,你当然也可以修改其他的preference相应的文件。preference.xml文件的内容就是第一种情况的custom_preference.xml文件的内容,这里就不重复了。
修改后重新mka下系统,重启模拟器,ok,就可以看到第一种方法一样的效果了。