上一篇文章:OAuth2.0入门(二)―― spring-security-oauth2入门例子JDBC存储(超详细版)上篇
本文我们继续上一篇文章的内容来讲解下oauth2-resource-server模块和oauth-client模块。
一、oauth2-resource-server模块

oauth2-resource-server模块是作为资源服务器,pom文件如下:
<?xml version="1.0" encoding="UTF-8"?>
<project xmlns="http://maven.apache.org/POM/4.0.0" xmlns:xsi="http://www.w3.org/2001/XMLSchema-instance"xsi:schemaLocation="http://maven.apache.org/POM/4.0.0 http://maven.apache.org/xsd/maven-4.0.0.xsd"><modelVersion>4.0.0</modelVersion><parent><groupId>com.scb</groupId><artifactId>oauth2-demo</artifactId><version>0.0.1-SNAPSHOT</version><relativePath/> <!-- lookup parent from repository --></parent><artifactId>oauth2-resource-server</artifactId><version>0.0.1-SNAPSHOT</version><name>oauth2-resource-server</name><description>Demo project for Spring Boot</description><properties><java.version>1.8</java.version></properties><dependencies><!-- 阿里系的Druid依赖包 --><dependency><groupId>com.alibaba</groupId><artifactId>druid-spring-boot-starter</artifactId><version>1.1.9</version></dependency><!-- Druid 依赖 log4j包 --><dependency><groupId>log4j</groupId><artifactId>log4j</artifactId><version>1.2.17</version></dependency><dependency><groupId>com.h2database</groupId><artifactId>h2</artifactId><scope>runtime</scope></dependency><dependency><groupId>org.springframework.boot</groupId><artifactId>spring-boot-starter-data-jpa</artifactId></dependency><dependency><groupId>org.springframework.boot</groupId><artifactId>spring-boot-starter-security</artifactId></dependency><dependency><groupId>org.springframework.boot</groupId><artifactId>spring-boot-starter-web</artifactId></dependency><dependency><groupId>org.springframework.security.oauth</groupId><artifactId>spring-security-oauth2</artifactId><version>2.3.4.RELEASE</version></dependency><dependency><groupId>org.springframework.security</groupId><artifactId>spring-security-test</artifactId><scope>test</scope></dependency></dependencies><build><plugins><plugin><groupId>org.springframework.boot</groupId><artifactId>spring-boot-maven-plugin</artifactId></plugin></plugins></build></project>
这里依然要导入数据库等依赖,因为要连同一个数据库,获取oauth2-authentication-server 模块创建好的数据表。
server:port: 8090
spring:h2:console:path: /h2-consoleenabled: truesettings:web-allow-others: truedatasource:platform: h2url: jdbc:h2:~/auth;AUTO_SERVER=TRUEusername: sapassword:type: com.alibaba.druid.pool.DruidDataSourcedruid:min-idle: 2initial-size: 5max-active: 10max-wait: 5000validation-query: select 1资源服务器配置:使用@EnableResourceServer注解来开启资源服务器,并继承ResourceServerConfigurerAdapter类重写configure方法来定义资源访问策略。
package com.scb.oauth2resourceserver.config;import lombok.extern.slf4j.Slf4j;
import org.springframework.beans.factory.annotation.Autowired;
import org.springframework.context.annotation.Bean;
import org.springframework.context.annotation.Configuration;
import org.springframework.http.HttpMethod;
import org.springframework.security.config.annotation.web.builders.HttpSecurity;
import org.springframework.security.oauth2.config.annotation.web.configuration.EnableResourceServer;
import org.springframework.security.oauth2.config.annotation.web.configuration.ResourceServerConfigurerAdapter;
import org.springframework.security.oauth2.config.annotation.web.configurers.ResourceServerSecurityConfigurer;
import org.springframework.security.oauth2.provider.token.TokenStore;
import org.springframework.security.oauth2.provider.token.store.JdbcTokenStore;import javax.sql.DataSource;@Slf4j
@Configuration
@EnableResourceServer
public class ResourceServerConfig extends ResourceServerConfigurerAdapter {@Autowiredprivate DataSource dataSource;public ResourceServerConfig() {super();}/*oauth_access_token Table*/@Beanpublic TokenStore tokenStore() {JdbcTokenStore tokenStore = new JdbcTokenStore(dataSource);log.info("Create TokenStore :: " + tokenStore);return tokenStore;}@Overridepublic void configure(ResourceServerSecurityConfigurer resources) throws Exception {resources.resourceId("product_api").tokenStore(tokenStore());}@Overridepublic void configure(HttpSecurity http) throws Exception {http.authorizeRequests().antMatchers(HttpMethod.GET, "/product/read").access("#oauth2.hasScope('read')").antMatchers(HttpMethod.POST, "/product/write").access("#oauth2.hasScope('write')").and().headers().addHeaderWriter((request, response) -> {response.addHeader("Access-Control-Allow-Origin", "*");if (request.getMethod().equals("OPTIONS")) {response.setHeader("Access-Control-Allow-Methods", request.getHeader("Access-Control-Request-Method"));response.setHeader("Access-Control-Allow-Headers", request.getHeader("Access-Control-Request-Headers"));}});}
}
在这个config中,我们需要通过DataSource去配置TokenStore,因为资源服务器需要去校验这个Token是否有效。然后在HttpSecurity的configure方法中,我们配置了资源的访问权限(比如token的scope有read才能GET访问”/product/read“)。
package com.scb.oauth2resourceserver.controller;import org.springframework.web.bind.annotation.GetMapping;
import org.springframework.web.bind.annotation.PostMapping;
import org.springframework.web.bind.annotation.RequestMapping;
import org.springframework.web.bind.annotation.RestController;@RestController
@RequestMapping("/product")
public class ProductController {@GetMapping("/read")public String getProduct(){return "[product] id = 1, name = test";}@PostMapping("/write")public String createProduct(){return "create product";}
}
控制层这里只是返回String来模拟查询数据库的过程。
二、oauth_client模块

oauth2-authentication-server 模块和oauth2-resource-server 模块其实是同一个系统,而oauth-client算是第三方系统。
<?xml version="1.0" encoding="UTF-8"?>
<project xmlns="http://maven.apache.org/POM/4.0.0" xmlns:xsi="http://www.w3.org/2001/XMLSchema-instance"xsi:schemaLocation="http://maven.apache.org/POM/4.0.0 http://maven.apache.org/xsd/maven-4.0.0.xsd"><modelVersion>4.0.0</modelVersion><parent><groupId>com.scb</groupId><artifactId>oauth2-demo</artifactId><version>0.0.1-SNAPSHOT</version><relativePath/> <!-- lookup parent from repository --></parent><artifactId>oauth-client</artifactId><version>0.0.1-SNAPSHOT</version><name>oauth-client</name><description>Demo project for Spring Boot</description><properties><java.version>1.8</java.version></properties><dependencies><dependency><groupId>org.springframework.boot</groupId><artifactId>spring-boot-starter-security</artifactId></dependency><dependency><groupId>org.springframework.boot</groupId><artifactId>spring-boot-starter-web</artifactId></dependency><dependency><groupId>org.springframework.boot</groupId><artifactId>spring-boot-starter-thymeleaf</artifactId></dependency><dependency><groupId>org.springframework.security.oauth</groupId><artifactId>spring-security-oauth2</artifactId><version>2.3.4.RELEASE</version></dependency><dependency><groupId>org.springframework.security</groupId><artifactId>spring-security-test</artifactId><scope>test</scope></dependency></dependencies><build><plugins><plugin><groupId>org.springframework.boot</groupId><artifactId>spring-boot-maven-plugin</artifactId></plugin></plugins></build></project>
server:port: 7001
spring:resources:static-locations: classpath:/templates/,classpath:/static/thymeleaf:prefix: classpath:/templates/suffix: .htmlmode: HTML5servlet:content-type: text/htmlcache: false
oauth_client这个第三方系统有自己的认证系统:
package com.scb.oauthclient.config;import org.springframework.beans.factory.annotation.Autowired;
import org.springframework.context.annotation.Bean;
import org.springframework.context.annotation.Configuration;
import org.springframework.security.config.annotation.authentication.builders.AuthenticationManagerBuilder;
import org.springframework.security.config.annotation.web.configuration.EnableWebSecurity;
import org.springframework.security.config.annotation.web.configuration.WebSecurityConfigurerAdapter;
import org.springframework.security.crypto.bcrypt.BCryptPasswordEncoder;
import org.springframework.security.crypto.password.PasswordEncoder;@Configuration
@EnableWebSecurity
public class SecurityConfig extends WebSecurityConfigurerAdapter {@Beanpublic PasswordEncoder passwordEncoder(){return new BCryptPasswordEncoder();}@Autowiredprivate PasswordEncoder passwordEncoder;@Overrideprotected void configure(AuthenticationManagerBuilder auth) throws Exception {auth.inMemoryAuthentication().withUser("user").password(passwordEncoder.encode("user")).roles("USER");}
}
这里我们采用inMemoryAuthentication来存储一个用户user。
package com.scb.oauthclient.controller;import org.springframework.stereotype.Controller;
import org.springframework.web.bind.annotation.GetMapping;
import org.springframework.web.bind.annotation.RequestMapping;
import org.springframework.web.bind.annotation.RequestParam;
import org.springframework.web.bind.annotation.ResponseBody;
import org.springframework.web.servlet.ModelAndView;import lombok.extern.slf4j.Slf4j;@Slf4j
@Controller
@RequestMapping("/oauth2")
public class OAuth2Controller {private final String CLIENT_ID="curl_client";private final String CLIENT_SECRET="password";private final String GRANT_TYPE="client_credentials";private final String URL="http://localhost:8080/oauth/token";@GetMapping("/client_credentials")public ModelAndView toClientCredentialsPage(){ModelAndView mv = new ModelAndView();mv.setViewName("client_credentials.html");StringBuilder builder = new StringBuilder();builder.append(URL);builder.append("?grant_type="+GRANT_TYPE);builder.append("&client_id="+CLIENT_ID);builder.append(("&client_secret="+CLIENT_SECRET));log.info("URL :: "+builder.toString());mv.addObject("url",builder.toString());return mv;}@GetMapping("/authorization_code")public ModelAndView toAuthorizationCodePage(){ModelAndView mv = new ModelAndView();mv.setViewName("authorization_code.html");String url = "http://localhost:8080/oauth/authorize";String clientId = "client_code";String responseType="code";String redirectUri = "http://localhost:7001/oauth2/code";mv.addObject("url",url);mv.addObject("client_id",clientId);mv.addObject("response_type",responseType);mv.addObject("redirect_uri",redirectUri);return mv;}@GetMapping("/code")@ResponseBodypublic String getAuthCode(@RequestParam("code") String code){log.info(code);return code;}
}
控制层这里采用了比较简单的方式将重定向的URL传给Thymeleaf View。
三、源码级讲解OAuth2认证流程
到这里,我们先把各模块缕一缕:
- oauth2-authentication-server模块:作为认证授权中心,端口8080,用户如下:
| 用户名 | 密码 | 权限 |
| oauth_admin | password | ROLE_OAUTH_ADMIN |
| resource_admin | password | ROLE_RESOURCE_ADMIN |
| product_admin | password | ROLE_PRODUCT_ADMIN |
- oauth2-resource-server模块:作为资源服务器,端口8090
- oauth2-client模块:作为第三方系统,端口7001,用户==》username:user,password:user,role:user
1、Authorization Code Grant
运行这三个项目,首先访问client:localhost:7001,可以看到被重定向到登录界面

输入用户名(user)和密码(user)后,可以看到404,因为我们没有根目录 :)

我们输入http://localhost:7001/oauth2/authorization_code

这个界面html如下:
<!DOCTYPE html>
<html lang="en" xmlns="http://www.w3.org/1999/xhtml" xmlns:th="http://www.thymeleaf.org">
<head><meta http-equiv="Content-Type" content="text/html; charset=UTF-8"/><title>Title</title>
</head>
<body><form th:action="${url}" method="get"><input type="hidden" name="client_id" th:value="${client_id}"><input type="hidden" name="response_type" th:value="${response_type}"><input type="hidden" name="redirect_uri" th:value="${redirect_uri}"><button type="submit">authorization_code模式</button></form>
</body>
</html>
经过解析后:
<!DOCTYPE html>
<html lang="en" xmlns="http://www.w3.org/1999/xhtml">
<head><meta http-equiv="Content-Type" content="text/html; charset=UTF-8"/><title>Title</title>
</head>
<body><form action="http://localhost:8080/oauth/authorize" method="get"><input type="hidden" name="client_id" value="client_code"><input type="hidden" name="response_type" value="code"><input type="hidden" name="redirect_uri" value="http://localhost:7001/oauth2/code"><button type="submit">authorization_code模式</button></form>
</body>
</html>可以看到这个按钮是往认证服务器的“/oauth/authorize”端点发请求的,还记得我们上节所讲的这个端点的作用吗?(/oauth/authorize:授权端点,用于grant_type为Authorization Code时,获取授权码。)然后参数需要带上client_id、response_type和重定向URL。
然后我们点击这个按钮,可以看到:

网页被重定向到认证服务器的登录界面了。这跟我们上次举得例子很像(网易云音乐第三方登录功能,用户使用QQ登录,被重定向到QQ的登录界面,然后选择是否授权。)我们使用oauth_admin用户登录。

可以看到这里是先进行SpringSecurity认证,进入了UsernamePasswordAuthenticationFilter。
然后是JdbcUserDetailsService来进行认证,这都是SpringSecurity的认证流程。见:Spring Security 认证流程详解

当认证走完后,我们终于进入了这次的目的地:/oauth/authorize

AuthorizationEndpoint端点负责处理/oauth/authorize请求,需要认证client_id。认证成功后将重定向到redirect_url
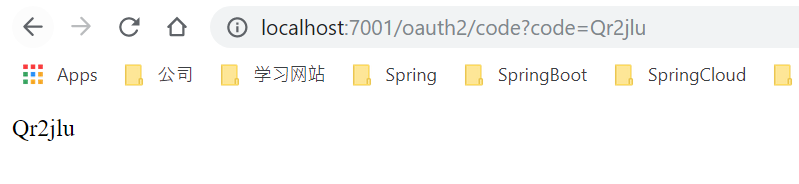
OK,到这里我们已经成功拿到了Authorization Code。剩下的就是通过Authorization Code去获取Access Token。

这里就直接使用postman发送请求去获取Token了(在实际中第三方获取到code后会在后台在发送一个请求去获取token)。需要注意的是通过授权码获取Token需要带上client_id和client_secret,然后redirect_url是第一次获取授权码的URL。TokenEndpoint会处理“/oauth/token”请求,去校验client_id和client_secret认证是否成功,还有code、redirect_url是否正确。
2、Client Credentials Grant
访问http://localhost:7001/oauth2/client_credentials
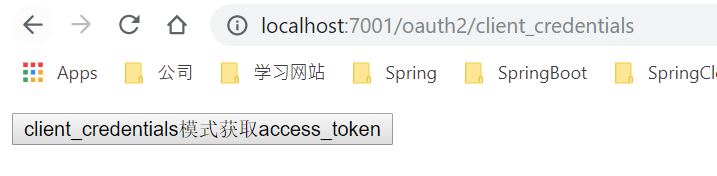
HTML代码如下:
<!DOCTYPE html>
<html lang="en" xmlns="http://www.w3.org/1999/xhtml" xmlns:th="http://www.thymeleaf.org">
<head><meta http-equiv="Content-Type" content="text/html; charset=UTF-8"/><title>Title</title>
</head>
<body><form th:action="${url}" method="post"><button type="submit">client_credentials模式获取access_token</button></form>
</body>
</html>
这里的URL是http://localhost:8080/oauth/token?grant_type=client_credentials&client_id=curl_client&client_secret=password

点击后,TokenEndpoint将会进行处理。

扩展
spring-security-oauth2-client是一个更好的获取Token的jar包 <dependency><groupId>org.springframework.security</groupId><artifactId>spring-security-oauth2-client</artifactId></dependency>我们可以通过以下配置以Client Credentials Grant获取Token
spring: security:oauth2:client:registration:cdd-alert:authorization-grant-type: client_credentialsclient-id: alert-generatorscope: alertclient-secret: secretprovider:cdd-alert:token-uri: http://localhost:8082/oauth/token更多见官方文档:OAuth2
获取到access token后,我们就可以使用access token去访问资源服务器上面的资源了。

其他:oauth2-authentication-server 界面

在这个界面我们可以看到approval和ClientDetails信息。
后记
到这里一个完整的spring-security-oauth2入门例子就演示完毕了。项目完整代码我稍后会上传到GitHub。(其实这个二次开发我觉得挺混乱的,之后有空我在完整实现下)
下载项目:https://download.csdn.net/download/qq_37771475/12054521