交换基础:(一)
一.实验要求:
1、R1为ISP,只能配置ip地址
2、内网ip–172.16.0.0/16
3、VTP/DTP均使用
4、PC用dhcp ip地址
5、nat均使用
6、PC均可访问ISP,不同vlan的PC和PC可互访
二.所用软件:Cisco Packet Tracer 6.1iv
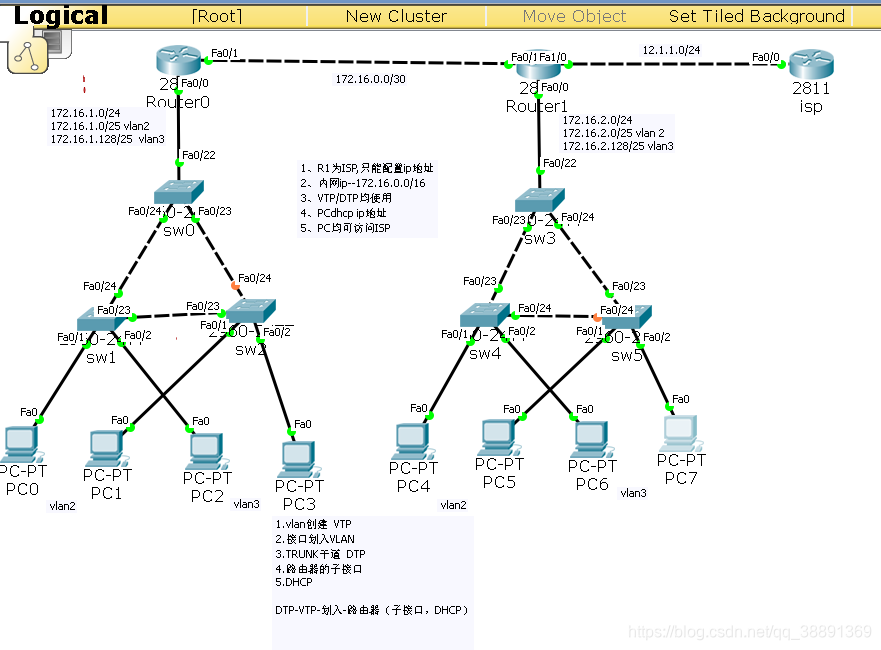
三.实验拓扑

四.配置过程
1):地址规划
2):思路步骤
1.TRUNK干道 DTP
2.vlan创建 VTP
3.接口划入VLAN
4.路由器的子接口
5.DHCP
6.路由配置
7.NAT
DTP-VTP-划入-路由器(子接口,DHCP)
1.TRUNK干道 DTP
交换机SW0需要对f0/22-24口 TRUNK
sw0(config)#interface range fastEthernet 0/22-24
sw0(config-if-range)#switchport mode trunk
对SW1的23口用DTP(动态trunk协议),和其他交换机协商为trunk干道
sw1(config)#interface range fastEthernet 0/23
sw1(config-if-range)#switchport mode ?
access Set trunking mode to ACCESS unconditionally
dynamic Set trunking mode to dynamically negotiate access or trunk mode
trunk Set trunking mode to TRUNK unconditionally
sw1(config-if-range)#switchport mode dynamic desirable
查看DTP协商结果
sw0#show interfaces trunk
Port Mode Encapsulation Status Native vlan
Fa0/23 on 802.1q trunking 1
Fa0/24 on 802.1q trunking 1
sw1#show interfaces trunk
Port Mode Encapsulation Status Native vlan
Fa0/23 desirable n-802.1q trunking 1
Fa0/24 auto n-802.1q trunking 1
sw2#show interfaces trunk
Port Mode Encapsulation Status Native vlan
Fa0/23 auto n-802.1q trunking 1
Fa0/24 auto n-802.1q trunking 1
注释:
被动—被动 不能形成trunk干道
主动–被动 形成
主动–主动 形成
以上所有模式同access接口相遇,必然不能形成
Switch#show interfaces trunk
为避免PC与交换机建立成为trunk干道,出现网络安全风险;建议所有连接PC
或预留的接口全部定义为access模式;
2.vlan创建 VTP
sw0(config)#vtp ?
domain Set the name of the VTP administrative domain.
mode Configure VTP device mode
password Set the password for the VTP administrative domain
version Set the adminstrative domain to VTP version
sw0(config)#vtp domain ccna
sw0(config)#vtp mode server
sw0(config)#vtp password cisco
sw0(config)#vlan 2
sw0(config-vlan)#name a
sw0(config-vlan)#vlan 3
sw0(config-vlan)#name b
sw1(config)#vtp domain ccna
sw1(config)#vtp password cisco
sw1(config)#vtp mode client (注释:接入层交换机 三层架构)
sw2(config)#vtp domain ccna
sw2(config)#vtp password cisco
sw2(config)#vtp mode client
此时sw0中的vlan信息同步到sw1 和sw2中
3.接口划入VLAN
sw1(config)#interface fastEthernet 0/1
sw1(config-if)#switchport access vlan 2
sw1(config)#interface fastEthernet 0/2
sw1(config-if)#switchport access vlan 3
sw1(config)#interface range fastEthernet 0/1-2
sw1(config-if-range)#switchport mode access
sw2(config)#interface fastEthernet 0/1
sw2(config-if)#switchport access vlan 2
sw2(config)#interface fastEthernet 0/2
sw2(config-if)#switchport access vlan 3
sw2(config)#interface range fastEthernet 0/1-2
sw2(config-if-range)#switchport mode access
VTP的同步条件: (只同步vlan信息)
1、版本相同
2、Domain相同
3、Password相同
4、配置版本号高同步低的
5、非透明模式
注释:
1.vtp的默认版本为2 共有三个版本 默认工作模式是Server
2.vtp作用:统一分发管理vlan的信息;在同一个交换网络内,在一台交换机上创建、修改、删除vlan信息后,其他交换机可以自动同步、学习;前提交换机间必须为trunk干道,因为同步信息为交换机上的vlan.dat文档----周期+触发 ;该信息只能基于trunk干道中的native vlan传输;
注:此时的sw3和sw0的配置一样 ,sw4和sw1的配置一样 , sw5和sw2的配置一样,这里就不一 一讲解。
4.路由器的子接口
R0(config)#interface fastEthernet 0/0
R0(config-if)#no shutdown 此时的f0/0口实际上成为一个物理通道,以后所有相关配置均在子接口上,包括以后的NAT也要在子接口上启用。
R0(config)#interface fastEthernet 0/0.1
R0(config-subif)#encapsulation dot1Q 2 (注释:802.1Q封装 应为二层SW0也为802.1Q封装)
R0(config-subif)#ip address 172.16.1.1 255.255.255.128 (注释:1.1为网关)
R0(config)#interface fastEthernet 0/0.2
R0(config-subif)#encapsulation dot1Q 3
R0(config-subif)#ip address 172.16.1.129 255.255.255.128
R1(config)#interface fastEthernet 0/0
R1(config-if)#no shutdown
R1(config)#interface fastEthernet 0/0.1
R1(config-subif)#encapsulation dot1Q 2
R1(config-subif)#ip address 172.16.2.1 255.255.255.128
R1(config)#interface fastEthernet 0/0.2
R1(config-subif)#encapsulation dot1Q 3
R1(config-subif)#ip address 172.16.2.129 255.255.255.128
5.DHCP
R0(config)#ip dhcp excluded-address 172.16.1.2 172.16.1.10 (注释:自己单加的vlan2的排除地址范围)
R0(config)#ip dhcp excluded-address 172.16.1.130 172.16.1.140 (注释:vlan3地址排除范围)
R0(dhcp-config)#?
default-router Default routers
dns-server Set name server
exit Exit from DHCP pool configuration mode
network Network number and mask
no Negate a command or set its defaults
option Raw DHCP options
R0(config)#ip dhcp pool vlan2
R0(dhcp-config)#default-router 171.16.1.1
R0(dhcp-config)#network 172.16.1.0 255.255.255.128
R0(dhcp-config)#dns-server 8.8.8.8
R0(config)#ip dhcp pool vlan3
R0(dhcp-config)#network 172.16.1.128 255.255.255.128
R0(dhcp-config)#default-router 172.16.1.129
R0(dhcp-config)#dns-server 8.8.8.8
R1(config)#ip dhcp excluded-address 172.16.2.2 172.16.2.10
R1(config)#ip dhcp excluded-address 172.16.2.130 172.16.2.140
R1(config)#ip dhcp pool vlan2
R1(dhcp-config)#network 172.16.2.0 255.255.255.128
R1(dhcp-config)#default-router 172.16.2.1
R1(dhcp-config)#dns-server 8.8.8.8
R1(config)#ip dhcp pool vlan3
R1(dhcp-config)#network 172.16.2.128 255.255.255.128
R1(dhcp-config)#default-router 172.16.2.129
R1(dhcp-config)#dns-server 8.8.8.8
6.路由配置
R0(config)#interface fastEthernet 0/1
R0(config-if)#ip address 172.16.0.1 255.255.255.252
R0(config-if)#no shutdown
R0(config)#ip route 0.0.0.0 0.0.0.0 172.16.0.2
R1(config)#interface fastEthernet 0/1
R1(config-if)#ip address 172.16.0.2 255.255.255.252
R1(config-if)#no shutdown
R1(config)#interface fastEthernet 1/0
R1(config-if)#ip address 12.1.1.1 255.255.255.0
R1(config-if)#no shutdown
R1(config)#ip route 0.0.0.0 0.0.0.0 12.1.1.2
R1(config)#ip route 172.16.1.0 255.255.255.0 172.16.0.1
ISP(config)#interface fastEthernet 0/0
ISP(config-if)#ip address 12.1.1.2 255.255.255.0
ISP(config-if)#no shutdown
ISP(config)#interface loopback 0
ISP(config-if)#ip address 1.1.1.1 255.255.255.0
7.NAT
R1(config)#ip nat inside source list 1 interface FastEthernet1/0 overload
R1(config)#interface fastEthernet 1/0
R1(config-if)# ip nat outside
R1(config)#interface fastEthernet 0/1
R1(config-if)#ip nat inside
R1(config)#interface fastEthernet 0/0.1
R1(config-subif)#ip nat inside
R1(config)#interface fastEthernet 0/0.2
R1(config-subif)#ip nat inside
R1(config)#access-list 1 permit 172.16.0.0 0.0.255.255
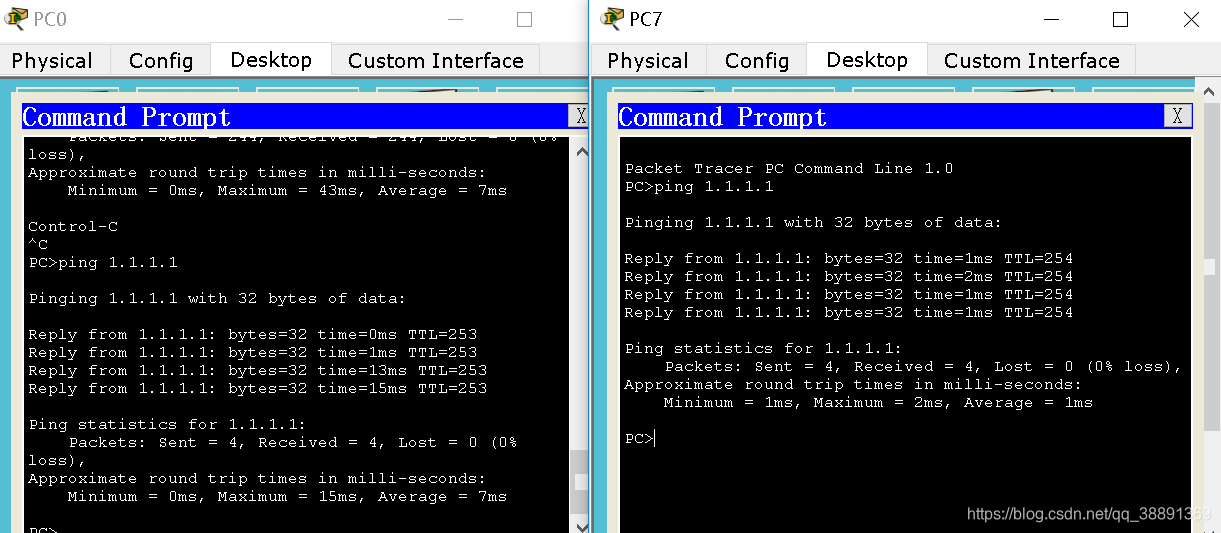
结果:
10台PC均可访问ISP,这里不一 一列出
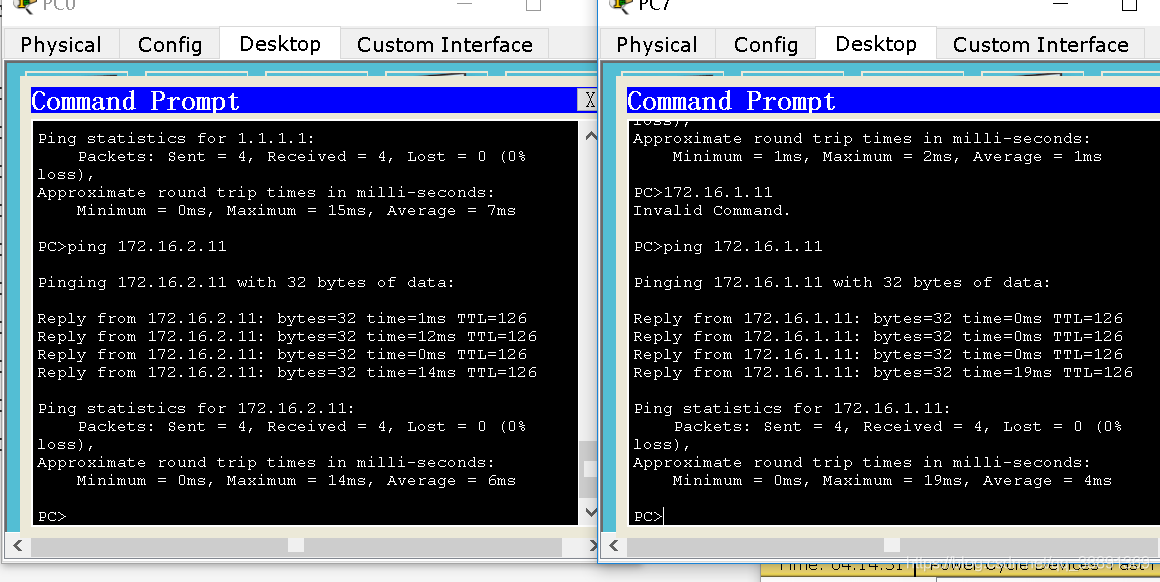
PC互访 10台不一 一列出
最后拓扑图
**
如果觉得不错麻烦点赞并关注,谢谢各位大佬能看,有什么不足之处还望指出或提问,共同进步
**