文章目录
- 前言
- 一、cron表达式
- 二、注解配置
-
- 1.Scheduled
- 2.使用注解实现定时任务
- 三、xml配置实现
-
- 1.线程池配置
- 2.任务配置
- 3.引入外部xml
- 总结
前言
项目常常用到定时任务,在某个特定的时间,程序会自主触发去执行一些机械重复的工作,例如定时发送邮件、定时释放数据库资源、定时票据核销等。
一、cron表达式
了解cron表达式
对于cron表达式,其结构是: 从左到右(用空格隔开):秒 分 小时 月份中的日期 月份 星期中的日期 年份
二、注解配置
1.Scheduled
1.@Scheduled(cron = “0 10 * * * ?”)
cron表达式就不多说了
2.@Scheduled(fixedDelay = 10000)
fixedDelay 的执行规则是上一个任务结束后到下个任务开始的间隔时间为设定时间,单位是毫秒(例:@Scheduled(fixedDelay = 10000)代表间隔10秒执行一次)
3.@Scheduled(fixedRate= 10000)
fixedRate表示上个任务开始到下个任务开始之间的间隔时间,单位也是毫秒。
4.@Scheduled(initialDelay= 10000)
这个代表第一次运行前延迟一段时间后执行,单位也是毫秒
2.使用注解实现定时任务
首先,启动类上加上@EnableScheduling
新建定时任务测试类:
@Component
@Slf4j
public class TaskDemo {
    @Scheduled(cron = "*/1 * * * * ?")public void task1() {
    log.info("task1:每1秒执行一次 " +new SimpleDateFormat("yyyy-MM-dd HH:mm:ss").format(new Date()));}@Scheduled(cron = "*/2 * * * * ?")public void task2() {
    try {
    log.info("task2:每2秒执行一次 " +new SimpleDateFormat("yyyy-MM-dd HH:mm:ss").format(new Date()));Thread.sleep(2000);} catch (InterruptedException e) {
    e.printStackTrace();}}
}
执行程序:
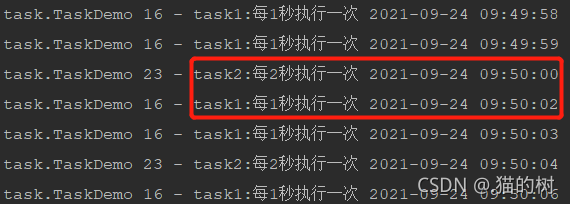
当有多个方法使用@Scheduled注解时,就会创建多个定时任务到任务列表中,当其中一个任务没执行完时,其它任务在阻塞队列当中等待,因此,所有的任务都是按照顺序执行的。
这时需要用到@Async实现多线程
@Component
@Slf4j
@EnableAsync
public class TaskDemo {
    @Async@Scheduled(cron = "*/1 * * * * ?")public void task1() {
    log.info("task1:每1秒执行一次 " +new SimpleDateFormat("yyyy-MM-dd HH:mm:ss").format(new Date()));}@Async@Scheduled(cron = "*/2 * * * * ?")public void task2() {
    try {
    log.info("task2:每2秒执行一次 " +new SimpleDateFormat("yyyy-MM-dd HH:mm:ss").format(new Date()));Thread.sleep(2000);} catch (InterruptedException e) {
    e.printStackTrace();}}
}
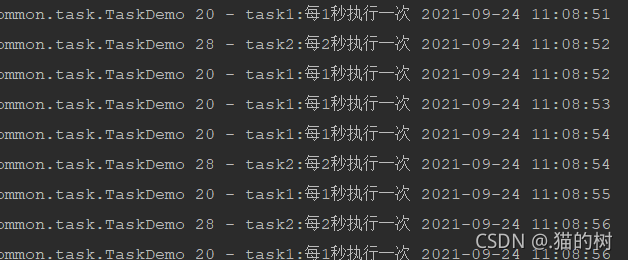
运行结果:
三、xml配置实现
1.线程池配置
新建springmvc-servlet.xml进行配置
<!-- 线程池 -->
<bean id="taskExecutor" class="org.springframework.scheduling.concurrent.ThreadPoolTaskExecutor"><!-- 核心线程数 -->	 <property name="corePoolSize" value="5" /><!-- 最大线程数 -->  <property name="maxPoolSize" value="50" /><!-- 队列最大长度 --><property name="queueCapacity" value="1000" /><!-- 线程池维护线程所允许的空闲时间,默认为60s --><property name="keepAliveSeconds" value="60" />
</bean>
2.任务配置
spring中使用task:annotation-driven标签作为定时器的启动开关,自动扫描程序中带注解的定时器。
<!-- 任务调度器线程数量 -->
<task:scheduler id="scheduler" pool-size="5"/>
<task:annotation-driven scheduler="scheduler" executor="taskExecutor" proxy-target-class="true"/>
<task:scheduled-tasks scheduler="scheduler"><task:scheduled ref="taskDemo" method="task1" cron="*/1 * * * * ?"/><task:scheduled ref="taskDemo" method="task2" cron="*/2 * * * * ?"/>
</task:scheduled-tasks>
3.引入外部xml
贴出完整的xml
<?xml version="1.0" encoding="UTF-8"?>
<beans xmlns="http://www.springframework.org/schema/beans"xmlns:xsi="http://www.w3.org/2001/XMLSchema-instance"xmlns:task="http://www.springframework.org/schema/task"xmlns:context="http://www.springframework.org/schema/context"xsi:schemaLocation="http://www.springframework.org/schema/beanshttp://www.springframework.org/schema/beans/spring-beans-3.2.xsdhttp://www.springframework.org/schema/taskhttp://www.springframework.org/schema/task/spring-task-4.1.xsdhttp://www.springframework.org/schema/contexthttp://www.springframework.org/schema/context/spring-context-3.2.xsd"><context:component-scan base-package="com.local.dev.root.devroot.common.task"/>
<!-- <bean id="taskDemo" class="com.local.dev.root.devroot.common.task.TaskDemo"></bean>--><!-- 线程池 --><bean id="taskExecutor" class="org.springframework.scheduling.concurrent.ThreadPoolTaskExecutor"><!-- 核心线程数 --><property name="corePoolSize" value="5"/><!-- 最大线程数 --><property name="maxPoolSize" value="50"/><!-- 队列最大长度 --><property name="queueCapacity" value="1000"/><!-- 线程池维护线程所允许的空闲时间,默认为60s --><property name="keepAliveSeconds" value="60"/></bean><!-- 配置任务线性池 --><!-- 任务执行器线程数量 --><!--<task:executor id="executor" pool-size="3" />--><!-- 任务调度器线程数量 --><task:scheduler id="scheduler" pool-size="5"/><task:annotation-driven scheduler="scheduler" executor="taskExecutor" proxy-target-class="true"/><task:scheduled-tasks scheduler="scheduler"><task:scheduled ref="taskDemo" method="task1" cron="*/1 * * * * ?"/><task:scheduled ref="taskDemo" method="task2" cron="*/2 * * * * ?"/></task:scheduled-tasks></beans>在启动类加上@ImportResource("classpath:spring-servlet.xml")
执行程序:

总结
以上就是今天要讲的内容,本文仅仅简单介绍了定时器的使用,注解实现很简单,但是项目中推荐使用xml配置的方式。
配置参考
? 上一章:SpringBoot ―― 实现邮件、短信的发送功能
? 下一章:SpringBoot ――统一异常处理