语义分割代码集锦
这里提供一个集锦的仓库地址:
https://github.com/GeorgeSeif/Semantic-Segmentation-Suite
其实实验了很久还是推荐大家使用专门的语义分割网络,去github上找星星多的,这个星星也超多,不过我在实验的时候还是发现一些坑的。
最开始跑的是deeplabv3的模型,小结一下使用过程:
首先本地建一个仓库 使用命令:
git clone https://github.com/GeorgeSeif/Semantic-Segmentation-Suite.git
大约3个G的文件,因为里面有数据集会比较大,等待下载完毕后就是按照README中步骤:
1、环境准备:
numpy: sudo pip install numpy
OpenCV Python:sudo apt-get install python-opencv、pip install opencv-python
TensorFlow: sudo pip install --upgrade tensorflow-gpu
这里有评论说这个命令并没有更新tf的gpu版本,其实大家在安装TensorFlow的时候都有安装对应的cuda和gpu版本吧,如果没有的话,就在安装命令后面添加“=1.9”类似的命令及想要更新的确定版本。
如果没有tf-gpu的话,训练是用cpu跑的,速度非常慢,所以建议大家都用gpu喔,还有这个模型貌似不支持多gpu训练,反正我用的是单gpu训练的。
2、代码仓库提供了数据集CamVid,如果需要训练自己的数据集就需要新建一个数据集文件,文件的目录形式如下:
├── “dataset_name”
| ├── train
| ├── train_labels
| ├── val
| ├── val_labels
| ├── test
| ├── test_labels
分别放好对应的训练、验证、测试集图像和label即可,格式jpg、png等都可以,但是要统一起来
3、在上述dataset文件下新建一个.csv文件,内容是语义分割目标的所有类别,和相应的用来表示的rgb值
name,r,g,b
Animal,64,128,64
Archway,192,0,128
Bicyclist,0,128, 192
Bridge,0, 128, 64
Building,128, 0, 0
Car,64, 0, 128
CartLuggagePram,64, 0, 192
Child,192, 128, 64
Column_Pole,192, 192, 128
Fence,64, 64, 128
LaneMkgsDriv,128, 0, 192
LaneMkgsNonDriv,192, 0, 64
Misc_Text,128, 128, 64
MotorcycleScooter,192, 0, 192
OtherMoving,128, 64, 64
ParkingBlock,64, 192, 128
Pedestrian,64, 64, 0
Road,128, 64, 128
RoadShoulder,128, 128, 192
Sidewalk,0, 0, 192
SignSymbol,192, 128, 128
Sky,128, 128, 128
SUVPickupTruck,64, 128,192
TrafficCone,0, 0, 64
TrafficLight,0, 64, 64
Train,192, 64, 128
Tree,128, 128, 0
Truck_Bus,192, 128, 192
Tunnel,64, 0, 64
VegetationMisc,192, 192, 0
Void,0, 0, 0
Wall,64, 192, 0
我们的数据集做人像分割所以是一个二分类问题修改class_dict.csv为如下即可:
name, r, g, b
Human, 255,255,255
void, 0,0,0
按照需要的类别自行设计
4、下面准备预训练模型
可用的前端网络Frontends有:MobileNetV2, ResNet50/101/152, and InceptionV4,在运行train.py时会根据参数设定,自动下载设定的Frontends,但是有个问题是网络原因下载很慢,偶尔连接断了的话程序会异常中断,可以在utils/get_pretrained_checkpoints.py中找自己需要模型的URL,自行下载。将下载好的模型放在models中。
5、下面是运行train.py的参数
[-h] [--num_epochs NUM_EPOCHS][--checkpoint_step CHECKPOINT_STEP][--validation_step VALIDATION_STEP] [--image IMAGE][--continue_training CONTINUE_TRAINING] [--dataset DATASET][--crop_height CROP_HEIGHT] [--crop_width CROP_WIDTH][--batch_size BATCH_SIZE] [--num_val_images NUM_VAL_IMAGES][--h_flip H_FLIP] [--v_flip V_FLIP] [--brightness BRIGHTNESS][--rotation ROTATION] [--model MODEL] [--frontend FRONTEND]
optional arguments:
-h, --help
show this help message and exit
–num_epochs NUM_EPOCHS
Number of epochs to train for
–checkpoint_step CHECKPOINT_STEP
How often to save checkpoints (epochs)
–validation_step VALIDATION_STEP
How often to perform validation (epochs)
–image IMAGE
The image you want to predict on. Only valid in “predict” mode.
–continue_training CONTINUE_TRAINING
Whether to continue training from a checkpoint
–dataset DATASET Dataset you are using.
–crop_height CROP_HEIGHT
Height of cropped input image to network
–crop_width CROP_WIDTH
Width of cropped input image to network
–batch_size BATCH_SIZE
Number of images in each batch
–num_val_images NUM_VAL_IMAGES
The number of images to used for validations
–h_flip H_FLIP
Whether to randomly flip the image horizontally for data augmentation
–v_flip V_FLIP
Whether to randomly flip the image vertically for data augmentation
–brightness BRIGHTNESS
Whether to randomly change the image brightness for data augmentation. Specifies the max bightness change as a factor between 0.0 and 1.0. For example, 0.1 represents a max brightness change of 10% (±).
–rotation ROTATION
Whether to randomly rotate the image for data augmentation. Specifies the max rotation angle in degrees.
–model MODEL
The model you are using. See model_builder.py for supported models
–frontend FRONTEND
The frontend you are using. See frontend_builder.py for supported models
这里是 我的训练参数: 给大家做个样例
python train.py --num_epochs 30 --checkpoint_step 6 --validation_step 1 --dataset dataset --crop_width 512 --crop_height 512 --batch_size 1 --num_val_images 700 --h_flip 1 --v_flip 0 --model DeepLabV3 --frontend ResNet101
根据需要可自行更改
6、代码的一些坑,目前遇到的不多,这里小结一下:
1)、文件夹utils里存放utils.py,train.py中导入utils文件夹中的utils.py和helpers.py时用from utils import utils,helpers,这里注意一下,程序会不晓得到底是utils还是utils.py的;哪里报错改一下就好了
2)、如果没有用命令sudo pip install --upgrade tensorflow-gpu更新gpu的TensorFlow版本的话,就会使用cpu进行训练。
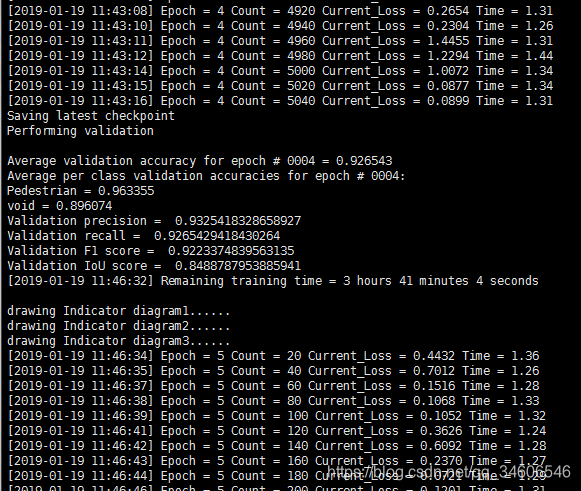
目前还在训练,deeplabv3出现了梯度爆炸
DeepLabV3的收敛速度较快,所以学习率尽量设置的小一些,默认的0.0001有点大了,设置为0.00001就ok了
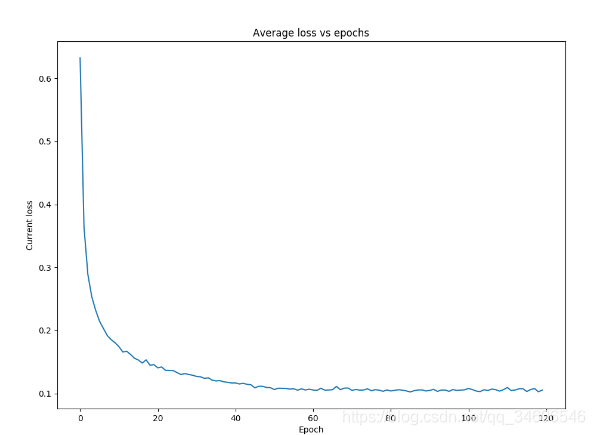
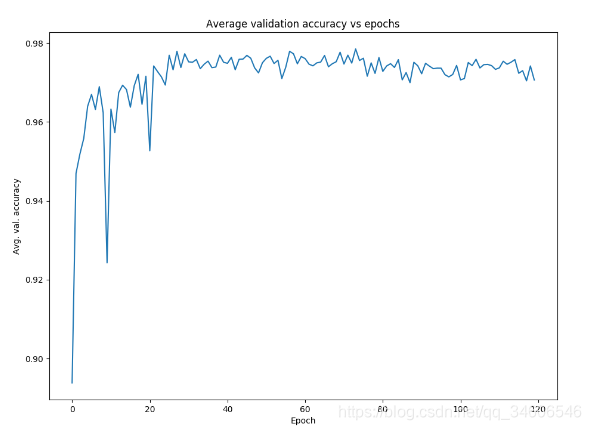
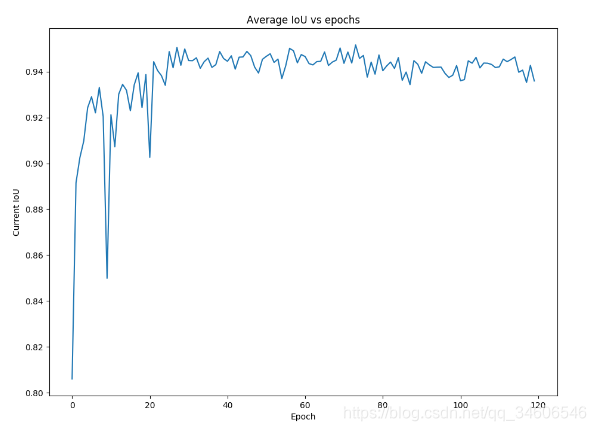
现在的训练情况:
其实到这里大家就都可以训练自己的模型了,不过在训练完后如果有更加深刻的思考就更好啦,因为我们发现这个集锦训练出来的模型在进行分割的时候即使看指标(loss、IOU、f1)等都比较不错,但是预测出的mask与label的mask在视觉上有较大的差距,其实也没有那么大啦,就是感觉效果不够理想,有些甚至还存在大量空洞的情况。
再仔细研究下代码和论文提出的模型就会发现一些猫腻,哈哈哈,这里给大家看一下代码:
1、models/GCN.py
def build_gcn(inputs, num_classes, preset_model='GCN', frontend="ResNet101", weight_decay=1e-5, is_training=True, upscaling_method="bilinear", pretrained_dir="models"):"""Builds the GCN model. Arguments:inputs: The input tensorpreset_model: Which model you want to use. Select which ResNet model to use for feature extraction num_classes: Number of classesReturns:GCN model"""logits, end_points, frontend_scope, init_fn = frontend_builder.build_frontend(inputs, frontend, pretrained_dir=pretrained_dir, is_training=is_training)res = [end_points['pool5'], end_points['pool4'],end_points['pool3'], end_points['pool2']]###size = 15?down_5 = GlobalConvBlock(res[0], n_filters=21, size=3)down_5 = BoundaryRefinementBlock(down_5, n_filters=21, kernel_size=[3, 3])down_5 = ConvUpscaleBlock(down_5, n_filters=21, kernel_size=[3, 3], scale=2)down_4 = GlobalConvBlock(res[1], n_filters=21, size=3)down_4 = BoundaryRefinementBlock(down_4, n_filters=21, kernel_size=[3, 3])down_4 = tf.add(down_4, down_5)down_4 = BoundaryRefinementBlock(down_4, n_filters=21, kernel_size=[3, 3])down_4 = ConvUpscaleBlock(down_4, n_filters=21, kernel_size=[3, 3], scale=2)down_3 = GlobalConvBlock(res[2], n_filters=21, size=3)down_3 = BoundaryRefinementBlock(down_3, n_filters=21, kernel_size=[3, 3])down_3 = tf.add(down_3, down_4)down_3 = BoundaryRefinementBlock(down_3, n_filters=21, kernel_size=[3, 3])down_3 = ConvUpscaleBlock(down_3, n_filters=21, kernel_size=[3, 3], scale=2)down_2 = GlobalConvBlock(res[3], n_filters=21, size=3)down_2 = BoundaryRefinementBlock(down_2, n_filters=21, kernel_size=[3, 3])down_2 = tf.add(down_2, down_3)down_2 = BoundaryRefinementBlock(down_2, n_filters=21, kernel_size=[3, 3])down_2 = ConvUpscaleBlock(down_2, n_filters=21, kernel_size=[3, 3], scale=2)net = BoundaryRefinementBlock(down_2, n_filters=21, kernel_size=[3, 3])net = ConvUpscaleBlock(net, n_filters=21, kernel_size=[3, 3], scale=2)net = BoundaryRefinementBlock(net, n_filters=21, kernel_size=[3, 3])net = slim.conv2d(net, num_classes, [1, 1], activation_fn=None, scope='logits')return net, init_fn
GCN论文中设计的是大卷积核,这份初始代码中竟然将GCN模块的卷积核设置成了3,很简单改成15就好啦,效果会有提升。
2、models/Bisenet.py
def build_bisenet(inputs, num_classes, preset_model='BiSeNet', frontend="ResNet101", weight_decay=1e-5, is_training=True, pretrained_dir="models"):"""Builds the BiSeNet model. Arguments:inputs: The input tensor=preset_model: Which model you want to use. Select which ResNet model to use for feature extraction num_classes: Number of classesReturns:BiSeNet model"""### The spatial path### The number of feature maps for each convolution is not specified in the paper### It was chosen here to be equal to the number of feature maps of a classification### model at each corresponding stage spatial_net = ConvBlock(inputs, n_filters=64, kernel_size=[3, 3], strides=2)spatial_net = ConvBlock(spatial_net, n_filters=128, kernel_size=[3, 3], strides=2)spatial_net = ConvBlock(spatial_net, n_filters=256, kernel_size=[3, 3], strides=2)### Context pathlogits, end_points, frontend_scope, init_fn = frontend_builder.build_frontend(inputs, frontend, pretrained_dir=pretrained_dir, is_training=is_training)##resnet101-pool4 16x应该是1024个通道吧,不过这里改成1024会报错?net_4 = AttentionRefinementModule(end_points['pool4'], n_filters=512)net_5 = AttentionRefinementModule(end_points['pool5'], n_filters=2048)global_channels = tf.reduce_mean(net_5, [1, 2], keep_dims=True)net_5_scaled = tf.multiply(global_channels, net_5)#这里跟论文不大一样,全局池化应该与net_5连接concat,这里竟然直接相乘了,我的修改是将全局池化的结果global_channels上采样到与net_5相同大小然后进行concat### Combining the pathsnet_4 = Upsampling(net_4, scale=2)net_5_scaled = Upsampling(net_5_scaled, scale=4)context_net = tf.concat([net_4, net_5_scaled], axis=-1)net = FeatureFusionModule(input_1=spatial_net, input_2=context_net, n_filters=num_classes)### Final upscaling and finishnet = Upsampling(net, scale=8)net = slim.conv2d(net, num_classes, [1, 1], activation_fn=None, scope='logits')return net, init_fn
Bisenet按照代码里我说明的修改后,效果改良不大,甚至我觉得将一个全局池化的一维向量,上采样到net_5的shape后略显粗糙了些,所以效果没有改善。
3、其他模型,总结下来,我们实验效果最好的是GCN的模型,大家有不同的实验结果可以和我发私信交流哈,因为大家训练参数各不相同嘛。为什么集锦里较为先进的模型像deeplabV3_plus效果不好呢(其实效果还可以的,训练速度相对很快),我的分析是因为deeplabV3_plus修改了backbone(resnet)中的结构,添加了空洞卷积,而这个集锦代码没有提供这样的backbone,我们只能使用固定参数的resnet-101、resnet-152等,所以效果没论文中好是理所当然的了。
大家可以通过这个集锦快速上手语义分割、然后多看看论文、多多思考,会很有帮助的这个仓库对于初学者来说很棒,真心推荐,后续更新…