概述
在微服务架构中,业务都会被拆分成一个独立的服务,服务与服务的通讯是基于 http restful 的。Spring Cloud 有两种服务调用方式,一种是 ribbon + restTemplate,另一种是 feign。
Ribbon 简介
Ribbon 是一个负载均衡客户端,可以很好的控制 http 和 top 的一些行为。
准备工作
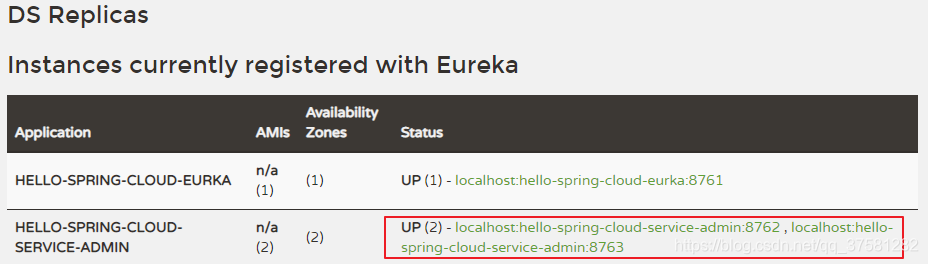
- 启动服务提供者
hello-spring-cloud-service-admin,端口号为:8762 - 修改配置文件的端口号为:
8763,启动后在 Eureka 中会注册两个实例,这相当于一个小集群
创建服务消费者
创建一个工程名为 hello-spring-cloud-web-admin-ribbon 的服务消费者项目,
pom.xml 配置如下:
<?xml version="1.0" encoding="UTF-8"?>
<project xmlns="http://maven.apache.org/POM/4.0.0" xmlns:xsi="http://www.w3.org/2001/XMLSchema-instance"xsi:schemaLocation="http://maven.apache.org/POM/4.0.0 http://maven.apache.org/xsd/maven-4.0.0.xsd"><modelVersion>4.0.0</modelVersion><parent><groupId>com.yuu</groupId><artifactId>hello-spring-cloud-dependencies</artifactId><version>1.0.0-SNAPSHOT</version><relativePath>../hello-spring-cloud-dependencies/pom.xml</relativePath></parent><artifactId>hello-spring-cloud-web-admin-ribbon</artifactId><packaging>jar</packaging><name>hello-spring-cloud-web-admin-ribbon</name><inceptionYear>2019-Now</inceptionYear><dependencies><!-- Spring Boot Begin --><dependency><groupId>org.springframework.boot</groupId><artifactId>spring-boot-starter-web</artifactId></dependency><dependency><groupId>org.springframework.boot</groupId><artifactId>spring-boot-starter-tomcat</artifactId></dependency><dependency><groupId>org.springframework.boot</groupId><artifactId>spring-boot-starter-thymeleaf</artifactId></dependency><dependency><groupId>org.springframework.boot</groupId><artifactId>spring-boot-starter-actuator</artifactId></dependency><dependency><groupId>org.springframework.boot</groupId><artifactId>spring-boot-starter-test</artifactId><scope>test</scope></dependency><!-- Spring Boot End --><!-- Spring Cloud Begin --><dependency><groupId>org.springframework.cloud</groupId><artifactId>spring-cloud-starter-netflix-eureka-server</artifactId></dependency><dependency><groupId>org.springframework.cloud</groupId><artifactId>spring-cloud-starter-netflix-ribbon</artifactId></dependency><!-- Spring Cloud End --><!-- 解决 thymeleaf 模板引擎一定要执行严格的 html5 格式校验问题 --><dependency><groupId>net.sourceforge.nekohtml</groupId><artifactId>nekohtml</artifactId></dependency></dependencies><build><plugins><plugin><groupId>org.springframework.boot</groupId><artifactId>spring-boot-maven-plugin</artifactId><configuration><mainClass>com.yuu.hello.spring.cloud.web.admin.ribbon.WebAdminRibbonApplication</mainClass></configuration></plugin></plugins></build>
</project>
主要是增加了 Ribbon 的依赖
<dependency><groupId>org.springframework.cloud</groupId><artifactId>spring-cloud-starter-netflix-ribbon</artifactId>
</dependency>
Application
通过 @EnableDiscoveryClient 注解注册到服务中心
package com.yuu.hello.spring.cloud.service.admin;import org.springframework.boot.SpringApplication;
import org.springframework.boot.autoconfigure.SpringBootApplication;
import org.springframework.cloud.netflix.eureka.EnableEurekaClient;/*** @Classname ServiceAdminApplication* @Date 2019/1/28 22:50* @Created by Yuu*/
@SpringBootApplication
@EnableEurekaClient
public class ServiceAdminApplication {public static void main(String[] args) {SpringApplication.run(ServiceAdminApplication.class, args);}
}
application.yml
设置程序端口号为:8764
spring:application:name: hello-spring-cloud-service-adminserver:port: 8763
eureka:client:servcieUrl:defaultZone: http://localhost:8761/eureka/
Configuration
配置注入 RestTemplate 的 Bean,并通过 @LoadBalanced 注解表明开启负载均衡功能
package com.yuu.hello.spring.cloud.web.admin.ribbon.config;import org.springframework.cloud.client.loadbalancer.LoadBalanced;
import org.springframework.context.annotation.Bean;
import org.springframework.context.annotation.Configuration;
import org.springframework.web.client.RestTemplate;/*** @Classname RestTemplateConfiguration* @Date 2019/1/29 0:08* @Created by Yuu*/
@Configuration
public class RestTemplateConfiguration {@Bean@LoadBalancedpublic RestTemplate restTemplate() {return new RestTemplate();}
}
创建测试用的 Service
在这里我们直接用的程序名替代了具体的 URL 地址,在 Ribbon 中它会根据服务名来选择具体的服务实例,根据服务实例在请求的时候会用具体的 URL 替换掉服务名,代码如下:
package com.yuu.hello.spring.cloud.web.admin.ribbon.service;import org.springframework.beans.factory.annotation.Autowired;
import org.springframework.stereotype.Service;
import org.springframework.web.client.RestTemplate;/*** @Classname AdminService* @Date 2019/1/29 0:09* @Created by Yuu*/
@Service
public class AdminService {@Autowiredprivate RestTemplate restTemplate;public String sayHi(String message) {return restTemplate.getForObject("http://HELLO-SPRING-CLOUD-SERVICE-ADMIN/hi?message=" + message, String.class);}
}
创建测试用的 Controller
package com.yuu.hello.spring.cloud.web.admin.ribbon.controller;import com.yuu.hello.spring.cloud.web.admin.ribbon.service.AdminService;
import org.springframework.beans.factory.annotation.Autowired;
import org.springframework.web.bind.annotation.RequestMapping;
import org.springframework.web.bind.annotation.RequestMethod;
import org.springframework.web.bind.annotation.RequestParam;
import org.springframework.web.bind.annotation.RestController;/*** @Classname AdminController* @Date 2019/1/29 0:14* @Created by Yuu*/
@RestController
public class AdminController {@Autowiredprivate AdminService adminService;@RequestMapping(value = "hi", method = RequestMethod.GET)public String sayHi(@RequestParam(value = "message") String message) {return adminService.sayHi(message);}
}
测是访问
在浏览器上多次访问 http://localhost:8764/hi?message=HelloSpringCloud
浏览器交替显示:


附
在 IDEA 中配置一个工程启动多个实例
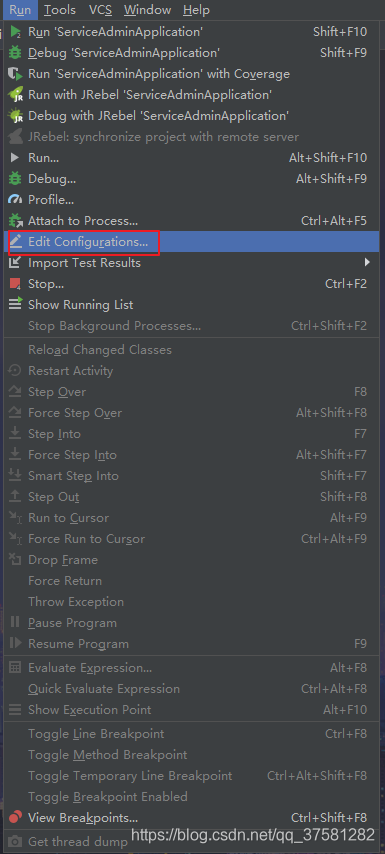
步骤一
点击 Run -> Edit Configurations...
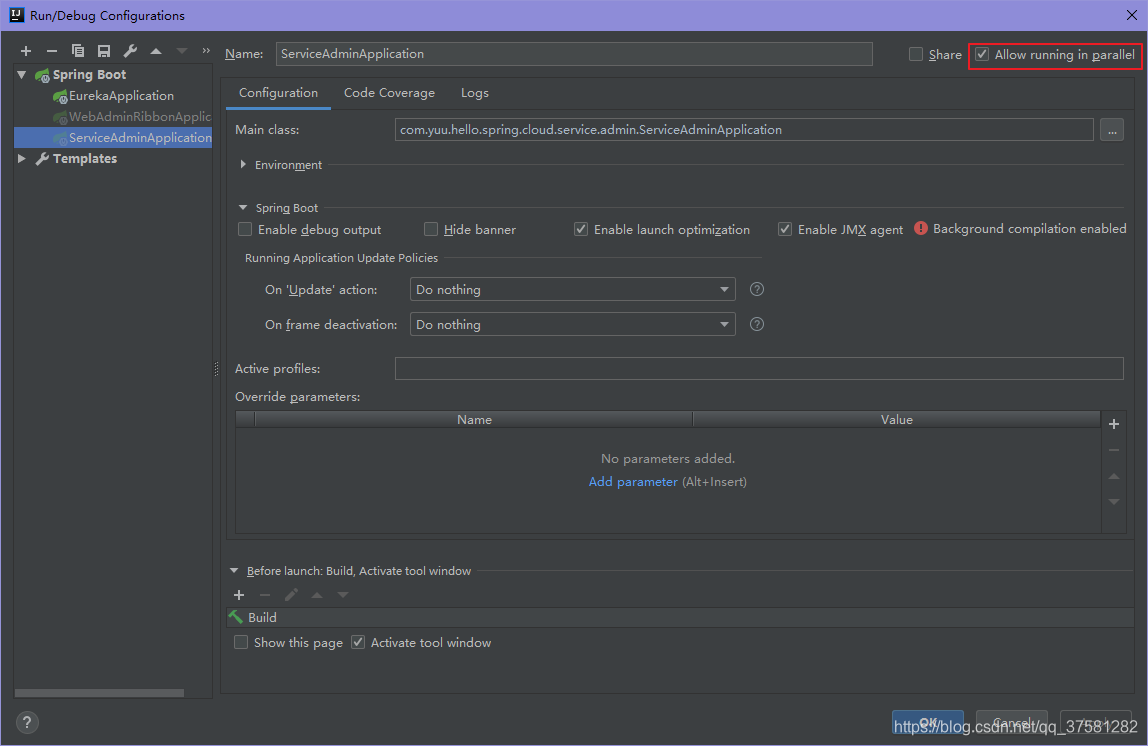
步骤二
选择需要启动多实例的项目并勾选 Allow running in parallel
步骤三
通过修改 application.yml 配置文件的 server.port 的端口,启动多个实例,需要多个端口,分别进行启动即可。