Android-гХЛЏUIадФм(4)-ЪЙгУViewStub
ViewStubИХФюЃК
ViewStubЪЧвЛИіПДВЛМћЕФЃЌЧсСПМЖЕФViewЁЃЫќУЛгаГпДчЃЌвВВЛЛсЛцжЦвдМАвдФГжжаЮЪНВЮгыЕНВМОжжаРДЁЃжЛгаЕБЕїгУСЫinflateЕФжЎКѓЦфжаЕФviewВХЛсБЛЪЕР§ЛЏЃЌ
етвтЮЖзХViewStubБЃСєViewВуДЮЕФНсЙЙЕФДњМлЪЧКмЕЭЕФ
1ЃЌбгЪБМгдиВЛГЃгУЕФUIПиМў
ЕБФГаЉПиМўжЛдкКмЖрКУЕФЧщПіЯТВХЛсЪЙгУЃЌЮвУЧПЩвдЕжгУViewStubРДбгГйМгди
вдЬсИпUIМгдиЕФЫйЖШМАМѕЩйФкДцЕФЯћКФ
ЯТУцЪЧвЛИіDemoЃК
жїActivityРрЃК
public class MainActivity extends Activity{ @Override protected void onCreate(Bundle savedInstanceState) { super.onCreate(savedInstanceState); //МгдиАДХЅВМОж setContentView(R.layout.layout_delay); //НЈСЂАДХЅЖдЯѓКЭЕуЛїЪТМў Button _button = (Button)findViewById(R.id.buttonLoad); _button.setOnClickListener(new OnClickListener() { @Override public void onClick(View arg0) { // TODO Auto-generated method stub //ЪЙЕУАДХЅВЛПЩМћ arg0.setEnabled(false); //ЕУЕНStubЖдЯѓ ViewStub _viewStub = (ViewStub)findViewById(R.id.viewStubLoad); //бЙШыЕБЧАВМОж View inflate = _viewStub.inflate(); } }); }СНИіВМОжЮФМўЃК
1ЃЌlayout_delay.xml
<?xml version="1.0" encoding="utf-8"?><LinearLayout xmlns:android="http://schemas.android.com/apk/res/android" android:layout_width="match_parent" android:layout_height="match_parent" android:orientation="vertical" > <ViewStub android:id="@+id/viewStubLoad" android:layout_width="wrap_content" android:layout_height="wrap_content" android:inflatedId="@+id/viewStub" //гІгУactivity_main.xml android:layout="@layout/activity_main"/> <Button android:id="@+id/buttonLoad" android:layout_width="wrap_content" android:layout_height="wrap_content" android:text="load" /></LinearLayout>2,activity.xml
<RelativeLayout xmlns:android="http://schemas.android.com/apk/res/android" xmlns:tools="http://schemas.android.com/tools" android:layout_width="match_parent" android:layout_height="match_parent" android:paddingBottom="@dimen/activity_vertical_margin" android:paddingLeft="@dimen/activity_horizontal_margin" android:paddingRight="@dimen/activity_horizontal_margin" android:paddingTop="@dimen/activity_vertical_margin" tools:context=".MainActivity" > <TextView android:layout_width="wrap_content" android:layout_height="wrap_content" android:text="@string/hello_world" /></RelativeLayout>НсЙћШчЯТ: 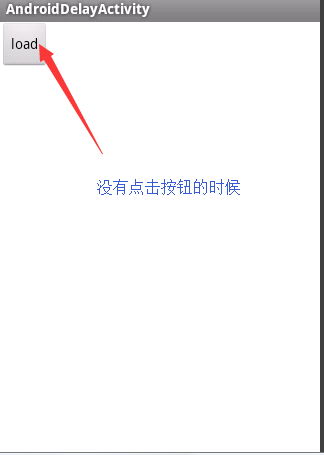

2ЃЌЬсИпИФБфВМОжЕФЫйЖШ
ашвЊЕФЪЙгУГЁОАЃКНчУцашвЊЦЕЗБЕФЧаЛЛЃЌЬсИпЧаЛЛЫйЖШ
ЪЙгУЕФЗНЗЈЃКвдЦЕЗБИФБфКсЪњЦСDemoРДНтЪЭ
1ЃЌЩшжУActivity
android:configChanged=ЁБkeyboardHidden|orientationЁБ
<activity android:name=".MyConfigureChangedActivity" android:configChanges="keyboardHidden|orientation"> <intent-filter> <action android:name="android.intent.action.MAIN" /> <category android:name="android.intent.category.LAUNCHER" /> </intent-filter> </activity>2,ЮЊКсЪњЦСБраДВЛЭЌЕФlayout
land:
<?xml version="1.0" encoding="utf-8"?><LinearLayout xmlns:android="http://schemas.android.com/apk/res/android" android:layout_width="match_parent" android:layout_height="match_parent" android:orientation="horizontal" > <TextView android:id="@+id/textViewLand" android:layout_width="wrap_content" android:layout_height="wrap_content" android:text="TextView" /> <SeekBar android:id="@+id/seekBarLand" android:layout_width="match_parent" android:layout_height="wrap_content" android:layout_weight="1" /></LinearLayout>ШчЯТЭМЃК 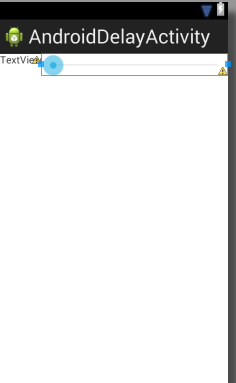
port:
<?xml version="1.0" encoding="utf-8"?><LinearLayout xmlns:android="http://schemas.android.com/apk/res/android" android:layout_width="match_parent" android:layout_height="match_parent" android:orientation="vertical" > <TextView android:id="@+id/textViewPort" android:layout_width="wrap_content" android:layout_height="wrap_content" android:text="TextViewPort" /> <SeekBar android:id="@+id/seekBarPort" android:layout_width="match_parent" android:layout_height="wrap_content" /></LinearLayout>ШчЯТЭМЃК 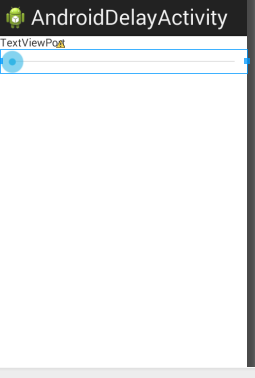
3ЃЌДДНЈвЛИіlayoutЃЌВЂЧвжЛАќКЌСНИіView StubЗжБ№ЖдгІКсЪњЦС
<?xml version="1.0" encoding="utf-8"?><LinearLayout xmlns:android="http://schemas.android.com/apk/res/android" android:layout_width="match_parent" android:layout_height="match_parent" android:orientation="vertical" > <ViewStub android:id="@+id/StubLand" android:layout_width="wrap_content" android:layout_height="wrap_content" android:inflatedId="@+id/inflateStubLand" android:layout="@layout/layout_land"/> <ViewStub android:id="@+id/StubPort" android:layout_width="wrap_content" android:layout_height="wrap_content" android:inflatedId="@+id/inflateStubPort" android:layout="@layout/layout_port"/></LinearLayout>4ЃЌдкКсЪњЦСЕФЪБКђЃЌЭЈЙ§ЕїгУViewStub.inflateДДНЈЕБЧАЕФViewВЂНЋСэЭтвЛИіЩшЮЊGONE
private void setOrientationlayout(int orientation) { //ШчЙћЯЕЭГзДЬЌЮЊЫЎЦНЗНЯђ if (orientation == Configuration.ORIENTATION_LANDSCAPE) { //ЫЎЦНЗНЯђУЛгаВМОжЃЌОЭДДНЈВМОж if (null == mLanderView) { ViewStub _viewStub = (ViewStub)findViewById(R.id.StubLand); mLanderView = _viewStub.inflate(); } //ШчЙћЕБЧАВМОжЕЭЪњжБВМОжЕФЛАОЭЩшжУЮЊВЛПЩМћ if (null != mPortView) { mPortView.setVisibility(View.GONE); } //АѓЖЈНчУцВМОж bindView(mLanderView); } else { //ШчЙћЯЕЭГзДЬЌЮЊЪњжБЗНЯђ //ЕБЧАВМОжЮЊЫЎЦНВМОжЃЌОЭЩшжУЮЊВЛПЩМћ if (null != mLanderView) { mLanderView.setVisibility(View.GONE); } //ЪњжБВМОжЮЊПеЃЌОЭбЙШыЪњжБВМОж if (null == mPortView) { ViewStub _viewStub = (ViewStub)findViewById(R.id.StubPort); mPortView = _viewStub.inflate(); } //АѓЖЈНчУц bindView(mPortView); } }5ЃЌАѓЖЈВЂЩшжУПиМўЕФзДЬЌ
//АѓЖЈКЏЪ§ private void bindView(View p_v) { //вЊАѓЖЈЕФViewЩшжУЮЊПЩМћ p_v.setVisibility(View.VISIBLE); //СНИіПиМўВЩгУЯЕЭГЕФВМОж mSeekBar = (SeekBar)findViewById(android.R.id.progress); mTextView = (TextView)findViewById(android.R.id.text1); }onCreate
//onCreate protected void onCreate(Bundle savedInstanceState) { // TODO Auto-generated method stub super.onCreate(savedInstanceState); setContentView(R.layout.layout_land); Display _disPlay = ((WindowManager)getSystemService(WINDOW_SERVICE)).getDefaultDisplay(); //ЕУЕНВМОжЕФЗНЯђ setOrientationlayout(_disPlay.getOrientation()); }АцШЈЩљУїЃКЛЖгНЛСїжИе§ЮФеТЕФДэЮѓЃЌБиЖЈащаФНгЪм,QQ872785786