Message,Handler是在Android中最常用的,更新UI点手段。与其他图形界面的原理类似,Android系统中UI也是靠消息驱动来工作的,具体有以下一些概念。
消息发送者:发生消息到队列
消息队列:存储消息的队列
消息循环:不断的循环取出消息,发给处理者
消息处理者:处理消息
他们的关系可以画成下图的样子:

消息机制原理图
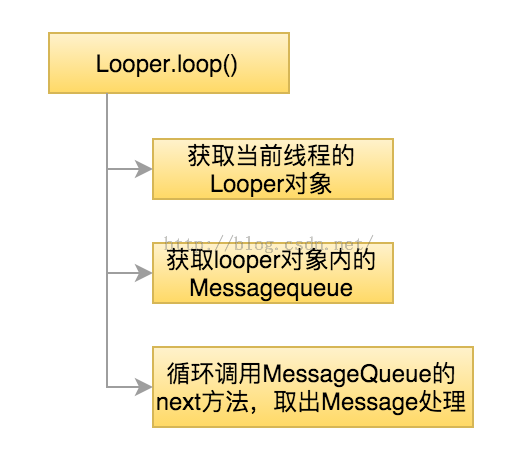
消息循环Looper
Android消息循环由Looper类来实现。使用Looper要经过以下两个方法。
Looper.prepare();
Looper.loop();
在Activity主线程中查看就有Looper的初始化,查看ActivityThread类的main方法中,有下列代码
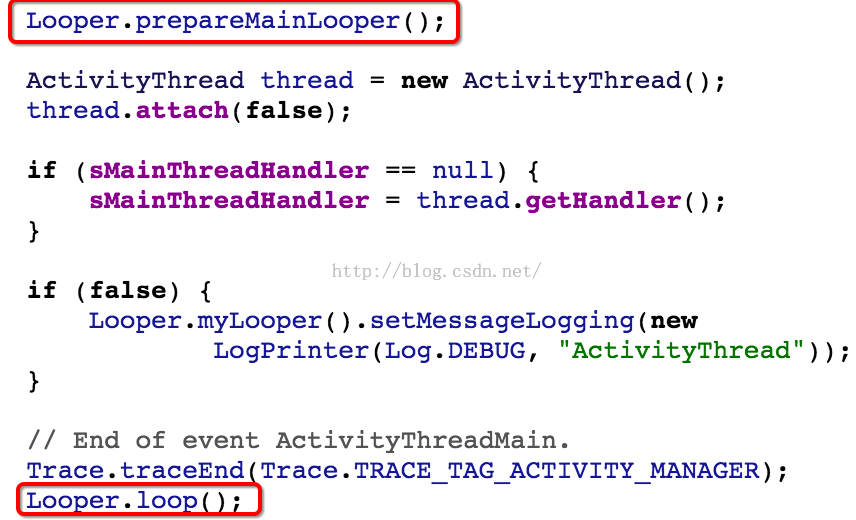
查看prepareMainLooper()方法第一句就调用了prepare方法。归根结底Looper的调用顺序先要调用prepare方法,然后再调用loop()方法。

1.Looper.prepare()
那我们先查看Looper的prepare方法
// sThreadLocal.get() will return null unless you've called prepare().static final ThreadLocal<Looper> sThreadLocal = new ThreadLocal<Looper>();private static void prepare(boolean quitAllowed) { // 保证一个线程Looper只能调用一次 // ThreadLocal并不是一个Thread,而是Thread的局部变量, // 也许把它命名为ThreadLocalVariable更容易让人理解一些。 if (sThreadLocal.get() != null) { throw new RuntimeException("Only one Looper may be created per thread"); } sThreadLocal.set(new Looper(quitAllowed));}该方法很简单就是创建了一个Looper对象存入sThreadLocal中。
注意:ThreadLocal调用set存储,调用get获取。普通对象当在不同线程中获取时候是同一个对象,数据相同。然而ThreadLocal不同线程调用这个get,set获取到的数据是不同的,它是线程相关的局部变量。
综上一个线程只能存储一个Looper对象。
查看下Looper的构造函数。
private Looper(boolean quitAllowed) { mQueue = new MessageQueue(quitAllowed); mThread = Thread.currentThread();}构造函数主要就是创建了一个MessageQueue。
用图概括下

Looper.prepare()工作流程
prepare方法主要就是创建了Looper对象存在当前线程,同时Looper内创建了一个MessageQueue。
1.Looper.loop()
先看loop的源码
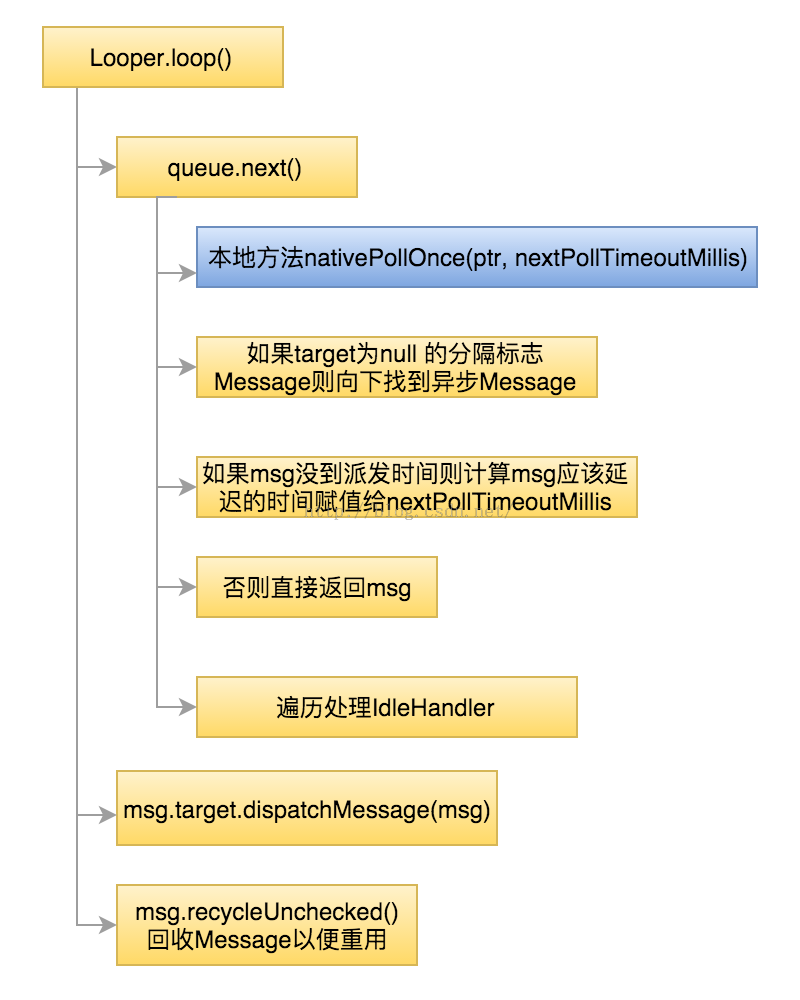
public static void loop() { //取出当前线程相关的looper对象 final Looper me = myLooper(); if (me == null) { throw new RuntimeException("No Looper; Looper.prepare() wasn't called on this thread."); } //获取当前线程Looper对象内的MessageQueue(消息队列) final MessageQueue queue = me.mQueue; // Make sure the identity of this thread is that of the local process, // and keep track of what that identity token actually is. Binder.clearCallingIdentity(); final long ident = Binder.clearCallingIdentity(); for (;;) { Message msg = queue.next(); // might block 可能阻塞 if (msg == null) { // No message indicates that the message queue is quitting. //没有消息表明消息队列退出 return; } // This must be in a local variable, in case a UI event sets the logger Printer logging = me.mLogging; if (logging != null) { logging.println(">>>>> Dispatching to " + msg.target + " " + msg.callback + ": " + msg.what); } //处理消息 msg.target.dispatchMessage(msg); if (logging != null) { logging.println("<<<<< Finished to " + msg.target + " " + msg.callback); } // Make sure that during the course of dispatching the // identity of the thread wasn't corrupted. final long newIdent = Binder.clearCallingIdentity(); if (ident != newIdent) { Log.wtf(TAG, "Thread identity changed from 0x" + Long.toHexString(ident) + " to 0x" + Long.toHexString(newIdent) + " while dispatching to " + msg.target.getClass().getName() + " " + msg.callback + " what=" + msg.what); } msg.recycleUnchecked(); }}查看loop方法,主要就是开启了消息循环,内部就是一个for循环一直获取一个个的Message调用msg.target.dispatchMessage处理。
1.获取调用线程的Looper对象,获取Looper对象内的MessageQueue
2.循环调用MessageQueue的next方法获取下一个元素
3.最终调用target的dispatchMessage方法处理Message。
4.继续步骤2
Looper.loop()工作流程
消息队列MessageQueue
MessageQueue主要提供了向队列插入Message的方法,获取下一个Message的方法。其类内部的成员变量
final MessageQueue mQueue;
为一个链表,存储所有的Message看下Message链表的结构应该是下图的样子

整个队列按照when变量从小到大排序,next变量指向下一个节点,其中的callback与target是消息最终的处理者。
上一节主要讲了loop方法内有个for循环,for内部会一直获取下一条Message。这里就看以下这个next方法。
MessageQueue的next方法是获取队列中的下一条Message
Message next() { // Return here if the message loop has already quit and been disposed. // This can happen if the application tries to restart a looper after quit // which is not supported. final long ptr = mPtr;//保存的是c++层的MessageQueue指针 供native层使用 if (ptr == 0) { return null; } int pendingIdleHandlerCount = -1; // -1 only during first iteration int nextPollTimeoutMillis = 0; for (;;) { if (nextPollTimeoutMillis != 0) { Binder.flushPendingCommands(); } nativePollOnce(ptr, nextPollTimeoutMillis);//调用到c++层方法,可能阻塞在这里 synchronized (this) { // Try to retrieve the next message. Return if found. final long now = SystemClock.uptimeMillis(); Message prevMsg = null; Message msg = mMessages; if (msg != null && msg.target == null) { //target为null则是作为一个分隔符,普通的Message不返回,则向下遍历直到一个异步的message // Stalled by a barrier. Find the next asynchronous message in the queue. do { prevMsg = msg; msg = msg.next; } while (msg != null && !msg.isAsynchronous()); } if (msg != null) { if (now < msg.when) { //msg当前时间小于msg派发的时间,则计算当前到派发时间还需要多久 可能由于某种原因nativePollOnce返回,例如新插入了Message // Next message is not ready. Set a timeout to wake up when it is ready. nextPollTimeoutMillis = (int) Math.min(msg.when - now, Integer.MAX_VALUE); } else { // Got a message. //获得一个Message返回 mBlocked = false; if (prevMsg != null) { prevMsg.next = msg.next; } else { mMessages = msg.next; } msg.next = null; msg.markInUse(); return msg; } } else { // No more messages. nextPollTimeoutMillis = -1; } // Process the quit message now that all pending messages have been handled. if (mQuitting) { dispose(); return null; } // If first time idle, then get the number of idlers to run. // Idle handles only run if the queue is empty or if the first message // in the queue (possibly a barrier) is due to be handled in the future. //Message队列为空或者还没有到队列头部的Message派发时间 则执行下idel if (pendingIdleHandlerCount < 0 && (mMessages == null || now < mMessages.when)) { pendingIdleHandlerCount = mIdleHandlers.size(); } if (pendingIdleHandlerCount <= 0) { //如果idle数目小于等于0 则进入下一次循环 // No idle handlers to run. Loop and wait some more. mBlocked = true; continue; } if (mPendingIdleHandlers == null) { mPendingIdleHandlers = new IdleHandler[Math.max(pendingIdleHandlerCount, 4)]; } mPendingIdleHandlers = mIdleHandlers.toArray(mPendingIdleHandlers); } // Run the idle handlers. // We only ever reach this code block during the first iteration. for (int i = 0; i < pendingIdleHandlerCount; i++) { final IdleHandler idler = mPendingIdleHandlers[i]; mPendingIdleHandlers[i] = null; // release the reference to the handler boolean keep = false; try { keep = idler.queueIdle(); } catch (Throwable t) { Log.wtf(TAG, "IdleHandler threw exception", t); } if (!keep) { synchronized (this) { mIdleHandlers.remove(idler); } } } // Reset the idle handler count to 0 so we do not run them again. pendingIdleHandlerCount = 0; // While calling an idle handler, a new message could have been delivered // so go back and look again for a pending message without waiting. nextPollTimeoutMillis = 0; }}这个next方法看似复杂,我们仔细梳理下它的条理。看看都做了什么
1.如果获取不到消息,让线程阻塞
2.如果有delay的Message,我们应该让阻塞一个定长的时间
3.如果有新的Message插入,应该重新调节阻塞时间
4.有一种特殊的Message是target为null。用来阻塞同步的Message
5.在空闲时间(队列为空,阻塞之前),执行些其他操作,比如垃圾回收。
MessageQueue中的一些native方法。
private native static long nativeInit();private native void nativePollOnce(long ptr, int timeoutMillis); /*non-static for callbacks*/private native static void nativeWake(long ptr);
在看next方法的时候首先会遇到一个nativePollOnce方法,这里先说下它的功能。
nativePollOnce方法是个native方法,它的功能主要是让线程阻塞,第一个参数是native的MessageQueue指针,第二个参数比较重要,是需要阻塞的时间
当为-1的时候标志永久阻塞,为0的时候立刻返回,为正数的时候表示要阻塞的时间。
nativePollOnce方法阻塞的时候,其实是可以被唤醒的,
nativeWake方法被调用的时候,nativePollOnce就会被唤醒。
next方法里边有个for循环,这个函数里的for循环并不是起循环获取消息的作用,而是当阻塞的时候被唤醒,再次进入上述next流程,以便能返回一个Message,或者重新计算阻塞时间。
看下阻塞时间nextPollTimeoutMillis赋值的几种情况。
1.new<msg.when即当前时间还没到Message的派发时间呢,我们需要重新计算下一个Message的发生时间,这是因为我们在向队列插入新的Message的时候可能引起队列中按时间排序的链表的变化,获取的下一个Message可能已经不是上次循环的那个Message了
2.当获取的下一条Message为null,nextPollTimeoutMillis赋值为-1,这时候线程将永远阻塞,直到被nativeWake唤醒,一般在向队列中插入Message需要唤醒处理。
3.当idleHandler被处理之后nextPollTimeoutMillis赋值为0,由于idleHandler可能是耗时处理,完成后可能已经有Message到了发生时间了。
代码节选,这个分支处理是next 的核心逻辑
if (msg != null) { if (now < msg.when) { //msg当前时间小于msg派发的时间,则计算当前到派发时间还需要多久 可能由于某种原因nativePollOnce返回,例如新插入了Message // Next message is not ready. Set a timeout to wake up when it is ready. nextPollTimeoutMillis = (int) Math.min(msg.when - now, Integer.MAX_VALUE); } else { // Got a message. //获得一个Message返回 mBlocked = false; if (prevMsg != null) { prevMsg.next = msg.next; } else { mMessages = msg.next; } msg.next = null; msg.markInUse(); return msg; }} else { // No more messages. nextPollTimeoutMillis = -1;}idle的处理:
在ActivityThread中,在某种情况下会在消息队列中设置GcIdler,进行垃圾收集,其定义如下:
final class GcIdler implements MessageQueue.IdleHandler { @Override public final boolean queueIdle() { doGcIfNeeded(); return false; }}一旦队列里设置了这个Idle Handler,那么当队列中没有马上需处理的消息时,就会进行垃圾收集。
综上中next方法流程如下
向队列中插入Message,要保证按时间排序,要处理分隔符Message,处理异步Message,看下插入的方法enqueueMessage。
boolean enqueueMessage(Message msg, long when) { if (msg.target == null) { throw new IllegalArgumentException("Message must have a target."); } if (msg.isInUse()) { throw new IllegalStateException(msg + " This message is already in use."); } synchronized (this) { if (mQuitting) { IllegalStateException e = new IllegalStateException( msg.target + " sending message to a Handler on a dead thread"); Log.w(TAG, e.getMessage(), e); msg.recycle(); return false; } msg.markInUse(); msg.when = when; Message p = mMessages; boolean needWake; //正式开始插入逻辑 if (p == null || when == 0 || when < p.when) { //这里是直接插入队列头部, 需要唤醒next方法的阻塞 进行下一次循环 // New head, wake up the event queue if blocked. msg.next = p; mMessages = msg; needWake = mBlocked; } else { // Inserted within the middle of the queue. Usually we don't have to wake // up the event queue unless there is a barrier at the head of the queue // and the message is the earliest asynchronous message in the queue. //插入队列中间.通常不需要唤醒next方法 当遇队列首个Message为分隔栏,且插入的Message为异步的需要唤醒 目的是让这个异步的Message接受处理 needWake = mBlocked && p.target == null && msg.isAsynchronous(); Message prev; //根据when遍历到合适的位置插入Message for (;;) { prev = p; p = p.next; if (p == null || when < p.when) { break; } //当前的Message是异步消息,并且不是第一个,不用唤醒了 if (needWake && p.isAsynchronous()) { needWake = false; } } msg.next = p; // invariant: p == prev.next prev.next = msg; } // We can assume mPtr != 0 because mQuitting is false. //唤醒阻塞 if (needWake) { nativeWake(mPtr); } } return true;}由于MessageQueue中存储的是一个根据when字段从小到大排列的有序链表,向队列中插入数据,其实就是根据when字段把Message插入到链表的合适的位置。根据插入情况决定是否唤醒next方法。一般插入链表头部需要唤醒,因为头部刚插入的这个Message变成了下一个要执行的,需要知道他的状态,然后进行定时阻塞,或者直接返回。
Message分析
Message大概有三种:
普通Message
target变量为发送Message的Handler自己
private boolean enqueueMessage(MessageQueue queue, Message msg, long uptimeMillis) { msg.target = this; if (mAsynchronous) { msg.setAsynchronous(true); } return queue.enqueueMessage(msg, uptimeMillis);}Handler的enqueueMessage方法中第一句对msg的target进行了赋值
异步Message
通过Message的setAsynchronous方法来设置是否是异步Message,isAsynchronous方法来判断是否是异步Message,普通创建的Message为同步的
int flags;public boolean isAsynchronous() { return (flags & FLAG_ASYNCHRONOUS) != 0;}public void setAsynchronous(boolean async) { if (async) { flags |= FLAG_ASYNCHRONOUS; } else { flags &= ~FLAG_ASYNCHRONOUS; }}handler构造函数提供了一个参数,async来决,向队列插入的Message是否是异步Message
public Handler(Callback callback, boolean async)public Handler(Looper looper, Callback callback, boolean async)
Message分隔符
上次多次提到了target为null的Message,它始终特殊的Message,在队列中作为一个分隔符,以他为标志,后边的同步的Message将不会被looper处理。
看下MessageQueue的定义,这种Message只能通过MessageQueue的下列方法打入队列,不能自己直接构造Message打入队列。
MessageQueue提供了postSyncBarrier方法用于向队列中打入”分隔符”。
removeSyncBarrier方法用于移除队列中的”分隔符"
详细见以下源码
public int postSyncBarrier() { return postSyncBarrier(SystemClock.uptimeMillis());}private int postSyncBarrier(long when) { // Enqueue a new sync barrier token. // We don't need to wake the queue because the purpose of a barrier is to stall it. synchronized (this) { final int token = mNextBarrierToken++; final Message msg = Message.obtain(); msg.markInUse(); msg.when = when; msg.arg1 = token; Message prev = null; Message p = mMessages; if (when != 0) { while (p != null && p.when <= when) { prev = p; p = p.next; } } if (prev != null) { // invariant: p == prev.next msg.next = p; prev.next = msg; } else { msg.next = p; mMessages = msg; } return token; }}/** * Removes a synchronization barrier. * * @param token The synchronization barrier token that was returned by * {@link #postSyncBarrier}. * * @throws IllegalStateException if the barrier was not found. * * @hide */public void removeSyncBarrier(int token) { // Remove a sync barrier token from the queue. // If the queue is no longer stalled by a barrier then wake it. synchronized (this) { Message prev = null; Message p = mMessages; while (p != null && (p.target != null || p.arg1 != token)) { prev = p; p = p.next; } if (p == null) { throw new IllegalStateException("The specified message queue synchronization " + " barrier token has not been posted or has already been removed."); } final boolean needWake; if (prev != null) { prev.next = p.next; needWake = false; } else { mMessages = p.next; needWake = mMessages == null || mMessages.target != null; } p.recycleUnchecked(); // If the loop is quitting then it is already awake. // We can assume mPtr != 0 when mQuitting is false. if (needWake && !mQuitting) { nativeWake(mPtr); } }}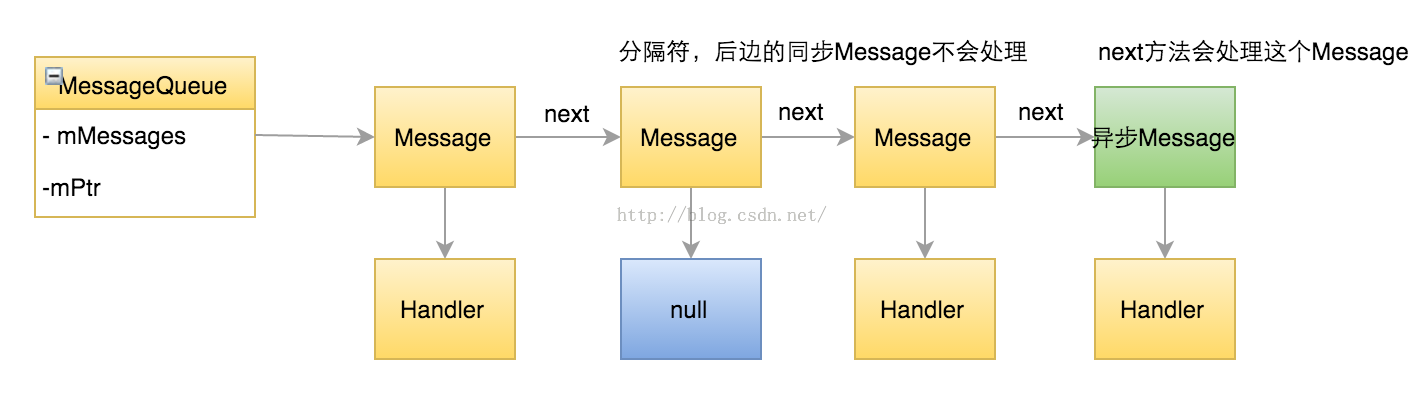
把所有的Message画入MessageQueue中如上图
处理者&发送者Handler
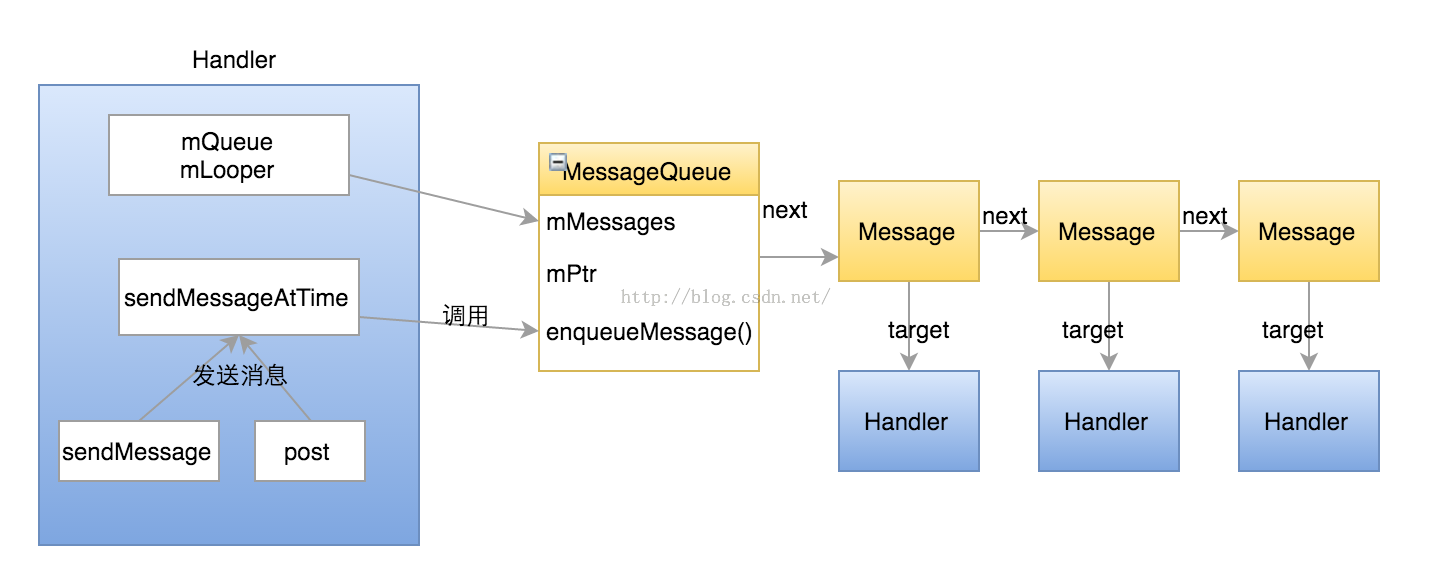
Handler主要封装了向MessageQueue添加Message的与处理Message的方法,让对MessageQueue的操作更简单
查看Handler中的成员变量,主要有以下两个
final MessageQueue mQueue;final Looper mLooper;
然后看下构造函数,看看他们的初始化过程
public Handler(Callback callback, boolean async) { if (FIND_POTENTIAL_LEAKS) { final Class<? extends Handler> klass = getClass(); if ((klass.isAnonymousClass() || klass.isMemberClass() || klass.isLocalClass()) && (klass.getModifiers() & Modifier.STATIC) == 0) { Log.w(TAG, "The following Handler class should be static or leaks might occur: " + klass.getCanonicalName()); } } mLooper = Looper.myLooper(); if (mLooper == null) { throw new RuntimeException( "Can't create handler inside thread that has not called Looper.prepare()"); } mQueue = mLooper.mQueue; mCallback = callback; mAsynchronous = async;}public Handler(Looper looper, Callback callback, boolean async) { mLooper = looper; mQueue = looper.mQueue; mCallback = callback; mAsynchronous = async;}主要有上边两个构造函数,第一个构造函数,获取当前线程的Looper对象与MessageQueue存储起来。
第二个构造函数,主要是从外部传入一个Looper对象,可以是其他线程Looper对象,然后存储这个Looper与他的MessageQueue
想想Handler的常用方法,一般会调用sendMessage,sendMessageDelayed,post的等相关方法发送一个Message,然后通过handler的handleMessage方法处理.
通过查询源码发现这些发送消息的方法都会调用Handler的sendMessageAtTime方法
public boolean sendMessageAtTime(Message msg, long uptimeMillis) { MessageQueue queue = mQueue; if (queue == null) { RuntimeException e = new RuntimeException( this + " sendMessageAtTime() called with no mQueue"); Log.w("Looper", e.getMessage(), e); return false; } return enqueueMessage(queue, msg, uptimeMillis);}private boolean enqueueMessage(MessageQueue queue, Message msg, long uptimeMillis) { msg.target = this; if (mAsynchronous) { msg.setAsynchronous(true); } return queue.enqueueMessage(msg, uptimeMillis);}原来最终是调用了MessageQueue的enqueueMessage方法,向队列插入消息,同时注意此时msg.target设置为了Handler自己。画图概括下发送消息的过程。
从第二个构造函数可知道,Handler内可以传入一个Looper对象,这样就可以传入其他线程的Looper,这样通过这个Handler就可以向其他线程消息循环发送Message了。
同时Handler也承担了处理Message的角色。上边说了在Looper的loop方法中,会一直循环获取MessageQueue的下一条消息处理,处理是调用
msg.target.dispatchMessage(msg);
target就是Handler类型,最终调用Handler的dispatchMessage方法处理消息
public void dispatchMessage(Message msg) { if (msg.callback != null) { handleCallback(msg); } else { if (mCallback != null) { if (mCallback.handleMessage(msg)) { return; } } handleMessage(msg); }}dispatchMessage中定义了一套消息处理优先级的机制
1.Message自己的callback,这种处理一般用在post相关方法发送消息的情况较多,例如post(new Runnable(){ run(){...} }) 。
2.Handler设置的全局callback,不常用。
3.交给Handler的handleMessage处理,通常需要子类中重写该方法来完成工作
至此JAVA已经分析完毕,知道那几个native方法的作用,不想了解他的原理,不看下边内容也可以。
Native层分析
我们这里主要遇到了下边几个native方法
private native static long nativeInit();private native void nativePollOnce(long ptr, int timeoutMillis); /*non-static for callbacks*/private native static void nativeWake(long ptr);
上述方法的native实现在
[/frameworks/base/core/jni/android_os_MessageQueue.cpp]
static JNINativeMethod gMessageQueueMethods[] = {/* name, signature, funcPtr */ {"nativeInit", "()J", (void*)android_os_MessageQueue_nativeInit}, {"nativeDestroy","(J)V",(void*)android_os_MessageQueue_nativeDestroy}, {"nativePollOnce","(JI)V",(void*)android_os_MessageQueue_nativePollOnce}, {"nativeWake","(J)V",(void*)android_os_MessageQueue_nativeWake}, {"nativeIsPolling","(J)Z",(void*)android_os_MessageQueue_nativeIsPolling}, {"nativeSetFileDescriptorEvents","(JII)V", (void*)android_os_MessageQueue_nativeSetFileDescriptorEvents}, };}这里看下android_os_MessageQueue方法
[/frameworks/base/core/jni/android_os_MessageQueue.cpp]
static jlong android_os_MessageQueue_nativeInit(JNIEnv* env, jclass clazz) { NativeMessageQueue* nativeMessageQueue = new NativeMessageQueue(); if (!nativeMessageQueue) { jniThrowRuntimeException(env, "Unable to allocate native queue"); return 0; } nativeMessageQueue->incStrong(env); return reinterpret_cast<jlong>(nativeMessageQueue);}这个方法里边创建了一个nativeMessageQueue,继续看NativeMessageQueue的构造函数
[/frameworks/base/core/jni/android_os_MessageQueue.cpp]
NativeMessageQueue::NativeMessageQueue() :mPollEnv(NULL), mPollObj(NULL), mExceptionObj(NULL) { mLooper = Looper::getForThread(); if (mLooper == NULL) { mLooper = new Looper(false); Looper::setForThread(mLooper); }}在NativeMessageQueue的构造函数中创建了一个Looper对象,这个Looper是native层的,定义在/system/core/include/utils/Looper.h文件中
class Looper : public RefBase{ protected: virtual~Looper(); public: ....... Looper(bool allowNonCallbacks); bool getAllowNonCallbacks()const; int pollOnce(int timeoutMillis,int*outFd,int*outEvents,void**outData); inline int pollOnce(int timeoutMillis){ return pollOnce(timeoutMillis,NULL,NULL,NULL); } ..... void wake(); int addFd(int fd,int ident,int events,Looper_callbackFunc callback,void*data); int addFd(int fd,int ident,int events,const sp<LooperCallback>&callback,void*data); int removeFd(int fd); void sendMessage(const sp<MessageHandler>&handler,const Message&message); void sendMessageDelayed(nsecs_t uptimeDelay,const sp<MessageHandler>&handler,const Message&message); void sendMessageAtTime(nsecs_t uptime,const sp<MessageHandler>&handler,const Message&message); void removeMessages(const sp<MessageHandler>&handler); void removeMessages(const sp<MessageHandler>&handler,int what); .......}主要定义了一些fd与Message等操作的方法,和本地Message相关的变量,这里不是着重分析,native的消息机制,主要分析下整个流程。
上边的说到NativeMessageQueue的构造函数中,创建了一个Looper对象,看下Looper的构造函数都做了什么。
查看Looper的构造函数
[/system/core/libutils/Looper.cpp]
Looper::Looper(bool allowNonCallbacks) :mAllowNonCallbacks(allowNonCallbacks), mSendingMessage(false),mPolling(false), mEpollFd(-1), mEpollRebuildRequired(false),mNextRequestSeq(0), mResponseIndex(0), mNextMessageUptime(LLONG_MAX) { mWakeEventFd = eventfd(0, EFD_NONBLOCK); LOG_ALWAYS_FATAL_IF(mWakeEventFd < 0, "Could not make wake event fd. errno=%d", errno); AutoMutex _l(mLock); rebuildEpollLocked();}首先初始化了一大堆变量,此处不重要略过,直接看eventfd方法创建的对象。
eventfd具体与pipe有点像,用来完成两个线程之间事件触发。这个函数会创建一个 事件对象 (eventfd object), 用来实现,进程(线程)间 的 等待/通知(wait/notify) 机制. 内核会为这个对象维护一个64位的计数器(uint64_t)。并且使用第一个参数(initval)初始化这个计数器。调用这个函数就会返回一个新的文件描述符。
这个mWakeEventFd很重要,看下边的rebuildEpollLocked方法
[/system/core/libutils/Looper.cpp]
void Looper::rebuildEpollLocked() { // Close old epoll instance if we have one. //如果创建了epoll,关闭epoll if (mEpollFd >= 0) { close(mEpollFd); } // Allocate the new epoll instance and register the wake pipe. // 创建一个epoll mEpollFd = epoll_create(EPOLL_SIZE_HINT); LOG_ALWAYS_FATAL_IF(mEpollFd < 0, "Could not create epoll instance. errno=%d", errno); struct epoll_event eventItem; memset(& eventItem, 0, sizeof(epoll_event)); // zero out unused members of data field union eventItem.events = EPOLLIN;//表示对应的文件描述符可以读事件 eventItem.data.fd = mWakeEventFd;//Looper构造函数中eventfd函数返回的文件描述符 //注册新的fd到epoll中 监听文件可读事件 int result = epoll_ctl(mEpollFd, EPOLL_CTL_ADD, mWakeEventFd, & eventItem); LOG_ALWAYS_FATAL_IF(result != 0, "Could not add wake event fd to epoll instance. errno=%d", errno); for (size_t i = 0; i < mRequests.size(); i++) {//mRequests是个KeyedVector<int, Request>类型,遍历每个Request对象,把他们一次加入epoll中监听 const Request& request = mRequests.valueAt(i); struct epoll_event eventItem; request.initEventItem(&eventItem); int epollResult = epoll_ctl(mEpollFd, EPOLL_CTL_ADD, request.fd, & eventItem); if (epollResult < 0) { ALOGE("Error adding epoll events for fd %d while rebuilding epoll set, errno=%d", request.fd, errno); } }}这里插入解释下epoll的作用。
epoll
epoll 是Linux内核中的一种可扩展IO事件处理机制,epoll会把被监听的文件发生了怎样的I/O事件通知我们。
native层主要就是利用了Linux提供的epoll机制,大家仔细了解下这个系统调用的作用,native层就没有什么难点了。
看下epoll的三个函数作用
int epoll_create(int size)
创建一个epoll的句柄。
int epoll_ctl(int epfd, int op, int fd, struct epoll_event *event)
epoll的事件注册函数epoll的事件注册函数
第一个参数是 epoll_create() 的返回值,第二个参数表示动作,第三个参数是需要监听的fd,第四个参数是告诉内核需要监听什么事件
int epoll_wait(int epfd, struct epoll_event * events, int maxevents, int timeout)
等待事件的产生。参数events用来从内核得到事件的集合,maxevents表示每次能处理的最大事件数,告之内核这个events有多大,这个maxevents的值不能大于创建epoll_create()时的size,参数timeout是超时时间(毫秒,0会立即返回,-1将不确定,也有说法说是永久阻塞)。该函数返回需要处理的事件数目,如返回0表示已超时。
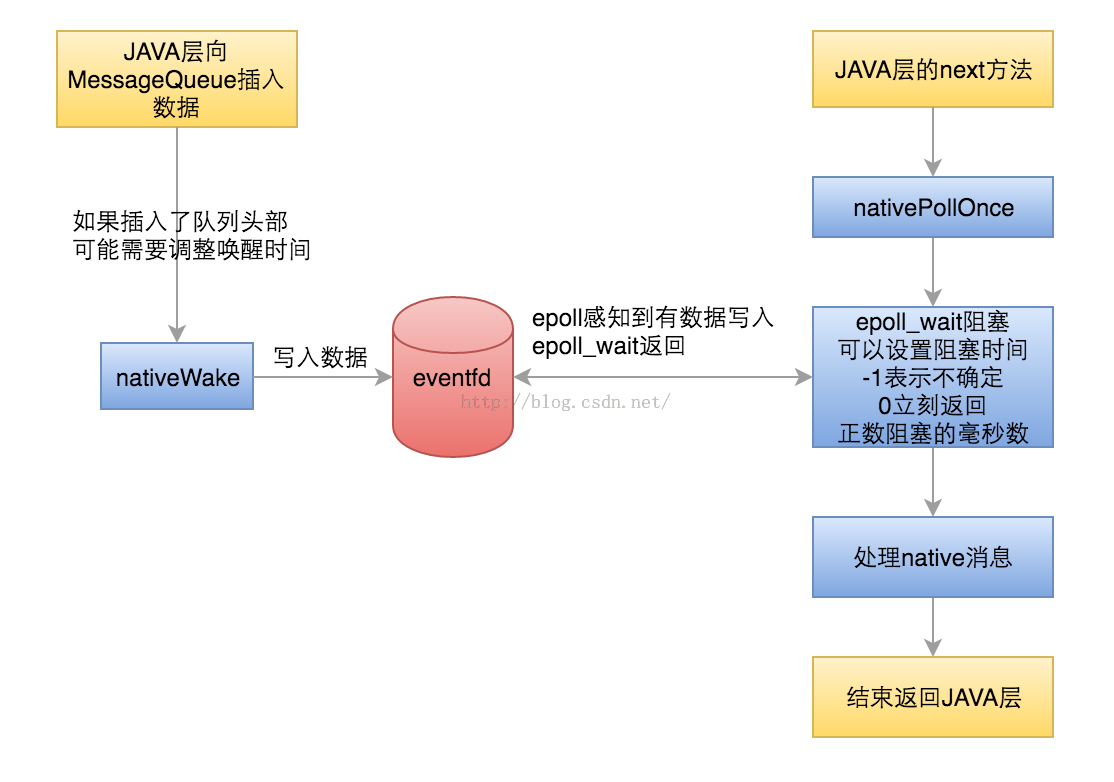
至此可以看到在构造Looper对象时,其内部除了创建了eventfd,还创建了一个epoll来监听eventfd。也就是说,是利用epoll机制来完成阻塞动作的。每当java层调用nativeWake的时候,最终会间接向eventfd写入数据,于是epoll立即就监听到了文件变化,epoll_wait()在等到事件后,随即进行相应的事件处理。这就是消息循环阻塞并处理的大体流程。
概括下nativeInit的流程:

nativePollOnce
在java层的next方法,首先调用的方法就是nativePollOnce 。然后看下native层的实现。nativePollOnce对应android_os_MessageQueue_nativePollOnce方法。看下这个方法。
[/frameworks/base/core/jni/android_os_MessageQueue.cpp]
static void android_os_MessageQueue_nativePollOnce(JNIEnv* env, jobject obj,jlong ptr, jint timeoutMillis) { NativeMessageQueue* nativeMessageQueue = reinterpret_cast<NativeMessageQueue*>(ptr); nativeMessageQueue->pollOnce(env, obj, timeoutMillis);}这里ptr就是定义在java层,MessageQueue中成员变量mPtr,强转成nativeMessageQueue
timeoutMillis就是java层中MessageQueue中传入的阻塞时间
该方法中直接调用了nativeInit创建的那个nativeMessageQueue的pollOnce方法。
[/frameworks/base/core/jni/android_os_MessageQueue.cpp]
void NativeMessageQueue::pollOnce(JNIEnv* env, jobject pollObj, int timeoutMillis) { mPollEnv = env; mPollObj = pollObj; mLooper->pollOnce(timeoutMillis); mPollObj = NULL; mPollEnv = NULL; if (mExceptionObj) { env->Throw(mExceptionObj); env->DeleteLocalRef(mExceptionObj); mExceptionObj = NULL; }}pollOnce方法没有做什么,就是直接调用了Looper的pollOnce方法。
看下Looper的pollOnce方法
[/system/core/libutils/Looper.cpp]
int Looper::pollOnce(int timeoutMillis, int* outFd, int* outEvents, void** outData) { int result = 0; for (;;) { while (mResponseIndex < mResponses.size()) { const Response& response = mResponses.itemAt(mResponseIndex++); int ident = response.request.ident; if (ident >= 0) { int fd = response.request.fd; int events = response.events; void* data = response.request.data; if (outFd != NULL) *outFd = fd; if (outEvents != NULL) *outEvents = events; if (outData != NULL) *outData = data; return ident; } } if (result != 0) { if (outFd != NULL) *outFd = 0; if (outEvents != NULL) *outEvents = 0; if (outData != NULL) *outData = NULL; return result; } result = pollInner(timeoutMillis); }}这里直接看最后一行,pollInner方法。这个方法比较长 ,主要注意epoll_wait方法,线程会阻塞在那里,等待事件的发生。
[/system/core/libutils/Looper.cpp]
int Looper::pollInner(int timeoutMillis) { ...... //阻塞在这里,到时间或者有事件发生返回 int eventCount = epoll_wait(mEpollFd, eventItems, EPOLL_MAX_EVENTS, timeoutMillis); ...... // Handle all events. //处理所有epoll事件 for (int i = 0; i < eventCount; i++) { int fd = eventItems[i].data.fd; uint32_t epollEvents = eventItems[i].events; if (fd == mWakeEventFd) { if (epollEvents & EPOLLIN) {//当fd是eventfd且事件为EPOLLIN 则执行awoke方法 内部只是读取eventfd awoken(); } else { ALOGW("Ignoring unexpected epoll events 0x%x on wake event fd.", epollEvents); } } else {//如果是其他事件 则把request加入到mResponses中 ssize_t requestIndex = mRequests.indexOfKey(fd); if (requestIndex >= 0) { int events = 0; if (epollEvents & EPOLLIN) events |= EVENT_INPUT; if (epollEvents & EPOLLOUT) events |= EVENT_OUTPUT; if (epollEvents & EPOLLERR) events |= EVENT_ERROR; if (epollEvents & EPOLLHUP) events |= EVENT_HANGUP; //内部调用mResponses.push(response); pushResponse(events, mRequests.valueAt(requestIndex)); } else { ALOGW("Ignoring unexpected epoll events 0x%x on fd %d that is " "no longer registered.", epollEvents, fd); } } } Done: ; // Invoke pending message callbacks. mNextMessageUptime = LLONG_MAX; //native层也有自己的Message,可以调用Looper::sendMessage,Looper::sendMessageDelayed方法进行发送Message //发送出的Message会包装在MessageEnvelope中 然后加入mMessageEnvelopes中 //这里会循环处理所有的native层的Message while (mMessageEnvelopes.size() != 0) { nsecs_t now = systemTime(SYSTEM_TIME_MONOTONIC); const MessageEnvelope& messageEnvelope = mMessageEnvelopes.itemAt(0); if (messageEnvelope.uptime <= now) { // Remove the envelope from the list. // We keep a strong reference to the handler until the call to handleMessage // finishes. Then we drop it so that the handler can be deleted *before* // we reacquire our lock. { // obtain handler sp<MessageHandler> handler = messageEnvelope.handler; Message message = messageEnvelope.message; mMessageEnvelopes.removeAt(0); mSendingMessage = true; mLock.unlock(); //调用MessageHandler的回调 handler->handleMessage(message); } // release handler mLock.lock(); mSendingMessage = false; result = POLL_CALLBACK; } else { // The last message left at the head of the queue determines the next wakeup time. //根据现在的队列头部的Message的uptime决定下一次唤醒时间 mNextMessageUptime = messageEnvelope.uptime; break; } } // Release lock. mLock.unlock(); // Invoke all response callbacks. //处理response for (size_t i = 0; i < mResponses.size(); i++) { Response& response = mResponses.editItemAt(i); if (response.request.ident == POLL_CALLBACK) { int fd = response.request.fd; int events = response.events; void* data = response.request.data; // Invoke the callback. Note that the file descriptor may be closed by // the callback (and potentially even reused) before the function returns so // we need to be a little careful when removing the file descriptor afterwards. int callbackResult = response.request.callback->handleEvent(fd, events, data); if (callbackResult == 0) { removeFd(fd, response.request.seq); } // Clear the callback reference in the response structure promptly because we // will not clear the response vector itself until the next poll. response.request.callback.clear(); result = POLL_CALLBACK; } } return result;}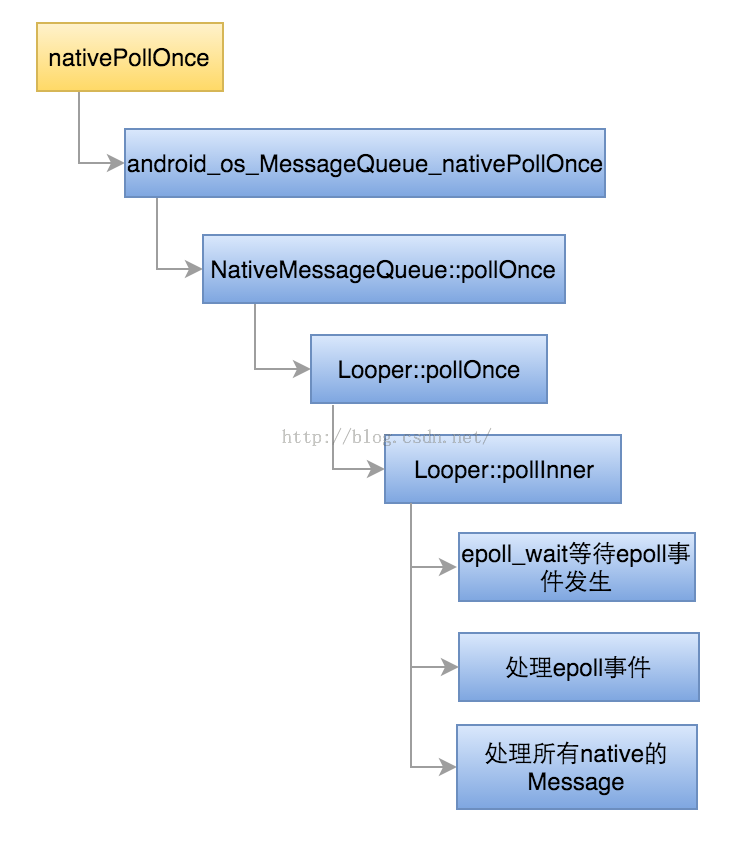
默认系统只是创建了一个eventfd,等待他的事件发生,一进入上述方法可能回阻塞在epoll_wait方法,当eventfd有个风吹草动就回被唤醒,例如往里边写点东西。当唤醒后就处理下,读取eventfd里的数据。剩下的代码就是处理native层的Message队列中的消息。所以当你在JAVA层发送一个Message可能不会立刻执行,因为可能还在处理native层的消息。
可以看出JAVA层每次循环取出一个Message处理,而native层是每次把队列中的消息一次性处理完。
nativeWake
看看最后一个方法nativeWake
这个方法比较简单直接就是向下调用最后调用到了Looper的wake方法。
[/frameworks/base/core/jni/android_os_MessageQueue.cpp]
static void android_os_MessageQueue_nativeWake(JNIEnv* env, jclass clazz, jlong ptr) { NativeMessageQueue* nativeMessageQueue = reinterpret_cast<NativeMessageQueue*>(ptr); nativeMessageQueue->wake();}[/frameworks/base/core/jni/android_os_MessageQueue.cpp]
void NativeMessageQueue::wake() { mLooper->wake();}[/system/core/libutils/Looper.cpp]
void Looper::wake() { uint64_t inc = 1; ssize_t nWrite = TEMP_FAILURE_RETRY(write(mWakeEventFd, &inc, sizeof(uint64_t))); if (nWrite != sizeof(uint64_t)) { if (errno != EAGAIN) { ALOGW("Could not write wake signal, errno=%d", errno); } }}看看这个方法的功能,就是往mWakeEventFd里,就是初始化的时候eventfd函数创建的文件,中写入了一个uint64_t数字。因为epoll监听这个文件,所以epoll会立刻返回,这样pollOnce就可以继续向下执行了。
最后概括下native层之于JAVA层的作用: