Using lists inAndroid (ListView) – Tutorial
原文地址:http://www.vogella.com/tutorials/AndroidListView/article.html
申明:本译文参考谷歌和原文协作翻译,有很小一部分是意译方便理解。如有错误请联系(邮箱:[email protected]:190951132 添加请表明是本文读者)更正。
拉尔斯· 沃格尔
Version4.6
Copyright? 2010,2011,2012,2013,2014 vogella Gmbh
2014年11月20日
Android中ListView、ListActivity和ListFragment的使用
本教程介绍了如何结合Activitys和Fragments使用ListView的。 本教程是基于Eclipse 4.4,Java的1.7和Android 5.0。
目录
1. Android和Lists
1.1。 在Android中使用Lists
1.2。 Views for handling lists
1.3。 lists中可能的输入类型
1.4。适配器
1.5。 过滤和排序
1.6。 adapter中的数据更新
1.7。listener(监听)
2.默认adapter
2.1。 平台默认adapter
2.2。 使用ArrayAdapter
2.3。 使用ArrayAdapter的ListView示例
3.自定义实现Adapter
3.1。 开发自定义adapter
3.2。 为list准备item布局
3.3。 自定义adapter示例
3.4。 更新adapter中的数据模型
4. ListActivity和ListFragment
4.1。 使用ListView的默认容器
4.2。 ListActivity和自定义布局
4.3。 空list用作占位
5.练习:使用ListView和ListActivity
6.运动:给ListActivity添加自己的布局
7.教程:实现自己的adapter
8.ListViews性能篇
8.1。 motivation(翻译成“动机”?^_^)
8.2。 耗时操作
8.3。 避免布局臃肿和对象的创建
8.4。 ViewHolder模式
8.5。 示例
9.保存selection of a view
10.ListViews中的上下文action mode
11.执行撤销操作
11.1。 当你想要提供一个撤消操作?
11.2。 示例
12.性能优化
13教程:如何在ListView中显示两个item
14.ListView多选操作
14.1。 数据模型和ListView交互
14.2。 教程:领域模型和行的交互
15.实现可扩展开的ListView
15.1。 ExpandableListView
15.2。 ExpandableListView 示例
16.教程:其他
16.1。 为item添加longclick监听器
16.2。 header和footer
17. SimpleCursorAdapter
18.其他开源库
19.关于本网站
19.1。 捐赠支持免费教程
19.2。 提问和讨论
19.3。 授权本教程及其代码
20.链接和文学
20.1。 源代码
20.2。 ListView的资源
20.3。vogella 资源
1. Android and Lists
1.1. Using lists in Android
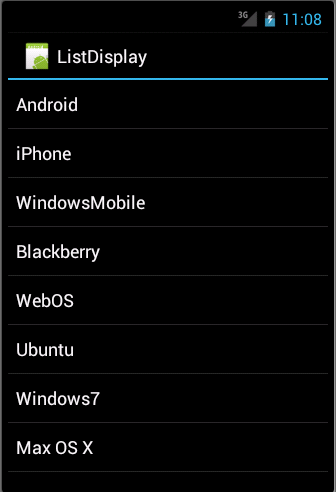
The display of elements in a list is a very common pattern in mobile applications. The user sees a list of items and can scroll through them. Such an activity is depicted in the following picture.
在移动应用中以非常普通的模式显示list中的item。 用户可以滚动他们看到的list。如下图。

Typically the user interacts with the list viathe action bar, for example, via a refresh button. Individual list items can beselected. This selection can update the action bar or can trigger a detailedscreen for the selection. The following graphic sketches that. On the selectionof a list item another activity is started.
通常用户通过操作栏和list交互,比如,按下一个刷新按钮。个别item可被选中,这种选中可以更新操作栏或者打开选中项的详细页。下图展示了选中item打开另一个activity1.2. Views for handling lists
Android provides the ListView and the ExpandableListView classes which is capable of displaying a scrollable list of items.
The ExpandableListView class supports a grouping of items.
ExpandableListView类支持的item的分组。
1.3。 对于列出了可能的输入类型
The input to the list(items in the list) can be arbitrary Java objects. The adapter extracts thecorrect data from the data object and assigns this data to the views in the row of theListView.
These items aretypically called the data model of the list. An adapter can receivedata as input.
List的item可以显示任意的Java对象。 adatper从数据对象中提取正确的数据,并显示到list的item中的views中 。
这些items通常被称为列表的数据模型 。 适配器可以接收数据作为输入。
1.4。 适配器
An adapter manages the data model and adapts itto the individual entries in the widget. An adapter extends the BaseAdapter class.
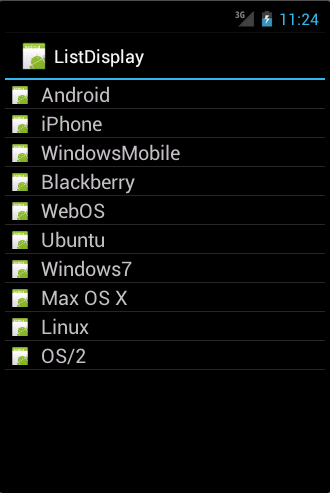
Every line in thewidget displaying the data consists of a layout which can be as complex as youwant. A typical line in a list has an image on the left side and two text linesin the middle as depicted in the following graphic.
适配器管理数据模型,将数据放入widget中。适配器继承自BaseAdapter类。
显示数据的widget中可以使用任意只要你想要的复杂布局。 在一个列表中一个典型的线对的左侧和在如以下图形所示的中间两个文本行图像。
A layout file for a such a line might look likethe following.
对于这样的布局文件就像下面这样:
<RelativeLayout xmlns:android="http://schemas.android.com/apk/res/android" android:layout_width="fill_parent" android:layout_height="?android:attr/listPreferredItemHeight" android:padding="6dip" > <ImageView android:id="@+id/icon" android:layout_width="wrap_content" android:layout_height="fill_parent" android:layout_alignParentBottom="true" android:layout_alignParentTop="true" android:layout_marginRight="6dip" android:contentDescription="TODO" android:src="@drawable/ic_launcher" /> <TextView android:id="@+id/secondLine" android:layout_width="fill_parent" android:layout_height="26dip" android:layout_alignParentBottom="true" android:layout_alignParentRight="true" android:layout_toRightOf="@id/icon" android:ellipsize="marquee" android:singleLine="true" android:text="Description" android:textSize="12sp" /> <TextView android:id="@+id/firstLine" android:layout_width="fill_parent" android:layout_height="wrap_content" android:layout_above="@id/secondLine" android:layout_alignParentRight="true" android:layout_alignParentTop="true" android:layout_alignWithParentIfMissing="true" android:layout_toRightOf="@id/icon" android:gravity="center_vertical" android:text="Example application" android:textSize="16sp" /></RelativeLayout>
The adapter would inflate the layout for each row in its getView() method and assign the data to the individual views in the row.
The adapter is assigned to the ListView via the setAdapter method on the ListView object.
Tip Adapters are not only used by ListView, but also by other views which extend AdapterView as, for example, Spinner, GridView, Gallery and StackView.
适配器不仅仅适用于ListView,也可用于其他继承了AdapterView的View,比如Spinner、GridView、Gallery、StackView等。
1.5. Filtering and sorting
Filtering and sorting of the data is handled by the adapter. You need to implement the logic in your custom adapter implementation.
数据的过滤和排序由适配器处理。 你只需要实现自定义适配器的逻辑。1.6. Data updates in the adapter
The notifyDataSetChanged() method on the adapter is called if the data has changed or if new data is available.
The notifyDataSetInvalidated() method is called if the data is not available anymore.
如果数据已经改变或者有新的数据可用,适配器应该调用notifyDataSetChanged()
如果数据不再可用,应当调用notifyDataSetInvalidated()方法
1.7. Listener
To react to selections in the list, set an OnItemClickListener to your ListView.
listView.setOnItemClickListener(new OnItemClickListener() { @Override public void onItemClick(AdapterView<?> parent, View view, int position, long id) { Toast.makeText(getApplicationContext(), "Click ListItem Number " + position, Toast.LENGTH_LONG) .show(); }}); 2. Default adapter
2.1. Default platform adapter
Android provides default adapter implementations; the most important are ArrayAdapter and CursorAdapter.
ArrayAdapter can handle data based on Arrays or java.util.List.
SimpleCursorAdapter can handle database related data.
Android提供了默认的适配器的实现; 最重要的是ArrayAdapter和CursorAdapter 。
ArrayAdapter可以处理基于Arrays或java.util.List 的数据。
SimpleCursorAdapter可以处理数据库的相关数据。
2.2. Using ArrayAdapter
The ArrayAdapter class can handle a list or array of Java objects as input. Every Java object is mapped to one row. By default, it maps the toString() method of the object to a view in the row layout.
You can define the ID of the view in the constructor of the ArrayAdapter otherwise the android.R.id.text1 ID is used as default.
The ArrayAdapter class allows to remove all elements in its underlying data structure with the clear() method call. You can then add new elements via the add() method or a Collection via the addAll() method.
You can also directly modify the underlying data structure and call the notifyDataSetChanged() method on the adapter to notify it about the changes in data.
Warning If you want to change the data in your adapter, the underlying data structure must support this operation. This is, for example, the case for the ArrayList class, but not for arrays.
该ArrayAdapter类可以处理Java对象作为输入列表或数组。 每个Java对象映射到一行。 默认情况下,它映射toString()对象的方法,在该行布局视图。
您可以定义在的构造函数的视图的ID ArrayAdapter否则android.R.id.text1 ID被用作默认。
在ArrayAdapter类可删除其底层数据结构中的所有元素与clear()方法调用。 然后,您可以通过添加新元素add()方法或Collection通过addAll()方法。
您也可以直接修改底层的数据结构,并调用notifyDataSetChanged()的适配器上的方法,通知它有关的变化数据。
警告 如果你想改变你的适配器中的数据,底层数据结构必须支持此操作。 这是,例如,对于该情况下ArrayList类,但不为阵列。
2.3. ListView example with ArrayAdapter
The following listing shows a layout file called activity_listviewexampleactivity.xml which includes a ListView.
<ListView xmlns:android="http://schemas.android.com/apk/res/android" android:id="@+id/listview" android:layout_width="wrap_content" android:layout_height="wrap_content" />
The following example shows the usage of the
ListView view in an activity. It uses a default layout from the Android platform for the row layout. It also demonstrates the removal of list items and uses animations for the removal.package com.vogella.android.listview.withanimation;public class ListViewExampleActivity extends Activity { @Override protected void onCreate(Bundle savedInstanceState) { super.onCreate(savedInstanceState); setContentView(R.layout.activity_listviewexampleactivity); final ListView listview = (ListView) findViewById(R.id.listview); String[] values = new String[] { "Android", "iPhone", "WindowsMobile", "Blackberry", "WebOS", "Ubuntu", "Windows7", "Max OS X", "Linux", "OS/2", "Ubuntu", "Windows7", "Max OS X", "Linux", "OS/2", "Ubuntu", "Windows7", "Max OS X", "Linux", "OS/2", "Android", "iPhone", "WindowsMobile" }; final ArrayList<String> list = new ArrayList<String>(); for (int i = 0; i < values.length; ++i) { list.add(values[i]); } final StableArrayAdapter adapter = new StableArrayAdapter(this, android.R.layout.simple_list_item_1, list); listview.setAdapter(adapter); listview.setOnItemClickListener(new AdapterView.OnItemClickListener() { @Override public void onItemClick(AdapterView<?> parent, final View view, int position, long id) { final String item = (String) parent.getItemAtPosition(position); view.animate().setDuration(2000).alpha(0) .withEndAction(new Runnable() { @Override public void run() { list.remove(item); adapter.notifyDataSetChanged(); view.setAlpha(1); } }); } }); } private class StableArrayAdapter extends ArrayAdapter<String> { HashMap<String, Integer> mIdMap = new HashMap<String, Integer>(); public StableArrayAdapter(Context context, int textViewResourceId, List<String> objects) { super(context, textViewResourceId, objects); for (int i = 0; i < objects.size(); ++i) { mIdMap.put(objects.get(i), i); } } @Override public long getItemId(int position) { String item = getItem(position); return mIdMap.get(item); } @Override public boolean hasStableIds() { return true; } }} 译不动了,直接复制谷歌的翻译了吧,基本意思有了,大体配合着看还是能看懂的。
请原谅我的懒~~~~~~~~~
3. Custom adapter implementations
3.1. Developing a custom adapter
The ArrayAdapter is limited as it supports only the mapping of toString() to one view in the row layout. To control the data assignment and to support several views, you have to create your custom adapter implementation.
For this you would extend an existing adapter implementation or subclass the BaseAdapter class directly.
所述ArrayAdapter有限 ??,因为它支持的唯一映射toString()中的行布局1图。 来控制数据的分配,并支持多个视图,你必须创建自己的自定义适配器实现。
为此,将扩大现有的适配器实现或子类BaseAdapter直接类。
3.2. Preparing a row for the list
The adapter needs to create a layout for each row of the list. The ListView instance calls the getView() method on the adapter for each data element. In this method the adapter creates the row layout and maps the data to the views in the layout.
This root of the layout is typically a ViewGroup (layout manager) and contains several other views , e.g., an ImageView and aTextView. The following graphic shows a list with different layouts for odd and even rows.
该适配器需要创建一个布局为列表中的每一行。 所述ListView实例调用getView()为每个数据元素在适配器上的方法。 在该方法中,适配器创建的行布局和数据映射到在布局的观点。
布局的这根通常是ViewGroup (布局管理器),并包含一些其他意见,例如,一个ImageView和TextView 。 下图显示了不同的布局奇数行和偶数行的列表。

Within the getView() method you would inflate an XML based layout and then set the content of the individual views based on the Java object for this row. To inflate the XML layout file, you can use the LayoutInflator system service.
After the adapter inflated the layout, it searches for the relevant views in the layout and fills them with the data. The individual elements in the layout can be found via the findViewById() method call on the top level view.
在getView()方法内,你会助长一种基于XML的布局,然后设置基于此行的Java对象的个人意见的内容。 膨胀的XML布局文件,你可以使用LayoutInflator系统服务。
后适配器膨胀的布局,它搜索的布局有关意见,并填写他们的数据。 在布局中的各个元件可以通过找到findViewById()上的顶层视图方法调用。
3.3. Example for a custom adapter
The following code shows an implementation of a custom adapter. This adapter assumes that you have two png files (no.png and yes.png) in one of your res/drawable folders. The coding inflates an XML layout file, finds the relevant views in the layout and sets their content based on the input data.
res/drawable文件夹。 编码膨胀的XML布局文件,找到有关的意见,在布局,并基于所述输入数据的内容。package de.vogella.android.listactivity;import android.content.Context;import android.view.LayoutInflater;import android.view.View;import android.view.ViewGroup;import android.widget.ArrayAdapter;import android.widget.ImageView;import android.widget.TextView;public class MySimpleArrayAdapter extends ArrayAdapter<String> { private final Context context; private final String[] values; public MySimpleArrayAdapter(Context context, String[] values) { super(context, R.layout.rowlayout, values); this.context = context; this.values = values; } @Override public View getView(int position, View convertView, ViewGroup parent) { LayoutInflater inflater = (LayoutInflater) context .getSystemService(Context.LAYOUT_INFLATER_SERVICE); View rowView = inflater.inflate(R.layout.rowlayout, parent, false); TextView textView = (TextView) rowView.findViewById(R.id.label); ImageView imageView = (ImageView) rowView.findViewById(R.id.icon); textView.setText(values[position]); // change the icon for Windows and iPhone String s = values[position]; if (s.startsWith("iPhone")) { imageView.setImageResource(R.drawable.no); } else { imageView.setImageResource(R.drawable.ok); } return rowView; }} 3.4. Updating the data model from the adapter
The row can also contain views which interact with the underlying data model via the adapter. For example, you can have aCheckbox in your row layout and if the Checkbox is selected, the underlying data is changed.
4. ListActivity and ListFragment
4.1. Default container for using ListView
Android provides specialized fragment and activity classes to simplify list handling.
The classes are the ListActivity class if you want to use lists in activities and the the ListFragment class if you want to use lists in fragments.
You do not have to assign a layout to these elements. If you do not define a layout, the activity or fragment contains a singleListView by default. ListActivity and ListFragment also allow you to override a onListItemClick() method for handling selection of list items.
Both classes allow you to set the adapter to the default ListView via the setListAdapter() method.
The following example code shows a simple ListFragment implementation.
package de.vogella.android.fragments;import android.content.Intent;import android.os.Bundle;import android.view.View;import android.widget.ArrayAdapter;import android.widget.ListView;import android.app.ListFragment;public class MyListFragment extends ListFragment { @Override public void onActivityCreated(Bundle savedInstanceState) { super.onActivityCreated(savedInstanceState); String[] values = new String[] { "Android", "iPhone", "WindowsMobile", "Blackberry", "WebOS", "Ubuntu", "Windows7", "Max OS X", "Linux", "OS/2" }; ArrayAdapter<String> adapter = new ArrayAdapter<String>(getActivity(), android.R.layout.simple_list_item_1, values); setListAdapter(adapter); } @Override public void onListItemClick(ListView l, View v, int position, long id) { // do something with the data }}
The next example code demonstrates the usage of a ListActivity.
package de.vogella.android.listactivity;import android.app.ListActivity;import android.os.Bundle;import android.widget.ArrayAdapter;public class MyListActivity extends ListActivity { public void onCreate(Bundle icicle) { super.onCreate(icicle); String[] values = new String[] { "Android", "iPhone", "WindowsMobile", "Blackberry", "WebOS", "Ubuntu", "Windows7", "Max OS X", "Linux", "OS/2" }; ArrayAdapter<String> adapter = new ArrayAdapter<String>(this, android.R.layout.simple_list_item_1, values); setListAdapter(adapter); }}
4.2. ListActivity and custom layout
You can use a custom layout with ListActivity or ListFragment. In this case the fragment or activity searches in the provided layout for a ListView with the pre-defined android:id attribute set to @android:id/list. This usage is demonstrated by the following code snippet.
<ListView android:id="@android:id/list" android:layout_width="match_parent" android:layout_height="wrap_content" ></ListView>
4.3. Placeholder for an empty list
You can also use a view with the @android:id/empty ID in your layout. The corresponding activity and fragment shows this view automatically if the ListView is empty and hides it otherwise. For example, you could display an error message in such a view.
5. Exercise: Using ListView and ListActivity
The following exercise demonstrates how to use a ListView in an ListActivity. You use the predefined ArrayAdapter class and an existing Android layout for the rows.
Create a new Android project called de.vogella.android.listactivity with the activity called MyListActivity.
Change MyListActivity class based on the the following code example. Note that the setContentView() method is not used.
package de.vogella.android.listactivity;import android.app.ListActivity;import android.os.Bundle;import android.view.View;import android.widget.ArrayAdapter;import android.widget.ListView;import android.widget.Toast;public class MyListActivity extends ListActivity { public void onCreate(Bundle icicle) { super.onCreate(icicle); String[] values = new String[] { "Android", "iPhone", "WindowsMobile", "Blackberry", "WebOS", "Ubuntu", "Windows7", "Max OS X", "Linux", "OS/2" }; ArrayAdapter<String> adapter = new ArrayAdapter<String>(this, android.R.layout.simple_list_item_1, values); setListAdapter(adapter); } @Override protected void onListItemClick(ListView l, View v, int position, long id) { String item = (String) getListAdapter().getItem(position); Toast.makeText(this, item + " selected", Toast.LENGTH_LONG).show(); }}
6. Exercise: ListActivity with own layout
In our example your will define your layout for the rows and use it in your adapter.
Create the rowlayout.xml layout file in the res/layout folder of the de.vogella.android.listactivity project.
<?xml version="1.0" encoding="utf-8"?><LinearLayout xmlns:android="http://schemas.android.com/apk/res/android" android:layout_width="wrap_content" android:layout_height="wrap_content" > <ImageView android:id="@+id/icon" android:layout_width="22px" android:layout_height="22px" android:layout_marginLeft="4px" android:layout_marginRight="10px" android:layout_marginTop="4px" android:src="@drawable/ic_launcher" > </ImageView> <TextView android:id="@+id/label" android:layout_width="wrap_content" android:layout_height="wrap_content" android:text="@+id/label" android:textSize="20px" > </TextView></LinearLayout>
Change your activity so that is using the new layout.
package de.vogella.android.listactivity;import android.app.ListActivity;import android.os.Bundle;import android.view.View;import android.widget.ArrayAdapter;import android.widget.ListView;import android.widget.Toast;public class MyListActivity extends ListActivity { public void onCreate(Bundle icicle) { super.onCreate(icicle); String[] values = new String[] { "Android", "iPhone", "WindowsMobile", "Blackberry", "WebOS", "Ubuntu", "Windows7", "Max OS X", "Linux", "OS/2" }; // use your custom layout ArrayAdapter<String> adapter = new ArrayAdapter<String>(this, R.layout.rowlayout, R.id.label, values); setListAdapter(adapter); } @Override protected void onListItemClick(ListView l, View v, int position, long id) { String item = (String) getListAdapter().getItem(position); Toast.makeText(this, item + " selected", Toast.LENGTH_LONG).show(); }}
7. Tutorial: Implementing your own adapter
The following uses two images "no.png" and "ok.png". I placed it in the "res/drawable-mdpi" folder. You must create your own icons. In case you do not find any icons just copy "icon.png" and use a drawing program to change it a little bit.
Create the class MySimpleArrayAdapter which will serve as our adapter.
package de.vogella.android.listactivity;import android.content.Context;import android.view.LayoutInflater;import android.view.View;import android.view.ViewGroup;import android.widget.ArrayAdapter;import android.widget.ImageView;import android.widget.TextView;public class MySimpleArrayAdapter extends ArrayAdapter<String> { private final Context context; private final String[] values; public MySimpleArrayAdapter(Context context, String[] values) { super(context, R.layout.rowlayout, values); this.context = context; this.values = values; } @Override public View getView(int position, View convertView, ViewGroup parent) { LayoutInflater inflater = (LayoutInflater) context .getSystemService(Context.LAYOUT_INFLATER_SERVICE); View rowView = inflater.inflate(R.layout.rowlayout, parent, false); TextView textView = (TextView) rowView.findViewById(R.id.label); ImageView imageView = (ImageView) rowView.findViewById(R.id.icon); textView.setText(values[position]); // Change the icon for Windows and iPhone String s = values[position]; if (s.startsWith("Windows7") || s.startsWith("iPhone") || s.startsWith("Solaris")) { imageView.setImageResource(R.drawable.no); } else { imageView.setImageResource(R.drawable.ok); } return rowView; }}
To use this adapter, change the activity to the following.
package de.vogella.android.listactivity;import android.app.ListActivity;import android.os.Bundle;public class MyListActivity extends ListActivity { public void onCreate(Bundle icicle) { super.onCreate(icicle); String[] values = new String[] { "Android", "iPhone", "WindowsMobile", "Blackberry", "WebOS", "Ubuntu", "Windows7", "Max OS X", "Linux", "OS/2" }; MySimpleArrayAdapter adapter = new MySimpleArrayAdapter(this, values); setListAdapter(adapter); }}
If you run this example you should get a list with different icons for the certain elements.

8. ListViews and performance
8.1. Motivation
Performance is especially important on Android as users expect fast reaction times. Compared to desktop computers an Android device is relatively slow from the hardware perspective.
This part describes how to reduce these operations to implement your custom list adapter efficiently. The default Android adapters like ArrayAdapter are already performance optimized.
8.2. Time consuming operations
Every view which get inflated from an XML layout file will result in a Java object. Inflating layouts and creating Java objects is expensive with regards to time and memory consumption.
In addition using the findViewById() method is relatively time consuming, even though it is not as bad as XML inflating.
8.3. Avoiding layout inflation and object creation
A ListView typically contains more data than the number of displayed rows. If the user scrolls the list, then rows and their associated views are being scrolled out of the visible area. The Java objects which represents the rows can be reused for newly visible rows.
If Android determines that a row is not visible anymore, it allows the getView() of the adapter method to reuse the associated view via the convertView parameter.
The adapter can assign new data to the views contained in the view hierarchy of the convertView. This avoids inflating an XML file and creating new Java objects.
In case Android cannot reuse a row, the Android system passes null to the convertView parameter. Therefore the adapter implementation needs to check for this.
8.4. View holder pattern
A ViewHolder implementation allows to avoid the findViewById() method in an adapter.
A ViewHolder class is typically a static inner class in your adapter which holds references to the relevant views. in your layout. This reference is assigned to the row view as a tag via the setTag() method.
If we receive a convertView object, we can get the instance of the ViewHolder via the getTag() method and assign the new attributes to the views via the ViewHolder reference.
While this sounds complex this is approximately 15 % faster then using the findViewById() method.
8.5. Example
The following code shows a performance optimized adapter implementation which reuses existing views and implements the holder pattern.
package de.vogella.android.listactivity;import android.app.Activity;import android.view.LayoutInflater;import android.view.View;import android.view.ViewGroup;import android.widget.ArrayAdapter;import android.widget.ImageView;import android.widget.TextView;public class MyPerformanceArrayAdapter extends ArrayAdapter<String> { private final Activity context; private final String[] names; static class ViewHolder { public TextView text; public ImageView image; } public MyPerformanceArrayAdapter(Activity context, String[] names) { super(context, R.layout.rowlayout, names); this.context = context; this.names = names; } @Override public View getView(int position, View convertView, ViewGroup parent) { View rowView = convertView; // reuse views if (rowView == null) { LayoutInflater inflater = context.getLayoutInflater(); rowView = inflater.inflate(R.layout.rowlayout, null); // configure view holder ViewHolder viewHolder = new ViewHolder(); viewHolder.text = (TextView) rowView.findViewById(R.id.TextView01); viewHolder.image = (ImageView) rowView .findViewById(R.id.ImageView01); rowView.setTag(viewHolder); } // fill data ViewHolder holder = (ViewHolder) rowView.getTag(); String s = names[position]; holder.text.setText(s); if (s.startsWith("Windows7") || s.startsWith("iPhone") || s.startsWith("Solaris")) { holder.image.setImageResource(R.drawable.no); } else { holder.image.setImageResource(R.drawable.ok); } return rowView; }}
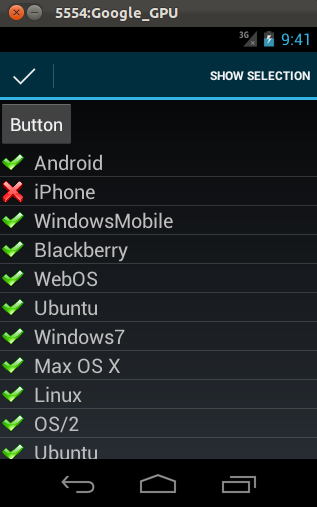
9. Storing the selection of a view
By default a ListView has no selection mode active. You can activate it via the setChoiceMode() method call. PassListView.CHOICE_MODE_MULTIPLE for multiple selections or ListView.CHOICE_MODE_SINGLE for single selections to this method.
To get the selected items of a ListView, use the getCheckedItemPosition() for a single selection method orlistView.getCheckedItemPositions() for multiple selections. . If you have stable ID, you could also use the getCheckedItemIds()method to get the selected IDs.
Android already provides a default layout for this: the android.R.layout.simple_list_item_multiple_choice layout which contains a configured CheckedTextView view.
The following activities demonstrate how to use these selection modes. If you use these modes, the ListView stores the selected values. It is not persisted in your data model.
package com.vogella.android.listview.selection.multi;import android.app.ListActivity;import android.os.Bundle;import android.view.Menu;import android.view.MenuItem;import android.widget.ArrayAdapter;import android.widget.ListView;import android.widget.Toast;import com.vogella.android.listview.selection.R;public class MainActivity extends ListActivity { @Override protected void onCreate(Bundle savedInstanceState) { super.onCreate(savedInstanceState); String[] values = new String[] { "a", "b", "c", "d", "e", "f", "g", "h", "i", "j", "k", "l", "m", "n", "o", "p", "q", "r", "s", "t", "u", "w", "x", "y", "z" }; ArrayAdapter<String> adapter = new ArrayAdapter<String>(this, android.R.layout.simple_list_item_multiple_choice, values); setListAdapter(adapter); getListView().setChoiceMode(ListView.CHOICE_MODE_MULTIPLE); } @Override public boolean onCreateOptionsMenu(Menu menu) { getMenuInflater().inflate(R.menu.main, menu); return true; } @Override public boolean onOptionsItemSelected(MenuItem item) { Toast.makeText(this, String.valueOf(getListView().getCheckedItemCount()), Toast.LENGTH_LONG).show(); return true; }}
package com.vogella.android.listview.selection.single;import android.app.ListActivity;import android.os.Bundle;import android.view.Menu;import android.view.MenuItem;import android.widget.ArrayAdapter;import android.widget.ListView;import android.widget.Toast;public class MainActivity extends ListActivity { @Override protected void onCreate(Bundle savedInstanceState) { super.onCreate(savedInstanceState); String[] values = new String[] { "a", "b", "c", "d", "e", "f", "g", "h", "i", "j", "k", "l", "m", "n", "o", "p", "q", "r", "s", "t", "u", "w", "x", "y", "z" }; ArrayAdapter<String> adapter = new ArrayAdapter<String>(this, android.R.layout.simple_list_item_single_choice, values); setListAdapter(adapter); getListView().setChoiceMode(ListView.CHOICE_MODE_SINGLE); } @Override public boolean onCreateOptionsMenu(Menu menu) { getMenuInflater().inflate(R.menu.main, menu); return true; } @Override public boolean onOptionsItemSelected(MenuItem item) { Toast.makeText(this, String.valueOf(getListView().getCheckedItemCount()), Toast.LENGTH_LONG).show(); return true; }}
10. Contextual action mode for ListViews
The following assumes that you already familiar with the concept of the ActionBar and contextual action mode in general. This part will explain how to use contextual action mode for a ListView selection.
To assign a contextual action mode to a long click on an individual item, use the method setOnItemLongClickListener() onListView. This methods includes information about the selected item. In this method you can start the ActionMode.
The following examples demonstrate that. It assumes that you have a menu XML file defined called rowselection.xml and that this menu contains one entry with the @+id/menuitem1_show ID.
package de.vogella.android.listactivity;import android.app.ListActivity;import android.os.Bundle;import android.view.ActionMode;import android.view.Menu;import android.view.MenuInflater;import android.view.MenuItem;import android.view.View;import android.widget.AdapterView;import android.widget.AdapterView.OnItemLongClickListener;import android.widget.Toast;public class MyListActivityActionbar extends ListActivity implements ActionMode.Callback { protected Object mActionMode; public int selectedItem = -1; @Override public void onCreate(Bundle icicle) { super.onCreate(icicle); String[] values = new String[] { "Android", "iPhone", "WindowsMobile", "Blackberry", "WebOS", "Ubuntu", "Windows7", "Max OS X", "Linux", "OS/2", "Ubuntu", "Windows7", "Max OS X", "Linux", "OS/2", "Ubuntu", "Windows7", "Max OS X", "Linux", "OS/2" }; MySimpleArrayAdapter adapter = new MySimpleArrayAdapter(this, values); setListAdapter(adapter); getListView().setOnItemLongClickListener(new OnItemLongClickListener() { @Override public boolean onItemLongClick(AdapterView<?> parent, View view, int position, long id) { if (mActionMode != null) { return false; } selectedItem = position; // Start the CAB using the ActionMode.Callback defined above MyListActivityActionbar.this.startActionMode(MyListActivityActionbar.this); view.setSelected(true); return true; } }); } private void show() { Toast.makeText(MyListActivityActionbar.this, String.valueOf(selectedItem), Toast.LENGTH_LONG).show(); } // Called when the action mode is created; startActionMode() was called @Override public boolean onCreateActionMode(ActionMode mode, Menu menu) { // Inflate a menu resource providing context menu items MenuInflater inflater = mode.getMenuInflater(); // Assumes that you have "contexual.xml" menu resources inflater.inflate(R.menu.rowselection, menu); return true; } // Called each time the action mode is shown. Always called after // onCreateActionMode, but // may be called multiple times if the mode is invalidated. @Override public boolean onPrepareActionMode(ActionMode mode, Menu menu) { return false; // Return false if nothing is done } // Called when the user selects a contextual menu item @Override public boolean onActionItemClicked(ActionMode mode, MenuItem item) { switch (item.getItemId()) { case R.id.menuitem1_show: show(); // Action picked, so close the CAB mode.finish(); return true; default: return false; } } // Called when the user exits the action mode @Override public void onDestroyActionMode(ActionMode mode) { mActionMode = null; selectedItem = -1; }}
If you start your application and long press on an item in the list, you get your contextual action bar.
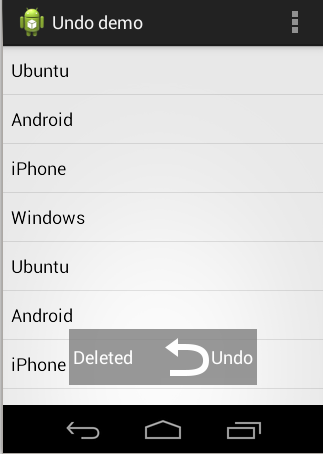
11. Implementing undo for an action
11.1. When should you offer an undo action?
It is good practice to allow the user to undo critical actions. Such a critical action is, for example, the deletion of list items.
A proven pattern to handle this undo option is to offer a selection at the end of the screen. This selection vanishes after a predefined time or once the user continues to interact with the application.
For example, the Gmail application implements such a behavior.

11.2. Example
The following description contains an example for implementing an undo action. It uses an animation to phase out the undo button automatically out after a while.
For this example create a new project called com.vogella.android.userinterface.undo based on the BlankTemplate template.
Create the following layout for your activity. It uses a FrameLayout to show two different parts of the user interface. The button bar is initially hidden. The button uses a drawable. Either add such a drawable to your project or remove the reference.
<FrameLayout xmlns:android="http://schemas.android.com/apk/res/android" xmlns:tools="http://schemas.android.com/tools" android:layout_width="match_parent" android:layout_height="match_parent" > <RelativeLayout android:layout_width="match_parent" android:layout_height="match_parent" tools:context=".MainActivity" > <ListView android:id="@+id/listview" android:layout_width="match_parent" android:layout_height="match_parent" > </ListView> </RelativeLayout> <LinearLayout android:id="@+id/undobar" android:visibility="gone" android:layout_width="wrap_content" android:layout_height="wrap_content" android:layout_gravity="bottom|center_horizontal" android:layout_margin="20dp" android:alpha="100" android:background="#808080" android:dividerPadding="11dp" android:padding="4dp" > <TextView android:id="@+id/undobar_message" android:layout_width="wrap_content" android:layout_height="wrap_content" android:text="Deleted" android:textAppearance="?android:attr/textAppearanceMedium" android:textColor="#fff" /> <Button android:id="@+id/undobar_button" android:layout_width="wrap_content" android:layout_height="wrap_content" android:layout_marginLeft="30dp" android:onClick="onClick" android:background="#808080" android:drawableLeft="@drawable/ic_undobar_undo" android:text="Undo" android:textAppearance="?android:attr/textAppearanceMedium" android:textColor="#fff" /> </LinearLayout></FrameLayout>
Change your activity so that it is similar to the following code. The Android project wizard in Eclipse already generated anActionBar entry. This entry is used in the following code. If in doubt, create your own ActionBar entry.
package com.vogella.android.userinterface.undo;import android.app.Activity;import android.os.Bundle;import android.view.Menu;import android.view.MenuItem;import android.view.View;import android.widget.ArrayAdapter;import android.widget.ListView;import android.widget.Toast;import com.vogella.android.actionbar.undo.R;public class MainActivity extends Activity { private View viewContainer; @Override protected void onCreate(Bundle savedInstanceState) { super.onCreate(savedInstanceState); setContentView(R.layout.activity_main); ListView l = (ListView) findViewById(R.id.listview); String[] values = new String[] { "Ubuntu", "Android", "iPhone", "Windows", "Ubuntu", "Android", "iPhone", "Windows" }; ArrayAdapter<String> adapter = new ArrayAdapter<String>(this, android.R.layout.simple_list_item_1, values); viewContainer = findViewById(R.id.undobar); l.setAdapter(adapter); } @Override public boolean onCreateOptionsMenu(Menu menu) { // Inflate the menu; this adds items to the action bar if it is present. getMenuInflater().inflate(R.menu.activity_main, menu); return true; } @Override public boolean onOptionsItemSelected(MenuItem item) { showUndo(viewContainer); return true; } public void onClick(View view) { Toast.makeText(this, "Deletion undone", Toast.LENGTH_LONG).show(); viewContainer.setVisibility(View.GONE); } public static void showUndo(final View viewContainer) { viewContainer.setVisibility(View.VISIBLE); viewContainer.setAlpha(1); viewContainer.animate().alpha(0.4f).setDuration(5000) .withEndAction(new Runnable() { @Override public void run() { viewContainer.setVisibility(View.GONE); } }); }}
If you select the entry in the ActionBar, the button bar becomes visible for 5 seconds.
12. Performance Optimization
The following will implement a performance optimized version of the adapter from the previous example.
Create the following MyPerformanceArrayAdapter class.
package de.vogella.android.listactivity;import android.app.Activity;import android.view.LayoutInflater;import android.view.View;import android.view.ViewGroup;import android.widget.ArrayAdapter;import android.widget.ImageView;import android.widget.TextView;public class MyPerformanceArrayAdapter extends ArrayAdapter<String> { private final Activity context; private final String[] names; static class ViewHolder { public TextView text; public ImageView image; } public MyPerformanceArrayAdapter(Activity context, String[] names) { super(context, R.layout.rowlayout, names); this.context = context; this.names = names; } @Override public View getView(int position, View convertView, ViewGroup parent) { View rowView = convertView; // reuse views if (rowView == null) { LayoutInflater inflater = context.getLayoutInflater(); rowView = inflater.inflate(R.layout.rowlayout, null); // configure view holder ViewHolder viewHolder = new ViewHolder(); viewHolder.text = (TextView) rowView.findViewById(R.id.TextView01); viewHolder.image = (ImageView) rowView .findViewById(R.id.ImageView01); rowView.setTag(viewHolder); } // fill data ViewHolder holder = (ViewHolder) rowView.getTag(); String s = names[position]; holder.text.setText(s); if (s.startsWith("Windows7") || s.startsWith("iPhone") || s.startsWith("Solaris")) { holder.image.setImageResource(R.drawable.no); } else { holder.image.setImageResource(R.drawable.ok); } return rowView; }}
Use your new adapter in your activity. If you run the application it should look the same but it will be much faster, especially for large datasets.
package de.vogella.android.listactivity;import android.app.ListActivity;import android.os.Bundle;public class MyListActivity extends ListActivity { public void onCreate(Bundle icicle) { super.onCreate(icicle); String[] values = new String[] { "Android", "iPhone", "WindowsMobile", "Blackberry", "WebOS", "Ubuntu", "Windows7", "Max OS X", "Linux", "OS/2" }; setListAdapter(new MyPerformanceArrayAdapter(this, values)); }}
13. Tutorial: How to display two items in a ListView
You can use the SimpleAdapter class to show the data of two elements. This class expects a Array of Strings (from data) in which the fields of the input data are defined. It also requires a Array of ints which defines the IDs of the widgets in the layout for the row to which these fields are mapped.
The actual data is then a list of Maps. The Map defines for each field in the from data a value.
The following shows an example which reuses an predefined layout from Android for the row.
package de.vogella.android.listactivity;import java.util.ArrayList;import java.util.HashMap;import java.util.Map;import android.app.ListActivity;import android.os.Bundle;import android.widget.SimpleAdapter;public class MyTwoListItemsActivity extends ListActivity { protected void onCreate(Bundle savedInstanceState) { super.onCreate(savedInstanceState); ArrayList<Map<String, String>> list = buildData(); String[] from = { "name", "purpose" }; int[] to = { android.R.id.text1, android.R.id.text2 }; SimpleAdapter adapter = new SimpleAdapter(this, list, android.R.layout.simple_list_item_2, from, to); setListAdapter(adapter); } private ArrayList<Map<String, String>> buildData() { ArrayList<Map<String, String>> list = new ArrayList<Map<String, String>>(); list.add(putData("Android", "Mobile")); list.add(putData("Windows7", "Windows7")); list.add(putData("iPhone", "iPhone")); return list; } private HashMap<String, String> putData(String name, String purpose) { HashMap<String, String> item = new HashMap<String, String>(); item.put("name", name); item.put("purpose", purpose); return item; } }
14. Selecting multiple items in the ListView
14.1. Interaction between the model and Listview
Frequently you need to select items in your ListView. As the row of the ListView are getting recycled you cannot store the selection on the View level.
Selection is just one possible example but you can imange other interaction between your row and model.
To persist the selection you have to update your data model with the selected state.
To update the data model in your ListView you define your own Adapter class. In this adapter class you attach a listener to theView which is responsible for selecting the model element. If selected you update the state in the model which you can add as a tag to the View to have access to it.
The following example demonstrates how to use standard Java object and how to interact from the Views with the model.
14.2. Tutorial: Domain Model and Rows interaction
Continue to use the de.vogella.android.listactivity project.
Create the following Model which hold the name and the information if this element is currently selected.
package de.vogella.android.listactivity;public class Model { private String name; private boolean selected; public Model(String name) { this.name = name; selected = false; } public String getName() { return name; } public void setName(String name) { this.name = name; } public boolean isSelected() { return selected; } public void setSelected(boolean selected) { this.selected = selected; }}
Create the following new layout file called rowbuttonlayout.xml.
<?xml version="1.0" encoding="utf-8"?><RelativeLayout xmlns:android="http://schemas.android.com/apk/res/android" android:layout_width="match_parent" android:layout_height="wrap_content" > <TextView android:id="@+id/label" android:layout_width="wrap_content" android:layout_height="wrap_content" android:text="@+id/label" android:textSize="30px" > </TextView> <CheckBox android:id="@+id/check" android:layout_width="wrap_content" android:layout_height="wrap_content" android:layout_alignParentRight="true" android:layout_marginLeft="4px" android:layout_marginRight="10px" > </CheckBox></RelativeLayout>
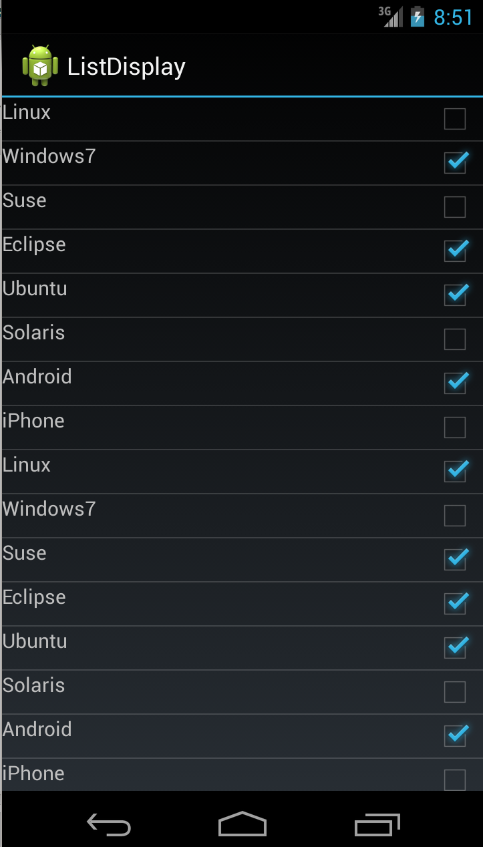
Create the following Adapter. This adapter adds a listener on the Checkbox view . If the checkbox is selected the underlying data of the model is changed. Checkbox gets the corresponding model element assigned via the getTag() method.
package de.vogella.android.listactivity;import java.util.List;import android.app.Activity;import android.view.LayoutInflater;import android.view.View;import android.view.ViewGroup;import android.widget.ArrayAdapter;import android.widget.CheckBox;import android.widget.CompoundButton;import android.widget.TextView;public class InteractiveArrayAdapter extends ArrayAdapter<Model> { private final List<Model> list; private final Activity context; public InteractiveArrayAdapter(Activity context, List<Model> list) { super(context, R.layout.rowbuttonlayout, list); this.context = context; this.list = list; } static class ViewHolder { protected TextView text; protected CheckBox checkbox; } @Override public View getView(int position, View convertView, ViewGroup parent) { View view = null; if (convertView == null) { LayoutInflater inflator = context.getLayoutInflater(); view = inflator.inflate(R.layout.rowbuttonlayout, null); final ViewHolder viewHolder = new ViewHolder(); viewHolder.text = (TextView) view.findViewById(R.id.label); viewHolder.checkbox = (CheckBox) view.findViewById(R.id.check); viewHolder.checkbox .setOnCheckedChangeListener(new CompoundButton.OnCheckedChangeListener() { @Override public void onCheckedChanged(CompoundButton buttonView, boolean isChecked) { Model element = (Model) viewHolder.checkbox .getTag(); element.setSelected(buttonView.isChecked()); } }); view.setTag(viewHolder); viewHolder.checkbox.setTag(list.get(position)); } else { view = convertView; ((ViewHolder) view.getTag()).checkbox.setTag(list.get(position)); } ViewHolder holder = (ViewHolder) view.getTag(); holder.text.setText(list.get(position).getName()); holder.checkbox.setChecked(list.get(position).isSelected()); return view; }}
Finally change your activity to the following.
package de.vogella.android.listactivity;import java.util.ArrayList;import java.util.List;import android.app.ListActivity;import android.os.Bundle;import android.widget.ArrayAdapter;public class MyList extends ListActivity {/** Called when the activity is first created. */public void onCreate(Bundle icicle) { super.onCreate(icicle); // create an array of Strings, that will be put to our ListActivity ArrayAdapter<Model> adapter = new InteractiveArrayAdapter(this, getModel()); setListAdapter(adapter); } private List<Model> getModel() { List<Model> list = new ArrayList<Model>(); list.add(get("Linux")); list.add(get("Windows7")); list.add(get("Suse")); list.add(get("Eclipse")); list.add(get("Ubuntu")); list.add(get("Solaris")); list.add(get("Android")); list.add(get("iPhone")); // Initially select one of the items list.get(1).setSelected(true); return list; } private Model get(String s) { return new Model(s); }}
If you start your app you should be able to flag items. These changes will be reflected in your model.
15. Implementing an expandable ListView
15.1. ExpandableListView
The ExpandableListView is similar to ListView but allow you to define groups and details for this group. ExpandableListViewexpects and adapter of type BaseExpandableListAdapter.
In this case you have to define two layouts, one for the group and another one for the details row.
15.2. ExpandableListView example
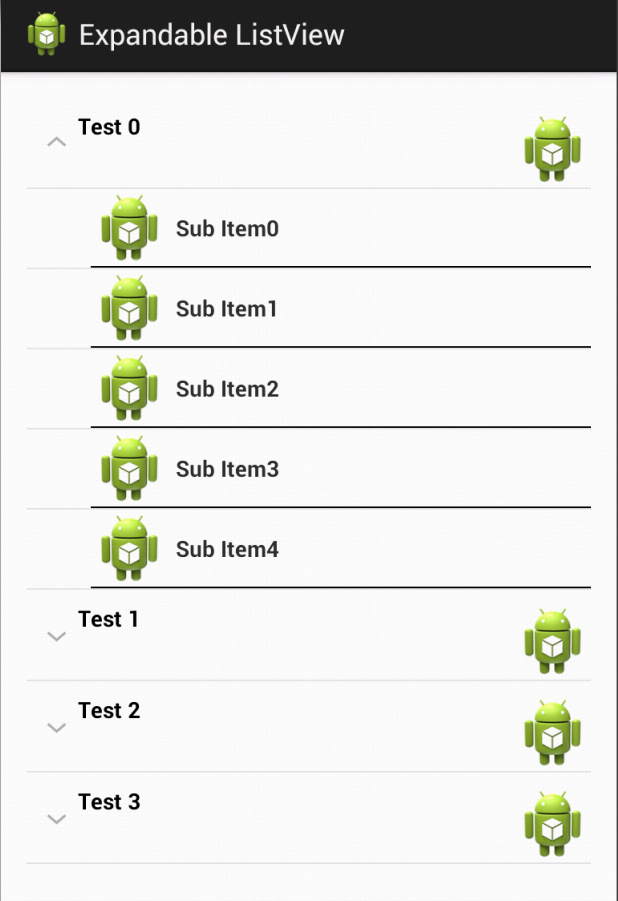
In the following example you create an expandable listview similar to the following screenshot.
Create a project called com.vogella.android.listview.expandable with the activity called MainActivity.
Create or adjust the following layout files. First layout/activity_main.xml.
<LinearLayout xmlns:android="http://schemas.android.com/apk/res/android" xmlns:tools="http://schemas.android.com/tools" android:id="@+id/LinearLayout1" android:layout_width="match_parent" android:layout_height="match_parent" android:paddingBottom="@dimen/activity_vertical_margin" android:paddingLeft="@dimen/activity_horizontal_margin" android:paddingRight="@dimen/activity_horizontal_margin" android:paddingTop="@dimen/activity_vertical_margin" tools:context=".MainActivity" > <ExpandableListView android:id="@+id/listView" android:layout_width="match_parent" android:layout_height="wrap_content" > </ExpandableListView></LinearLayout>
Afterwards create layout/listrow_group.xml.
<CheckedTextView xmlns:android="http://schemas.android.com/apk/res/android" xmlns:tools="http://schemas.android.com/tools" android:id="@+id/textView1" android:layout_width="wrap_content" android:layout_height="?android:attr/listPreferredItemHeight" android:layout_marginLeft="8dp" android:drawableRight="@drawable/ic_launcher" android:gravity="left" android:paddingLeft="32dp" android:paddingTop="8dp" android:text="Test" android:textSize="14sp" android:textAlignment="textEnd" android:textStyle="bold" />
The last required layout is layout/listrow_details.xml.
<LinearLayout xmlns:android="http://schemas.android.com/apk/res/android" xmlns:tools="http://schemas.android.com/tools" android:layout_width="match_parent" android:layout_height="40dp" android:clickable="true" android:orientation="vertical" android:paddingLeft="40dp" tools:context=".MainActivity" > <TextView android:id="@+id/textView1" android:layout_width="wrap_content" android:layout_height="wrap_content" android:drawableLeft="@drawable/ic_launcher" android:drawablePadding="5dp" android:gravity="center_vertical" android:text="@string/hello_world" android:textSize="14sp" android:textStyle="bold" > </TextView> <View android:layout_width="match_parent" android:layout_height="1dp" android:background="@android:color/black" /></LinearLayout>
Create the following class which hold your domain model for the ExpandableListView.
package com.vogella.android.listview.expandable;import java.util.ArrayList;import java.util.List;public class Group { public String string; public final List<String> children = new ArrayList<String>(); public Group(String string) { this.string = string; }}
Finally create the adapter as described by the following listing and change the activity to the code provided below.
package com.vogella.android.listview.expandable;import android.app.Activity;import android.util.SparseArray;import android.view.LayoutInflater;import android.view.View;import android.view.View.OnClickListener;import android.view.ViewGroup;import android.widget.BaseExpandableListAdapter;import android.widget.CheckedTextView;import android.widget.TextView;import android.widget.Toast;public class MyExpandableListAdapter extends BaseExpandableListAdapter { private final SparseArray<Group> groups; public LayoutInflater inflater; public Activity activity; public MyExpandableListAdapter(Activity act, SparseArray<Group> groups) { activity = act; this.groups = groups; inflater = act.getLayoutInflater(); } @Override public Object getChild(int groupPosition, int childPosition) { return groups.get(groupPosition).children.get(childPosition); } @Override public long getChildId(int groupPosition, int childPosition) { return 0; } @Override public View getChildView(int groupPosition, final int childPosition, boolean isLastChild, View convertView, ViewGroup parent) { final String children = (String) getChild(groupPosition, childPosition); TextView text = null; if (convertView == null) { convertView = inflater.inflate(R.layout.listrow_details, null); } text = (TextView) convertView.findViewById(R.id.textView1); text.setText(children); convertView.setOnClickListener(new OnClickListener() { @Override public void onClick(View v) { Toast.makeText(activity, children, Toast.LENGTH_SHORT).show(); } }); return convertView; } @Override public int getChildrenCount(int groupPosition) { return groups.get(groupPosition).children.size(); } @Override public Object getGroup(int groupPosition) { return groups.get(groupPosition); } @Override public int getGroupCount() { return groups.size(); } @Override public void onGroupCollapsed(int groupPosition) { super.onGroupCollapsed(groupPosition); } @Override public void onGroupExpanded(int groupPosition) { super.onGroupExpanded(groupPosition); } @Override public long getGroupId(int groupPosition) { return 0; } @Override public View getGroupView(int groupPosition, boolean isExpanded, View convertView, ViewGroup parent) { if (convertView == null) { convertView = inflater.inflate(R.layout.listrow_group, null); } Group group = (Group) getGroup(groupPosition); ((CheckedTextView) convertView).setText(group.string); ((CheckedTextView) convertView).setChecked(isExpanded); return convertView; } @Override public boolean hasStableIds() { return false; } @Override public boolean isChildSelectable(int groupPosition, int childPosition) { return false; }}
package com.vogella.android.listview.expandable;import java.util.ArrayList;import android.app.Activity;import android.os.Bundle;import android.util.SparseArray;import android.view.Menu;import android.widget.ExpandableListView;public class MainActivity extends Activity { // more efficient than HashMap for mapping integers to objects SparseArray<Group> groups = new SparseArray<Group>(); @Override protected void onCreate(Bundle savedInstanceState) { super.onCreate(savedInstanceState); setContentView(R.layout.activity_main); createData(); ExpandableListView listView = (ExpandableListView) findViewById(R.id.listView); MyExpandableListAdapter adapter = new MyExpandableListAdapter(this, groups); listView.setAdapter(adapter); } public void createData() { for (int j = 0; j < 5; j++) { Group group = new Group("Test " + j); for (int i = 0; i < 5; i++) { group.children.add("Sub Item" + i); } groups.append(j, group); } }}
16. Tutorial: Miscellaneous
16.1. Adding a longclick listener to the list items
You can also add a LongItemClickListener to the View. For this receive the ListView via the getListVIew() method and set the LongItemClickListener via the setOnItemLongClickListener() method.
package de.vogella.android.listactivity;import android.app.ListActivity;import android.os.Bundle;import android.view.View;import android.widget.AdapterView;import android.widget.AdapterView.OnItemLongClickListener;import android.widget.ArrayAdapter;import android.widget.ListView;import android.widget.Toast;public class MyList extends ListActivity {/** Called when the activity is first created. */public void onCreate(Bundle icicle) { super.onCreate(icicle); // create an array of Strings, that will be put to our ListActivity String[] names = new String[] { "Linux", "Windows7", "Eclipse", "Suse", "Ubuntu", "Solaris", "Android", "iPhone" }; ArrayAdapter<String> adapter = new MyPerformanceArrayAdapter(this, names); setListAdapter(adapter); ListView list = getListView(); list.setOnItemLongClickListener(new OnItemLongClickListener() { @Override public boolean onItemLongClick(AdapterView<?> parent, View view, int position, long id) { Toast.makeText(MyList.this, "Item in position " + position + " clicked", Toast.LENGTH_LONG).show(); // Return true to consume the click event. In this case the // onListItemClick listener is not called anymore. return true; } }); } @Override protected void onListItemClick(ListView l, View v, int position, long id) { super.onListItemClick(l, v, position, id); // Get the item that was clicked Object o = this.getListAdapter().getItem(position); String keyword = o.toString(); Toast.makeText(this, "You selected: " + keyword, Toast.LENGTH_SHORT) .show(); }}
16.2. Header and Footer
You can of course put arbitrary Views elements around your ListView. For example you can define a layout with two TextViewsand a ListView between them. In this case the two TextViews will always be visible above the List (header) and the other will be visible below the ListView. If you want to display a list header or list footer only at the see the beginning or end of the list you can use the addHeaderView() method or addFooterView() method on the ListView class.
package de.vogella.android.listactivity;import android.app.ListActivity;import android.os.Bundle;import android.view.View;import android.widget.ArrayAdapter;import android.widget.ListView;public class MyList extends ListActivity {/** Called when the activity is first created. */public void onCreate(Bundle icicle) { super.onCreate(icicle); // create an array of Strings, that will be put to our ListActivity String[] names = new String[] { "Linux", "Windows7", "Eclipse", "Suse", "Ubuntu", "Solaris", "Android", "iPhone", "Linux", "Windows7", "Eclipse", "Suse", "Ubuntu", "Solaris", "Android", "iPhone" }; View header = getLayoutInflater().inflate(R.layout.header, null); View footer = getLayoutInflater().inflate(R.layout.footer, null); ListView listView = getListView(); listView.addHeaderView(header); listView.addFooterView(footer); setListAdapter(new ArrayAdapter<String>(this, android.R.layout.simple_list_item_single_choice, android.R.id.text1, names)); }}
17. SimpleCursorAdapter
In case you work with a content provider or directly with the database you can use the SimpleCursorAdapter to define the data for your ListView. The following will demonstrates how to access the Contacts ContentProvider.
Create a new Android project called "de.vogella.android.listactivity.cursor" with the activity called MyListActivity. ChangeMyListActivity to the following.
package de.vogella.android.listactivity.cursor;import android.app.ListActivity;import android.database.Cursor;import android.net.Uri;import android.os.Bundle;import android.provider.ContactsContract;import android.widget.ListAdapter;import android.widget.SimpleCursorAdapter;public class MyListActivity extends ListActivity {/** Called when the activity is first created. */@Override public void onCreate(Bundle savedInstanceState) { super.onCreate(savedInstanceState); Cursor mCursor = getContacts(); startManagingCursor(mCursor); // now create a new list adapter bound to the cursor. // SimpleListAdapter is designed for binding to a Cursor. ListAdapter adapter = new SimpleCursorAdapter(this, // Context. android.R.layout.two_line_list_item, // Specify the row template // to use (here, two // columns bound to the // two retrieved cursor // rows). mCursor, // Pass in the cursor to bind to. // Array of cursor columns to bind to. new String[] { ContactsContract.Contacts._ID, ContactsContract.Contacts.DISPLAY_NAME }, // Parallel array of which template objects to bind to those // columns. new int[] { android.R.id.text1, android.R.id.text2 }); // Bind to our new adapter. setListAdapter(adapter); } private Cursor getContacts() { // Run query Uri uri = ContactsContract.Contacts.CONTENT_URI; String[] projection = new String[] { ContactsContract.Contacts._ID, ContactsContract.Contacts.DISPLAY_NAME }; String selection = ContactsContract.Contacts.IN_VISIBLE_GROUP + " = '" + ("1") + "'"; String[] selectionArgs = null; String sortOrder = ContactsContract.Contacts.DISPLAY_NAME + " COLLATE LOCALIZED ASC"; return managedQuery(uri, projection, selection, selectionArgs, sortOrder); }}
Make sure you give your application the permission to read the contacts. (Uses Permissions "android.permission.READ_CONTACTS" in AndroidManifest.xml)
18. Additional Open Source libraries
Sometimes having to press a refresh button on the ActionBar to refresh data can be annoying for the user. Chris Banes has implemented an Open Source library to implement the pull to refresh pattern for a Listview. https://github.com/chrisbanes/Android-PullToRefresh.
Also you may want to use the swipe to dismiss gesture to delete items from a ListView. Roman Nurik provides an example for this atAndroid swipe-to-dismiss library which Jake Wharton backported to earlier Android releases at SwipeToDismissNOA.
!!!!!!!!!!!!!!!!!!!!!!!!!!!!!!!!!!!!!!!!!!!!!!!!!!!!!!!!!!!!!!!!!!!!!!!!!!!!!!
4. ListActivity和ListFragment
4.1。 使用ListView的默认容器
Android提供了专门的片段和活动课,以简化处理列表。
该班 ??是ListActivity类,如果你想使用列表中的活动和在ListFragment ,如果你想使用列表中的片段类。
你不必布局分配给这些元素。 如果你没有定义布局,活动或片段包含一个ListView默认。 ListActivity和ListFragment还允许您重写onListItemClick()方法来处理选择列表中的项目。
这两个类允许您设置适配器默认ListView通过setListAdapter()方法。
下面的示例代码显示了一个简单的ListFragment实现。
接下来的示例代码演示的使用ListActivity 。
4.2。 ListActivity和自定义布局
你可以使用一个自定义布局ListActivity或ListFragment 。 在这种情况下,该片段或活性的搜索在为提供布局ListView与预先定义android:id属性设置为@android:id/list 。 这种用法表现在下面的代码片段。
4.3。 占位符空列表
您还可以使用与视图@android:id/empty在布局ID。 相应的活动和片段显示了这一观点自动如果ListView是空的,否则隐藏它。 例如,你可以在这样一个视图中显示错误消息。
5.练习:使用ListView和ListActivity
下面的练习演示如何使用ListView中的ListActivity 。 可以使用预定义的ArrayAdapter类和用于行现有机器人布局。
创建一个名为de.vogella.android.listactivity与所谓的活动新的Android项目MyListActivity 。
改变MyListActivity基础上,下面的代码示例类。 需要注意的是setContentView()未使用的方法。
6.运动:ListActivity有自己的布局
在我们的例子中你将定义你的布局行,并用它在你的适配器。
创建rowlayout.xml在布局文件res/layout的文件夹de.vogella.android.listactivity项目。
所以在使用新的布局改变你的活动。
7.教程:实现自己的适配器
下面使用两个图像“no.png”和“ok.png”。 我把它放在了“RES /绘制-MDPI”文件夹中。 你必须创建自己的图标。 如果你没有找到任何图标只是复制“的icon.png”,并使用绘图程序来改变它一点点。
创建类MySimpleArrayAdapter这将作为我们的适配器。
要使用此适配器, 活动更改为以下。
如果你运行这个例子,你应该得到不同的图标的某些元素的列表。
8.列表视图和性能
8.1。 动机
性能在Android上尤其重要,因为用户所期望的快速的反应时间。 与台式机相比Android设备是从硬件的角度来看相对缓慢。
这部分介绍如何减少这些操作有效地实现您的自定义列表适配器。 默认的Android适配器像ArrayAdapter已经优化性能。
8.2。 耗时的操作
这从一个XML布局文件得到充气每个视图将导致Java对象。 充气布局和创建Java对象是昂贵的问候时间和内存消耗。
除了 ??使用findViewById()方法比较费时,即使它不是那么糟糕,因为XML膨胀。
8.3。 避免布局通胀和对象创建
一个ListView通常包含比显示的行数更多的数据。 如果用户滚动列表中,则行和与其相关的意见正在滚动出可视区域的。 它代表行的Java对象可以再次用于新的可见行。
如果Android的确定一个行不再可见,它允许getView()适配器方法重用通过相关视图convertView参数。
该适配器可以将新的数据包含在的视图层次的意见convertView 。 这避免了膨胀的XML文件,并创建新的Java对象。
在Android的情况下,不能再使用一排,Android系统传递null到convertView参数。 因此适配器实现需要检查这一点。
8.4。 查看持有人模式
一个ViewHolder实现允许避免findViewById()在适配器的方法。
一ViewHolder类通常是在你的适配器持有引用相关意见静态内部类。 在您的布局。 该参考分配给行视图,经由一个标签setTag()方法。
如果我们收到convertView对象,我们可以得到的实例ViewHolder通过getTag()方法,并指定新的属性通过意见ViewHolder参考。
虽然这听起来复杂,这是更快的约15%,然后使用findViewById()方法。
8.5。 例
下面的代码显示了一个性能优化的适配器实现其重用现有的意见,并实现了持有人格局。
9.保存视图的选择
默认情况下ListView没有选择模式激活。 您可以通过激活它setChoiceMode()方法调用。 通过ListView.CHOICE_MODE_MULTIPLE多个选择或ListView.CHOICE_MODE_SINGLE单选择此方法。
要获得的所选项目ListView ,使用getCheckedItemPosition()为一个单一的选择方法或listView.getCheckedItemPositions()进行多选。 。 如果你有稳定的ID,你也可以使用getCheckedItemIds()方法来获得所选择的ID。
安卓已经 ??提供了这样的默认布局:在android.R.layout.simple_list_item_multiple_choice布局,其中包含一个配置CheckedTextView视图。
以下活动演示了如何使用这些选择模式。 如果你使用这些模式, ListView存储选择的值。 它不坚持你的数据模型。
10.上下文动作模式列表视图
以下假定您已经熟悉了动作条的一般概念和上下文的行动模式。 这部分将介绍如何使用上下文的行动模式的ListView选择。
要在单个项目分配上下文的动作模式,长按,使用的方法setOnItemLongClickListener()上ListView 。 该方法包括对所选项目的信息。 在这种方法中,你可以开始ActionMode 。
下面的实施例证明。 它假定您已经定义了一个名为菜单XML文件rowselection.xml而这个菜单包含一个条目与@+id/menuitem1_showID。
如果你启动应用程序,并长按列表中的一个项目,你会得到你的上下文行动吧。
11.实施撤消一个动作
11.1。 当你要提供一个撤消操作?
这是很好的做法,以允许用户撤消关键行动。 这样一个关键的动作是,例如,删除的列表项。
甲证明图案来处理这种撤消选项是提供一种选择在屏幕的末端。 后的预定时间该选择消失或者一旦用户继续与应用程序交互。
例如,Gmail应用程序实现了这样的行为。
11.2。 例
下面的描述包含用于实现撤消操作的一个例子。它使用动画来自动淘汰撤销按钮了一段时间后。
在这个例子中创建一个名为新项目com.vogella.android.userinterface.undo基础上,BlankTemplate模板。
为您的布局如下活动。它使用的FrameLayout显示用户接口的两个不同的部分。按钮栏最初是隐藏的。按钮采用了绘制。无论是添加这样的绘制到项目或删除引用。
<FrameLayout xmlns:android = "http://schemas.android.com/apk/res/android" xmlns:tools = "http://schemas.android.com/tools" android:layout_width = "match_parent" android:layout_height = "match_parent" > <RelativeLayout android:layout_width = "match_parent" android:layout_height = "match_parent" tools:context = ".MainActivity" > <ListView android:id = "@+id/listview" android:layout_width = "match_parent" android:layout_height = "match_parent" > </ListView> </RelativeLayout> <LinearLayout android:id = "@+id/undobar" android:visibility = "gone" android:layout_width = "wrap_content" android:layout_height = "wrap_content" android:layout_gravity = "bottom|center_horizontal" android:layout_margin = "20dp" android:alpha = "100" android:background = "#808080" android:dividerPadding = "11dp" android:padding = "4dp" > <TextView android:id = "@+id/undobar_message" android:layout_width = "wrap_content" android:layout_height = "wrap_content" android:text = "Deleted" android:textAppearance = "?android:attr/textAppearanceMedium" android:textColor = "#fff" /> <Button android:id = "@+id/undobar_button" android:layout_width = "wrap_content" android:layout_height = "wrap_content" android:layout_marginLeft = "30dp" android:onClick = "onClick" android:background = "#808080" android:drawableLeft = "@drawable/ic_undobar_undo" android:text = "Undo" android:textAppearance = "?android:attr/textAppearanceMedium" android:textColor = "#fff" /> </ LinearLayout中></的FrameLayout>
改变你的活动,使其类似于下面的代码。在Eclipse中的Android项目向导已经生成的动作条条目。本条目中使用以下代码。如有疑问,创建自己的动作条条目。
如果您选择的入门动作条,按钮栏变为显示5秒钟。
12.性能优化
下面将实施适配器从前面的例子性能优化的版本。
创建以下MyPerformanceArrayAdapter类。
在您使用新的适配器的活动。如果你运行的应用程序应该看起来是一样的,但它会快很多,尤其是对于大型数据集。
13教程:如何显示在ListView两个项目
可以使用SimpleAdapter类显示两种元素的数据。此类期望字符串的一个阵列(从数据),其中输入数据的字段定义。它还要求整数的数组定义为以这些字段映射行布局部件的ID。
实际的数据是再映射的列表。地图定义了从数据的值的每个字段。
以下示出了重用来自机器人的预定义布局的行的一个例子。
14.选择在ListView多个项目
14.1。 模型和ListView互动
经常,你需要选择你的项目的ListView。由于排的ListView越来越回收你不能存储在选择视图的水平。
选择只是一种可能的例子,但你可以imange你行和模型之间的相互作用等。
坚持你必须与选定的状态更新数据模型的选择。
更新您的数据模型的ListView你定义自己的适配器类。在这个适配器类附加一个监听到视图负责选择模型元素。如果您选择更新,你可以作为一个标签添加到视图来访问它的模型的状态。
下面的例子演示了如何使用标准的Java对象,如何从交互视图和模型。
14.2。 教程:域模型和交互行
继续使用de.vogella.android.listactivity项目。
创建以下模型如果该元素是当前选择哪个保持的名称和信息。
创建一个名为以下新布局文件rowbuttonlayout.xml。
创建以下适配器。此适配器加上了一个侦听器复选框观点。如果该复选框被选中的模式的基础数据被改变。复选框获取经由所分配的相应的模型元素getTag()方法。
最后,您更改活动以下内容。
如果你开始你的应用程序,你应该能够标志的物品。这些变化将反映在您的模型。
15.实现可扩展的ListView
15.1。 ExpandableListView
该ExpandableListView类似的ListView但允许您定义组和详细信息该组。ExpandableListView预期和类型的适配器BaseExpandableListAdapter。
在这种情况下,你必须定义两个布局,一个组,另一个用于详情一行。
15.2。 ExpandableListView例如
在下面的例子中,你创建一个类似于下面的截图可扩展列表视图。
创建了一个名为com.vogella.android.listview.expandable与所谓的活动MainActivity。
创建或调整下列布局文件。一是布局/ activity_main.xml。
<LinearLayout xmlns:android = "http://schemas.android.com/apk/res/android" xmlns:tools = "http://schemas.android.com/tools" android:id = "@+id/LinearLayout1" android:layout_width = "match_parent" android:layout_height = "match_parent" android:paddingBottom = "@dimen/activity_vertical_margin" android:paddingLeft = "@dimen/activity_horizontal_margin" android:paddingRight = "@dimen/activity_horizontal_margin" android:paddingTop = "@dimen/activity_vertical_margin" tools:context = ".MainActivity" > <ExpandableListView android:id = "@+id/listView" android:layout_width = "match_parent" android:layout_height = "wrap_content" > </ExpandableListView> </ LinearLayout中>
随后创建布局/ listrow_group.xml。
<CheckedTextView xmlns:android = "http://schemas.android.com/apk/res/android" xmlns:tools = "http://schemas.android.com/tools" android:id = "@+id/textView1" android:layout_width = "wrap_content" android:layout_height = "?android:attr/listPreferredItemHeight" android:layout_marginLeft = "8dp" android:drawableRight = "@drawable/ic_launcher" android:gravity = "left" android:paddingLeft = "32dp" android:paddingTop = "8dp" android:text = "Test" android:textSize = "14sp" android:textAlignment = "textEnd" android:textStyle = "bold" />
最后所需的布局布局/ listrow_details.xml。
<LinearLayout xmlns:android = "http://schemas.android.com/apk/res/android" xmlns:tools = "http://schemas.android.com/tools" android:layout_width = "match_parent" android:layout_height = "40dp" android:clickable = "true" android:orientation = "vertical" android:paddingLeft = "40dp" tools:context = ".MainActivity" > <TextView android:id = "@+id/textView1" android:layout_width = "wrap_content" android:layout_height = "wrap_content" android:drawableLeft = "@drawable/ic_launcher" android:drawablePadding = "5dp" android:gravity = "center_vertical" android:text = "@string/hello_world" android:textSize = "14sp" android:textStyle = "bold" > </TextView> <View android:layout_width = "match_parent" android:layout_height = "1dp" android:background = "@android:color/black" /> </ LinearLayout中>
创建占据着为你的域模型下面的类ExpandableListView。
最后创建适配器所描述的以下列表并改变活动下面提供的代码。
16.教程:杂项
16.1。 添加longclick监听器列表项
您还可以添加LongItemClickListener的视图。对于这个接收的ListView经由getListVIew()方法,并设置LongItemClickListener经由setOnItemLongClickListener()方法。
16.2。 页眉和页脚
当然,你可以把任意查看你周围的ListView元素。例如,你可以定义两个布局TextViews和ListView控件之间。在这种情况下,两个TextViews总是会名单(头)以上可见,另一个是下面的ListView可见。如果你只想在显示列表页眉或页脚列表中看到您可以使用该列表的开头或结尾addHeaderView()方法或addFooterView()上的方法的ListView类。
17. SimpleCursorAdapter
如果你与内容供应商合作,或直接与数据库可以使用SimpleCursorAdapter定义数据为您的ListView。下面将演示如何访问联系人ContentProvider的。
创建一个名为“de.vogella.android.listactivity.cursor”与新的Android项目活动称为MyListActivity。改变MyListActivity下面的内容。
请确保你给你的应用程序读取联系人的权限。(在AndroidManifest.xml中使用权限“android.permission.READ_CONTACTS”)
18.其他开源库
有时不得不按下动作条的刷新按钮来刷新数据,可恼人的用户。克里斯·巴内斯实施了一个开放源码库来实现拉刷新模式的列表视图。https://github.com/chrisbanes/Android-PullToRefresh。
你也可能需要使用的刷卡解雇的姿态,从一个ListView删除项目。罗马Nurik提供在一个这样的例子Android的刷卡到解雇库而杰克沃顿回迁到早期的Android版 ??本在SwipeToDismissNOA。