首先先简单介绍下hessian ,protocol buffer, easyUI框架
hessian:
Hessian是一个轻量级的remoting on http工具,采用的是Binary RPC协议,所以它很适合于发送二进制数据,同时又具有防火墙穿透能力。Hessian一般是通过Web应用来提供服务,因此非常类似于平时我们用的 WebService。只是它不使用SOAP协议,但相比webservice而言更简单、快捷。Hessian官网:http://hessian.caucho.com/
Hessian 可通过Servlet提供远程服务,需要将匹配某个模式的请求映射到Hessian服务。也可Spring框架整合,通过它的 DispatcherServlet可以完成该功能,DispatcherServlet可将匹配模式的请求转发到Hessian服务。Hessian的server端提供一个servlet基类, 用来处理发送的请求,而Hessian的这个远程过程调用,完全使用动态代理来实现的,,建议采用面向接口编程,Hessian服务通过接口暴露。
Hessian处理过程示意图:客户端——>序列化写到输出流——>远程方法(服务器端)——>序列化写到输出流 ——>客户端读取输入流——>输出结果
使用hessian所要下载的包:hessian-4.0.37.jar;
protocol buffer:
protocolbuffer(以下简称PB)是google 的一种数据交换的格式,它独立于语言,独立于平台。google 提供了三种语言的实现:java、c++ 和 python,每一种实现都包含了相应语言的编译器以及库文件。由于它是一种二进制的格式,比使用 xml 进行数据交换快许多。可以把它用于分布式应用之间的数据通信或者异构环境下的数据交换。作为一种效率和兼容性都很优秀的二进制数据传输格式,可以用于诸如网络传输、配置文件、数据存储等诸多领域。
EasyUI:
jQuery EasyUI是一组基于jQuery的UI插件集合体,而jQuery EasyUI的目标就是帮助web开发者更轻松的打造出功能丰富并且美观的UI界面。开发者不需要编写复杂的javascript,也不需要对css样式有深入的了解,开发者需要了解的只有一些简单的html标签。
案例如下:
需求介绍:
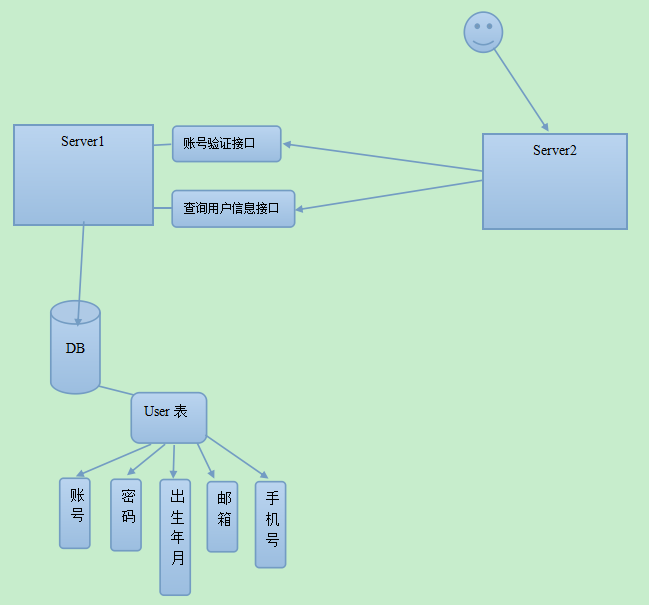
实现Server1上的用户账号可在其他应用(Server2)上登录的功能,达到一号多用和用户数据共享的目的。
主要功能点如下:
① 用户登录
② 显示用户信息
登录流程
①用户通过浏览器访问Server2的登陆界面。
②用户输入账号密码,点击登陆按钮。
③Server2收到用户的登录请求,调用Server1的账号验证接口。
④Server1验证Server2发送过来的账号信息(用户名、密码)后,返回验证结果。
⑤Server2收到并处理Server1返回的验证结果,再将相关信息返回给用户(提示登录失败或者显示用户信息)。
技术需求
①所有网页界面均采用easyui编写。
②服务器之间(Server1和Server2)的通信基于protobuf和 hessian(protobuf用于数据传输,hessian用于远程接口调用)。
③hessian远程接口方法的入参和返回值类型均为字节数组。
Server2调用Server1的接口时,先构造protobuf对象,将属性填充完毕后,将该对象序列化得到的字节数组填入接口方法传给Server1;Server1收到该请求,将Server2传过来的字节数组反序列化成protobuf对象,获取其中的属性值(比如用户帐号、密码),处理完成后,将处理结果填入protobuf对象,并返回该对象的序列化结果(字节数组)。
流程图:
具体实现:
先下载所必须的包 hessioan-4.0.37.jar,必须安装protocol buffer,下载easyUI包
首先先写服务端:
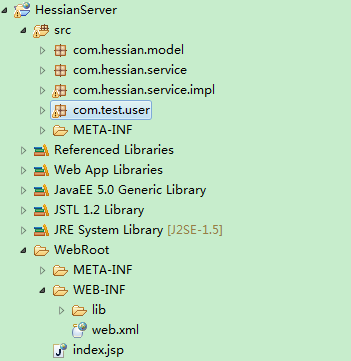
创建web项目hessianServer
目录如下:
在protocol安装目录下的examples下创建user.proto文件
package com.hessian.model;option java_package="com.hessian.model";option java_outer_classname="UserProtos";message User{ required string name=1; required string password=2; required string birth=3; optional string email = 4; optional int64 phone=5;}
进入XXX\protobuf-2.4.1\examples目录,可以看到user.proto文件,执行命令 protoc --java_out=. user.proto 命令,如果生成com文件夹并在最终生成UserProtos类。
将UserProtos.java和XXX\protobuf-2.4.1\java\target目录下的protobuf-java-2.4.1.jar, hessioan-4.0.37.jar导入到web项目中
下面编写服务端代码
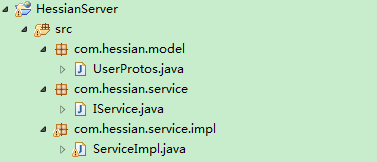
IService:
package com.hessian.service;public interface IService { public Boolean login(byte[] user); }
ServiceImpl
package com.hessian.service.impl;import java.io.ByteArrayInputStream;import java.io.IOException;import java.io.ObjectInputStream;import com.google.protobuf.InvalidProtocolBufferException;import com.hessian.model.UserProtos;import com.hessian.model.UserProtos.User;import com.hessian.service.IService;public class ServiceImpl implements IService { public Boolean login(byte[] user) { UserProtos.User use=null; try { use=UserProtos.User.parseFrom(user); //将字节数组转化为对象 System.out.println(use); } catch (InvalidProtocolBufferException e) { // TODO Auto-generated catch block e.printStackTrace(); } //进行用户名,密码验证 if(use.getName().equals("oumyye")&&use.getPassword().equals("oumyye")){ return true; } else { return false; } } }
web.xml配置
<?xml version="1.0" encoding="UTF-8"?><web-app version="2.5" xmlns="http://java.sun.com/xml/ns/javaee" xmlns:xsi="http://www.w3.org/2001/XMLSchema-instance" xsi:schemaLocation="http://java.sun.com/xml/ns/javaee http://java.sun.com/xml/ns/javaee/web-app_2_5.xsd"> <welcome-file-list> <welcome-file>index.jsp</welcome-file> </welcome-file-list> <servlet> <!-- 配置 HessianServlet,Servlet的名字随便配置,例如这里配置成ServiceServlet--> <servlet-name>ServiceServlet</servlet-name> <servlet-class>com.caucho.hessian.server.HessianServlet</servlet-class> <!-- 配置接口的具体实现类 --> <init-param> <param-name>service-class</param-name> <param-value>com.hessian.service.impl.ServiceImpl</param-value> </init-param> </servlet> <!-- 映射 HessianServlet的访问URL地址--> <servlet-mapping> <servlet-name>ServiceServlet</servlet-name> <url-pattern>/ServiceServlet</url-pattern> </servlet-mapping></web-app>
到此服务service1编写完成
进入http://localhost:8080/HessianServer/ServiceServlet出现
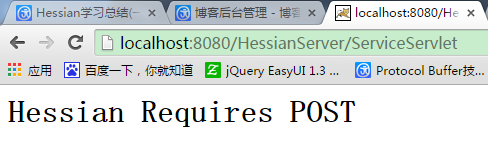
则编写成功,将src下的代码打包成hessian-common.jar文件。
下面进行service2客户端的编写loginClient
首先也要导入相关jar包,及目录如下:

编写前端代码:
index.jsp
<%@ page language="java" import="java.util.*" pageEncoding="UTF-8"%><%String path = request.getContextPath();String basePath = request.getScheme()+"://"+request.getServerName()+":"+request.getServerPort()+path+"/";%><!DOCTYPE html><html><head> <meta http-equiv="Content-Type" content="text/html; charset=UTF-8"> <title>ValidateBox - jQuery EasyUI Demo</title> <link rel="stylesheet" type="text/css" href="themes/default/easyui.css"> <link rel="stylesheet" type="text/css" href="themes/icon.css"> <link rel="stylesheet" type="text/css" href="demo.css"> <style type="text/css"> input,textarea{ width:200px; border:1px solid #ccc; padding:2px; } </style> <script type="text/javascript" src="jquery/jquery-1.7.2.min.js"></script> <script type="text/javascript" src="jquery/jquery.easyui.min.js"></script></head><body> <h2>登陆</h2> ${info} <div> <form action="Login" method="post"> <table> <tr> <td>用户名:</td> <td><input class="easyui-validatebox" data-options="required:true,validType:'length[1,3]'" name="name"></td> </tr> <tr> <td>密码:</td> <td><input class="easyui-validatebox" data-options="validType:'password'" name="password"></td> </tr> </table> <input type="submit" value="登陆" style="width: 50px"> </form> </div> </body> </html>
success.jsp
<%@ page language="java" import="java.util.*" pageEncoding="UTF-8"%><%String path = request.getContextPath();String basePath = request.getScheme()+"://"+request.getServerName()+":"+request.getServerPort()+path+"/";%><!DOCTYPE html><html><head> <meta http-equiv="Content-Type" content="text/html; charset=UTF-8"> <title>ValidateBox - jQuery EasyUI Demo</title> <link rel="stylesheet" type="text/css" href="themes/default/easyui.css"> <link rel="stylesheet" type="text/css" href="themes/icon.css"> <link rel="stylesheet" type="text/css" href="demo.css"> <style type="text/css"> input,textarea{ width:200px; border:1px solid #ccc; padding:2px; } </style> <script type="text/javascript" src="jquery/jquery-1.7.2.min.js"></script> <script type="text/javascript" src="jquery/jquery.easyui.min.js"></script></head><body> <h2>登陆成功</h2> ${name} </body> </html>
然后编写servlet代码
package com.hessian.servlet;import java.io.IOException;import javax.servlet.RequestDispatcher;import javax.servlet.ServletException;import javax.servlet.http.HttpServlet;import javax.servlet.http.HttpServletRequest;import javax.servlet.http.HttpServletResponse;import com.caucho.hessian.client.HessianProxyFactory;import com.hessian.model.UserProtos.User.Builder;import com.hessian.service.IService;public class loginServlet extends HttpServlet { /** * */ private static final long serialVersionUID = 1L; public void doGet(HttpServletRequest request, HttpServletResponse response) throws ServletException, IOException { doPost(request, response); } public void doPost(HttpServletRequest request, HttpServletResponse response) throws ServletException, IOException { String url = "http://192.168.2.108:8080/HessianServer/ServiceServlet"; HessianProxyFactory factory = new HessianProxyFactory(); IService service = (IService) factory.create(IService.class, url);//创建IService接口的实例对象 com.hessian.model.UserProtos.User.Builder ump=com.hessian.model.UserProtos.User.newBuilder(); ump.setName(request.getParameter("name")); ump.setPassword(request.getParameter("password")); ump.setEmail("54654@qq.com"); ump.setBirth("19931223"); ump.setPhone(12313213); com.hessian.model.UserProtos.User info=ump.build(); byte[] user=info.toByteArray(); if(service.login(user)){ RequestDispatcher dispatcher = request.getRequestDispatcher("success.jsp"); dispatcher .forward(request, response); }else { request.setAttribute("info", "登陆失败!"); RequestDispatcher dispatcher = request.getRequestDispatcher("index.jsp"); dispatcher .forward(request, response); } } }
编写web.xml
<?xml version="1.0" encoding="UTF-8"?><web-app version="2.5" xmlns="http://java.sun.com/xml/ns/javaee" xmlns:xsi="http://www.w3.org/2001/XMLSchema-instance" xsi:schemaLocation="http://java.sun.com/xml/ns/javaee http://java.sun.com/xml/ns/javaee/web-app_2_5.xsd"> <welcome-file-list> <welcome-file>index.jsp</welcome-file> </welcome-file-list> <servlet> <servlet-name>Login</servlet-name> <servlet-class>com.hessian.servlet.loginServlet</servlet-class> </servlet> <servlet-mapping> <servlet-name>Login</servlet-name> <url-pattern>/Login</url-pattern> </servlet-mapping></web-app>
这样整个代码就算编写完成了,下面进行测试:
http://localhost:8080/loginClient/ 可进行登陆,当用户名密码为oumyye时可登陆成功,跳转success.jsp页面