Ansible ad-hoc应用一
- 测试主机列表中的主机是否可以ping通
- 查看被管理主机的服务器信息(如时间、版本、内存等)
- 学习ansible-doc命令的用法
- 测试command与shell模块的区别
- 使用script模块在远程主机执行脚本(装软件包、启服务)
[root@control ansible]# ansible-doc -l #查看所有的模块
Ansible ad-hoc是一种通过命令行批量管理的方式,命令基本格式如下:
格式:ansible 主机集合 -m 模块名 -a "参数"
查看主机列表
[root@control ~]# cd ~/ansible
[root@control ansible]# ansible all --list-hosts # --list-hosts是ansible这个命令的固定选项,如同ls -a一样(-a是ls命令的固定选项)
hosts (5):
node1
node2
node3
node4
node5
测试远程主机是否能ping通
当需要远程多个主机或者多个组时,中间使用逗号分隔
- [root@control ansible]# ansible node1 -m ping #调用ping模块
- [root@control ansible]# ansible node1,webserver -m ping
- [root@control ansible]# ansible all -m ping #测试所有模块(绿色表示成功)

模块就是脚本(多数为Python脚本),多数脚本都支持参数,默认模块为command
- [root@control ansible]# ansible node1 -m command -a "uptime" #查看CPU负载
- [root@control ansible]# ansible node1 -m command -a "uname -r" #查看内核版本
- [root@control ansible]# ansible node1 -a "ip a s" #查看网卡信息
- [root@control ansible]# ansible all -a "date" #查看时间(所有机器的时间)
Shell模块
command和shell模块的区别,command不支持bash的特性。如管道和重定向等功能,但是shell模块可以支持,不可以使用shell模块执行交互命令,如vim、top等
- [root@control ansible]# ansible test -m command -a "ps | wc -l" #报错 #wc -l 统计
- [root@control ansible]# ansible test -m command -a "ls &" #报错
- [root@control ansible]# ansible test -m shell -a "ps aux | wc -l" #进程数量
- [root@control ansible]# ansible test -m shell -a "who" #登陆信息
- [root@control ansible]# ansible test -m shell -a "touch /tmp/txt.txt"
[WARNING]: Consider using the file module with state=touch rather than running 'touch'. If you
need to use command because file is insufficient you can add 'warn: false' to this command task
or set 'command_warnings=False' in ansible.cfg to get rid of this message.node1 | CHANGED | rc=0 >>
#使用shell模块创建文件会有Warning警告提示,正常!!!
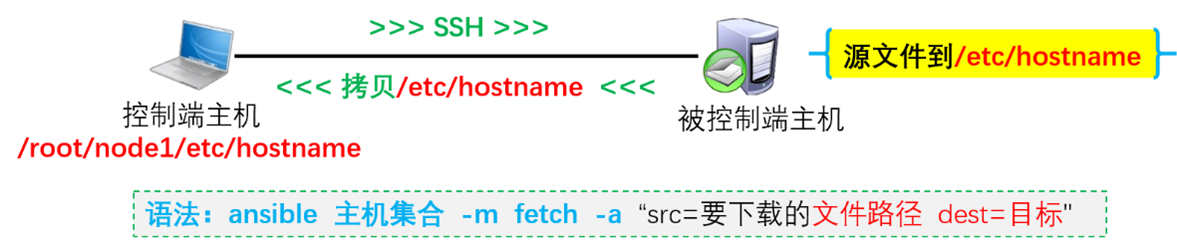
script模块
script模块会把-a后面的脚本拷贝到被管理端主机,然后执行这个脚本
- [root@control ansible]# vim ~/ansible/test.sh
- #!/bin/bash
- dnf -y install httpd
- systemctl start httpd
- [root@control ansible]# ansible test -m script -a "./test.sh" #test是主机组的名称,-m调用script模块,-a后面的./test.sh是上面创建脚本的相对路径和文件名,./是当前目录的意思,在当前目录下有个脚本叫test.sh

因为ansible远程的是node1,所以打开node1这台电脑,查看下是否安装了httpd软件、是否启动了服务
[root@node1 ~]# rpm -q httpd
httpd-2.4.37-21.module+el8.2.0+5008+cca404a3.x86_64
Ansible ad-hoc应用二
- 远程目标主机新建文件和目录、修改文件或目录的权限
- 在远程目标主机创建链接文件
- 删除远程目标主机上的文件或目录
- 将控制端本地的文件拷贝到被管理端
- 从被管理端下载文件到本地
- 修改远程目标主机上的文件内容
很多ansible模块都具有幂等性的特征。
幂等性:任意次执行所产生的影响均与一次执行的影响相同。(如一个执行创建1.txt的命令,如果主机上已经存在1.txt则不会执行命令)
file模块
file模块可以创建文件、目录、链接;修改权限与属性等(ansible-doc file)
[root@control ansible]# ansible test -m file -a "path=/tmp/file.txt state=touch" #远程test组中所有主机,新建文件,path后面指定要创建的文件或目录的名称
- state=touch是创建文件,state=directory是创建目录
- 验证: 到node1主机,使用ls /tmp/file.txt看看文件是否被创建成功

常见报错
- node1 | FAILED! => {
- … …
- "changed": false,
- "msg": "value of state must be one of: absent, directory, file, hard, link, touch, got: touc"
- }
- value of state must be one of:【state的值必须是后面给出的其中一个值】
- 解决办法:检查state的值是否有字母错误,上面报错例子中输入的是touc,不是touch。
- node1 | FAILED! => {
- … …
- "msg": "Unsupported parameters for (file) module: nmae Supported parameters include: _diff_peek, _original_basename, access_time,
- access_time_format, attributes, backup, content, delimiter, directory_mode,
- follow, force, group, mode, modification_time, modification_time_format, owner,
- path, recurse, regexp, remote_src, selevel, serole, setype, seuser, src, state,
- unsafe_writes"
- }
- unsupported(不支持的),parameters(参数),supported(支持的)include(包括)
- 解决办法:检查模块的参数是否有字母错误,上面错误案例将name错写为nmae。
更多使用分析
[root@control ansible]# ansible test -m file -a "path=/tmp/mydir state=directory" #如果再次执行出现的输出结果不为黄色change(对主机进行操作了),为绿色success(因为幂等性,所以不会对主机进行任何操作)粉warning(报警)红failed(报错)
#远程test组中所有主机,创建目录,path后面指定要创建的文件或目录的名称
#验证:到node1主机,使用ls /tmp/看看tmp目录下是否有mydir子目录
- [root@control ansible]# ansible test -m file \
- -a "path=/tmp/file.txt owner=sshd group=adm mode=0777"
#修改文件或目录权限,path后面指定要修改的文件名或目录名称,owner后面指定用户,group后面指定组,mode后面指定要修改的权限(0777中第一个0代表的是无特殊权限,如SUID、SGID等)
# 验证:到node1主机,使用ls -l /tmp/file.txt查看文件的详细信息是否正确
- [root@control ansible]# ansible test -m file -a "path=/tmp/mydir state=absent"
- #state=absent代表删除(删除目录)
- [root@control ansible]# ansible test -m file -a "path=/tmp/file.txt state=absent"
- # state=absent代表删除(删除文件)
- [root@control ansible]# ansible test -m file -a "src=/etc/hosts path=/tmp/host.txt state=link"
- #给/etc/hosts文件创建一个链接文件/tmp/host.txt(src指定源文件,path是软链接文件名)
- #相当于执行命令 ln -s /etc/hosts /tmp/host.txt
- #验证:到node1主机使用ls -l /tmp/hosts查看文件是否为软链接
- [root@node1 ~]# ls -l /tmp/host.txt
lrwxrwxrwx. 1 root root 10 May 25 03:48 /tmp/host.txt -> /etc/hosts
copy模块
copy模块可以将文件拷贝到远程主机 (ansible-doc copy)。
- [root@control ansible]# echo AAA > ~/a3.txt #新建测试文件
- [root@control ansible]# ansible test -m copy -a "src=~/a3.txt dest=/root/"
- #把管理端本机的a3.txt文件,拷贝到test组中所有主机的/root/目录
- #src代表源文件,dest代表目标文件
- #验证:到node1主机使用ls /root/a3.txt查看是否有该文件

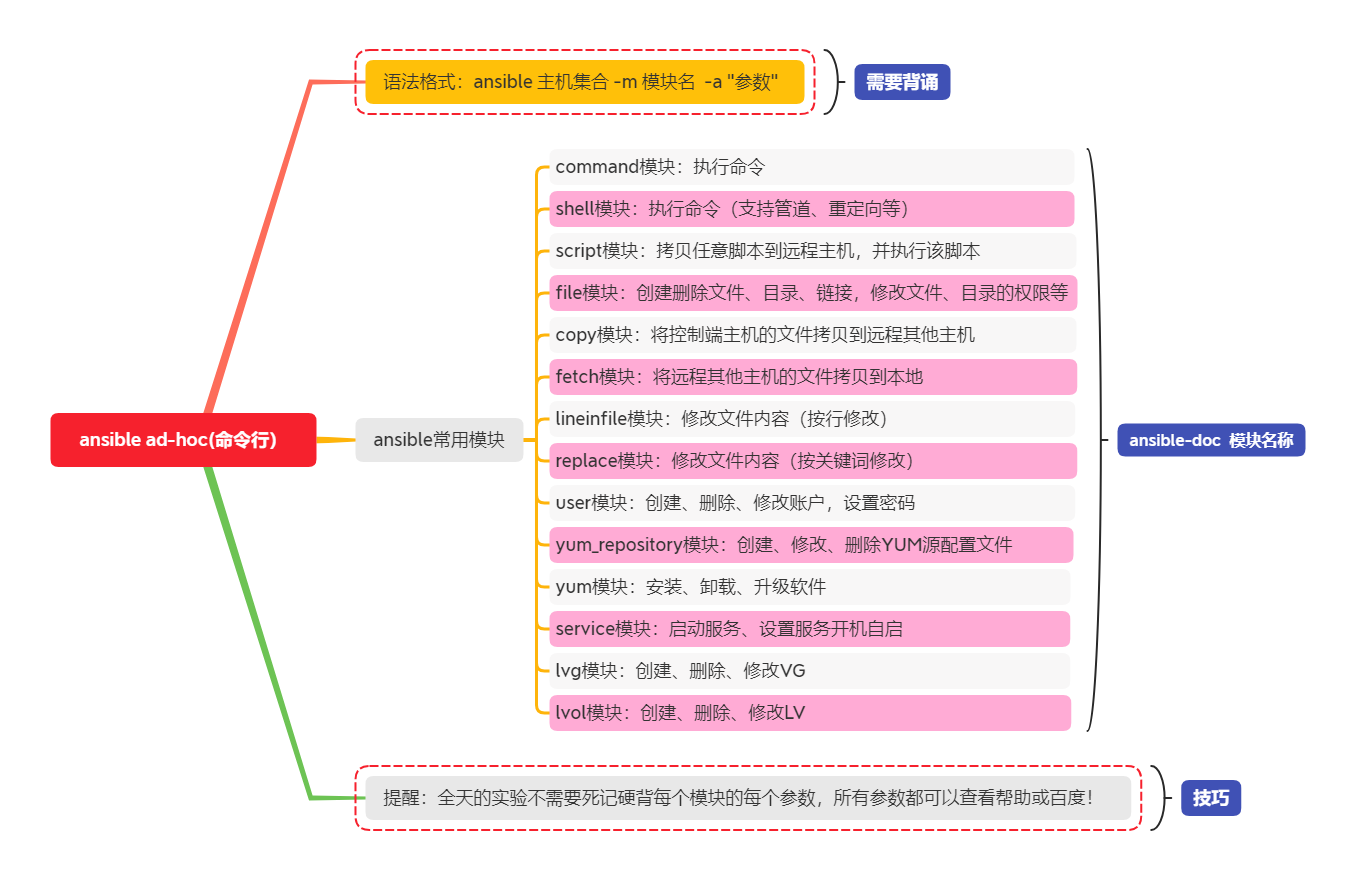
fetch模块
fetch模块与copy类似,但是作用相反,可以将其他主机的文件拷贝到本地(ansible-doc fetch)。
- [root@control ansible]# ansible test -m fetch -a "src=/etc/hostname dest=~/" #将远程test组中所有主机的hostname文件下载到本地家目录,src代表源文件,dest代表目标文件
- [root@control ansible]# ls ~/ #使用ls查看下是否下载成功 [root@control ansible]# ls /root/
- node1 #会自动生成目录
- #不能下载目录,如果需要下载目录,可以先打包后再下载
lineinfile|replace模块
[root@control ansible]# ansible test -m lineinfile -a "path=/etc/issue line='hello world'" #在/etc/issue文件中添加一行内容hello world,默认添加到最后,line后面跟的是需要添加的文件内容
# 验证:到node1主机执行命令cat /etc/issue查看文件内容是否正确
- [root@control ansible]# ansible test -m lineinfile \
- -a "path=/etc/issue line='hello world'" #基于幂等原则,重复执行,不会创建多行内容,执行多少遍都是一行hello world
lineinfile会替换一整行,replace可以替换关键词(ansible-doc replace)
- [root@control ansible]# ansible test -m replace -a "path=/etc/issue.net regexp=Kernel replace=Ocean"
- #将node1主机中/etc/issue.net文件全文所有的Kernel替换为Ocean
- #regexp后面是需要替换的旧内容;replace后面是需要替换的新内容
- # 验证:到node1主机执行命令cat /etc/issue.net查看文件内容是否正确
Ansible ad-hoc应用三
- 远程目标主机创建、删除系统账户;设置系统账户属性、修改账户密码
- 为目标主机创建、删除yum源配置文件;远程目标主机安装、卸载软件包
- 使用service模块管理远程主机的服务
- 创建、删除逻辑卷
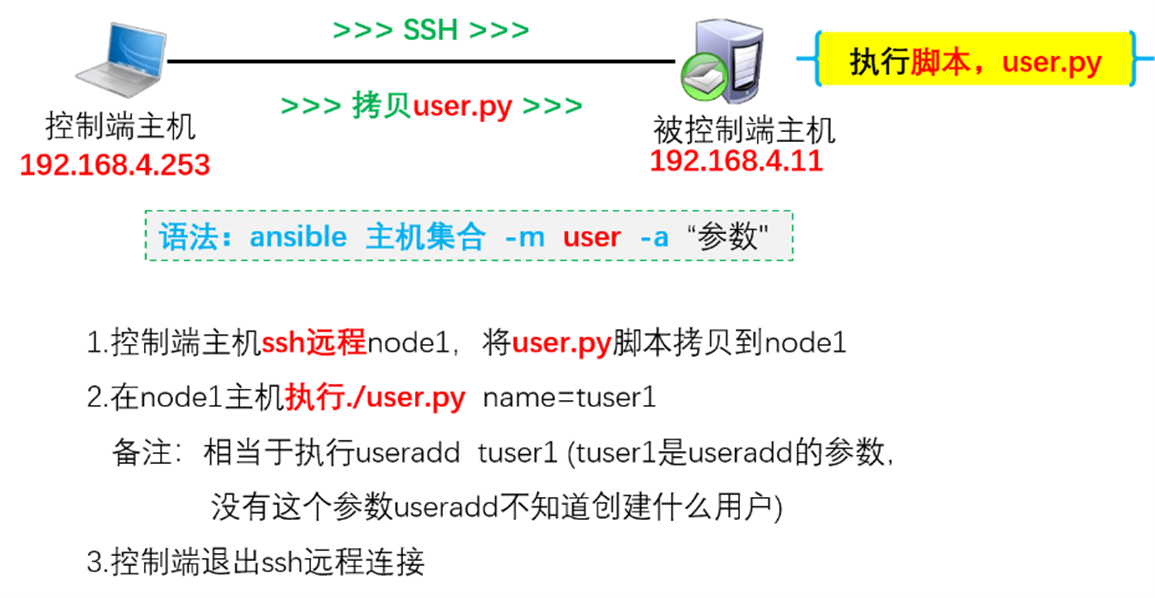
user模块
user模块可以实现Linux系统账户管理(ansible-doc user)
[root@control ansible]# ansible test -m user -a "name=tuser1" #远程test组中的所有主机并创建系统账户tuser1,默认state的值为present(state=present),代表创建用户
#验证:到node1主机执行命令id tuser1查看是否有该用户
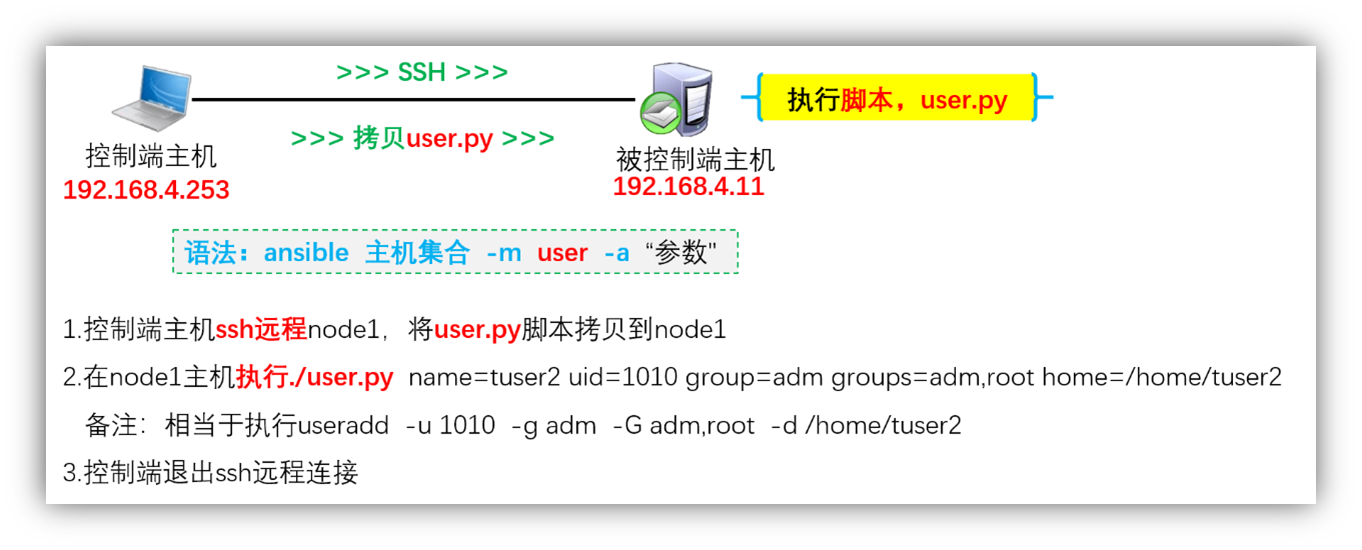
- [root@control ansible]# ansible test -m user -a "name=tuser2 uid=1010 group=adm groups=daemon,root home=/home/tuser2"
- #创建账户并设置对应的账户属性,uid指定用户ID号,group指定用户属于哪个基本组
- #groups指定用户属于哪些附加组,home指定用户的家目录 ,还可以指定解释执行器
- # 验证: 到node1主机执行命令id tuser2查看是否有该用户
改账户密码
- [root@control ansible]# ansible test -m user \
- -a "name=tuser1 password={ {'abc'| password_hash('sha512')}}"
- #修改账户密码,用户名是tuser1,密码是abc,密码经过sha512加密
- [root@node1 ~]# cat /etc/shadow #验证
tuser1:$6$mLDuDg9fZb29gmu9$BY/QiniBltfu.3z6RwrPyksfwOu4PDhPbcZq5cd2RQ.gY0Hfglyzdy1rj/ENGnKAKgY7wNQrBScdm0NQkZhpp1:18772:0:99999:7:::
删除用户
- [root@control ansible]# ansible test -m user \
- -a "name=tuser1 state=absent"
- #删除账户tuser1,state=absent代表删除账户的意思,name指定要删除的用户名是什么
- #账户的家目录不会被删除,相当于执行userdel tuser1 如果想继续删除家目录不能使用下个方法再次删除,要使用file模块删除tuser1目录
- [root@control ansible]# ansible test -m user \
- -a "name=tuser2 state=absent remove=true"
- #删除tuser2账户同时删除家目录、邮箱,相当于执行userdel -r tuser2
yum_repository模块
使用yum_repository可以创建或修改yum源配置文件(ansible-doc yum_repository)
- [root@control ansible]# ansible test -m yum_repository \
- -a "name=myyum description=hello baseurl=ftp://192.168.4.254/centos gpgcheck=no" #新建一个yum源配置文件/etc/yum.repos.d/myyum.repo,#yum源文件名为myyum,该文件的内容如下:
- [myyum]
- baseurl = ftp://192.168.4.254/centos
- gpgcheck = 0
- name = hello
- # 验证:到node1主机ls /etc/yum.repos.d/查看该目录下是否有新的yum文件
- [root@control ansible]# ansible test -m yum_repository \
- -a "name=myyum description=test baseurl=ftp://192.168.4.254/centos gpgcheck=yes gpgkey=…"
- #修改yum源文件内容
- [root@control ansible]# ansible test -m yum_repository -a "name=myyum state=absent"
- #删除yum源文件myyum
yum模块
使用yum模块可以安装、卸载、升级软件包(ansible-doc yum)
state: present(安装)|absent(卸载)|latest(升级)
- [root@control ansible]# ansible test -m yum -a "name=unzip state=present"
- #安装unzip软件包,state默认为present,也可以不写
- # 验证:到node1主机执行命令rpm -q unzip查看是否有该软件
- [root@control ansible]# ansible test -m yum -a "name=unzip state=latest"
- #升级unzip软件包,软件名称可以是*,代表升级所有软件包
- [root@control ansible]# ansible test -m yum -a "name=unzip state=absent"
- #调用yum模块,卸载unzip软件包,state=absent代表卸载软件
- # 验证:到node1主机执行命令rpm -q unzip查看该软件是否已经被卸载
service模块(ansible-doc service)
service为服务管理模块(启动、关闭、重启服务等),
state:started|stopped|restarted(启动,关闭,重启)enabled:yes设置开机启动。
- [root@control ansible]# ansible test -m yum -a "name=httpd"
- #调用yum模块,安装httpd软件包
- ## 验证:到node1主机执行命令rpm -q httpd查看该软件是否被安装
- [root@control ansible]# ansible test -m service -a "name=httpd state=started"
- #调用service模块,启动httpd服务
- ## 验证:到node1主机执行命令systemctl status httpd查看服务状态
- [root@control ansible]# ansible test -m service -a "name=httpd state=stopped"
- #调用service模块,关闭httpd服务
- ## 验证:到node1主机执行命令systemctl status httpd查看服务状态
- [root@control ansible]# ansible test -m service -a "name=httpd state=restarted"
- #调用service模块,重启httpd服务
- [root@control ansible]# ansible test -m service -a "name=httpd enabled=yes"
#调用service模块,设置httpd服务开机自启,将yes改为no是开机不自启 #[root@node1 ~]# systemctl is-enabled httpd 查看是否为开机自启
enabled
新添加一块硬盘
[root@node1 ~]# lsblk
NAME MAJ:MIN RM SIZE RO TYPE MOUNTPOINT
sda 8:0 0 20G 0 disk
├─sda1 8:1 0 1G 0 part /boot
└─sda2 8:2 0 19G 0 part
├─rhel-root 253:0 0 17G 0 lvm /
└─rhel-swap 253:1 0 2G 0 lvm [SWAP]
sdb 8:16 0 20G 0 disk
sr0 11:0 1 7.9G 0 rom /media[root@node1 ~]# fdisk /dev/sdb #创建分区
[root@node1 ~]# lsblk
NAME MAJ:MIN RM SIZE RO TYPE MOUNTPOINT
sda 8:0 0 20G 0 disk
├─sda1 8:1 0 1G 0 part /boot
└─sda2 8:2 0 19G 0 part
├─rhel-root 253:0 0 17G 0 lvm /
└─rhel-swap 253:1 0 2G 0 lvm [SWAP]
sdb 8:16 0 20G 0 disk
├─sdb1 8:17 0 5G 0 part
└─sdb2 8:18 0 5G 0 part
逻辑卷相关模块(ansible-doc lvg、ansible-doc lvol)
做实验之前需要给对应的虚拟机添加额外磁盘,并创建磁盘2个分区
lvg模块:创建、删除卷组(VG),修改卷组大小,
state:present(创建)|absent(删除)。
- [root@control ansible]# ansible test -m yum -a "name=lvm2"
- #安装lvm2软件包,安装了lvm2软件后,才有pvcreate、vgcreate、lvcreate等命令
- [root@control ansible]# ansible test -m lvg -a "vg=myvg pvs=/dev/sdb1"
- #创建名称为myvg的卷组,该卷组由/dev/sdb1组成
- #注意:这里的磁盘名称要根据实际情况填写 (sdb1)lsblk进行查看
- # 验证:到node1主机执行命令pvs和vgs查看是否有对应的PV和VG
- [root@control ansible]# ansible test -m lvg -a "vg=myvg pvs=/dev/sdb1,/dev/sdb2"
- #修改卷组大小,往卷组中添加一个设备/dev/sdb2
lvol模块:创建、删除逻辑卷(LV),修改逻辑卷大小
state:present(创建)|absent(删除)。
- [root@control ansible]# ansible test -m lvol -a "lv=mylv vg=myvg size=2G"
- #使用myvg这个卷组创建一个名称为mylv的逻辑卷,大小为2G
- # 验证:到node1主机执行命令lvs查看是否有对应的LV逻辑卷
- [root@control ansible]# ansible test -m lvol -a "lv=mylv vg=myvg size=4G"
- #修改LV逻辑卷大小
- [root@control ansible]# ansible test -m lvol -a "lv=mylv vg=myvg state=absent force=yes"
- #删除逻辑卷,force=yes是强制删除
- [root@control ansible]# ansible test -m lvg -a "vg=myvg state=absent"
- #删除卷组myvg