1、NuxtJs官方文档
https://www.nuxtjs.cn/guide/installation
简单来说,Nuxt 就是基于Vue的一个应用框架,采用 服务端渲染 ,让你的SPA应用(Vue)也可以拥有SEO
Nuxt.js简单的说是Vue.js的通用框架,最常用的就是用来作SSR(服务器端渲染)。再直白点说,就是Vue.js原来是开发SPA(单页应用)的,但是随着技术的普及,很多人想用Vue开发多页应用,并在服务端完成渲染。这时候就出现了Nuxt.js这个框架,她简化了SSR的开发难度。还可以直接用命令把我们制作的vue项目生成为静态html。
生成的文件夹架构:
2、NuxtJs的生命周期
众所周知,Vue 的生命周期全都跑在客户端(浏览器),而Nuxt的生命周期有些在服务端(Node)、客户端,甚至两边都在:
以上是 nuxt.js 的生命周期流程图,红框内的是Nuxt 的生命周期(运行在服务端),黄框内同时运行在服务端&&客户端上,绿框内则运行在客户端
因为 红框、黄框内的周期都不存在Window对象,所以不能直接使用window
<script>
export default {asyncData() {console.log(window) // 服务端报错},fetch() {console.log(window) // 服务端报错},created () {console.log(window) // undefined},mounted () {console.log(window) // Window {postMessage: ?, blur: ?, focus: ?, close: ?, frames: Window, …}}
}
</script>
3、NuxtJs自定义配置IP地址和端口

4、NuxtJs配置全局的CSS

5、NuxtJs配置loaders

6、nuxt + lib-flexible + postcss-pxtorem 实现 rem 适配
安装 lib-flexible 与 postcss-pxtorem
npm i -S amfe-flexible
npm install postcss-pxtorem --save-dev
配置 nuxt.config.js
export default {// ......// 在plugins内引入 amfe-flexible ,ssr设置为false(不设置为false会报错)plugins: [{src: './node_modules/amfe-flexible/index.js',ssr: false}],// ......// 更改build为如下,我这里面项目还引入了 vant 所以这是根字体设置为37.5build: {postcss: {plugins: {'postcss-pxtorem': {rootValue: 75, // vant-UI的官方根字体大小是37.5propList: ['*']},}},/*** You can extend webpack config here*/extend (config, ctx) {},vendor: ['axios'] // 为防止重复打包},
}
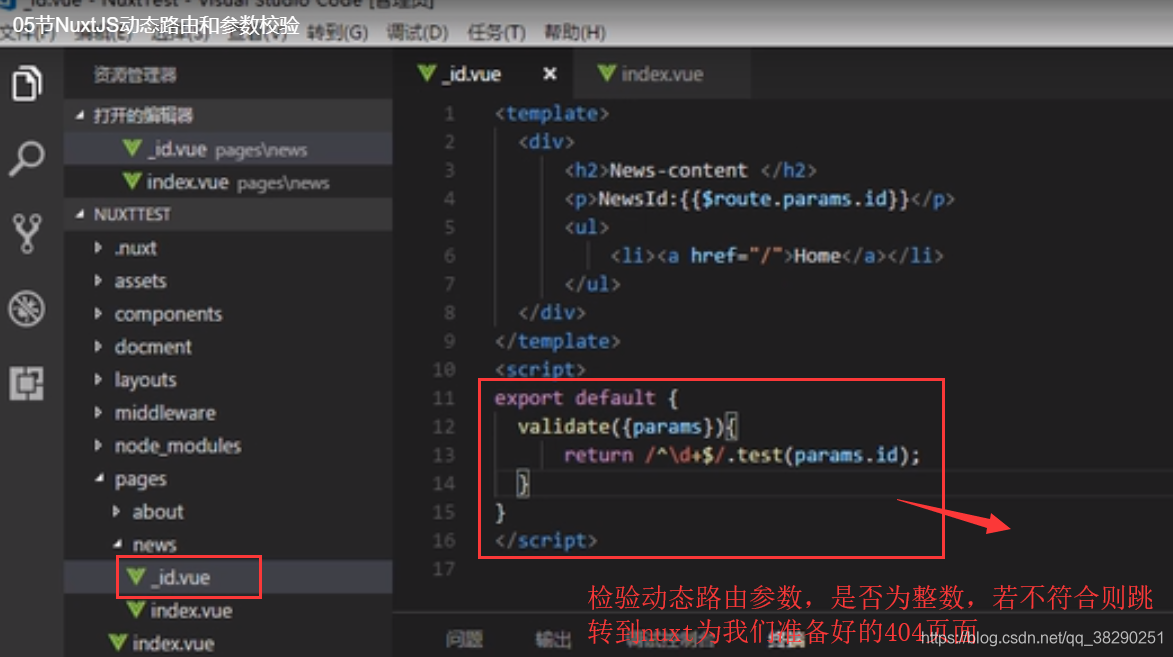
7、NuxtJs动态路由的配置和参数校验

创建_id.vue文件,可对参数进行校验
8、NuxtJs路由动画效果
必须使用 <nuxt / > 和 <nuxt-link>才有效果
全局使用:
<!-- 过渡路由 --><transition name="bounce" mode="out-in"><nuxt /></transition>个别页面使用:
<script>
export default {transition: 'bounce'
}
</script>
样式:
/* 页面过渡效果 */
.bounce-enter-active {animation: bounce-up 1s;
}
.bounce-leave-active {animation: bounce-down 1s;
}
@keyframes bounce-up {0% {transform: translateY(30px);opacity: 0;}100% {transform: translateY(0);opacity: 1;}
}
@keyframes bounce-down {0% {transform: translateY(0);}100% {transform: translateY(30px);opacity: 0;}
}
9、Nuxt.js默认模板和默认布局
默认模板:app.html

注意:更改默认模板需要重启服务器
默认布局:

不需要重启服务器
10、 NuxtJs错误页面和个性 meta 标签设置
错误页面配置:
当用户输入路由错误的时候,我们需要给他一个明确的指引,所以说在 应用程序开发中404页面时必不可少的。Nuxt.js支持直接在默认布局文件夹里建立错误页面。
代码用 v-if 进行判断错误类型,需要注意的是这个错误时你需要在<script>里进行声明的

meta标签配置:
页面的Meta对于SEO的设置非常重要,比如你现在要做个新闻页面,那为了搜索引擎对新闻的收录,需要每个页面对新闻都有不同的 title 和 meta 设置。直接使用head方法来设置当前页面的头部信息就可以了。
默认meta 标签在 nuxt.config.js 配置
module.exports = {head: {title: '标题',meta: [{ charset: 'utf-8' },{name: 'keyword',content: '关键字'},{hid: 'description',name: 'description',content: '描述'},{ name: 'viewport', content: 'width=device-width,initial-scale=1,maximum-scale=1,user-scalable=no' }]}}在页面中独立设置head信息:
注意:为了避免组件中的meta标签不能正确覆盖父组件中相同的标签而产生重复的现象,建议利用 hid 键为meta标签配一个唯一的标识编号。

配置完之后:

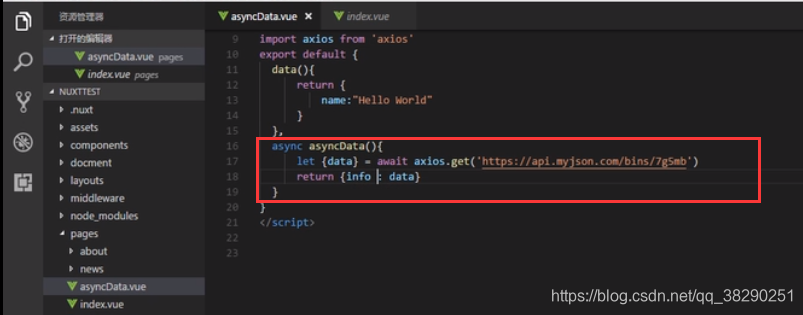
11、NuxtJS的 asyncData (异步请求数据的)方法
简单使用:

复杂更优雅的使用:async await
12、Nuxt.js 自定义Loading页面
nuxt.config.js

loading.vue
<template lang="html">
<div class="loading-outer" v-if="loading"><div class="loading-inner"><img src="../assets/loading-logo.png" alt="鼎湖山泉" class="loading-logo"><div><span class="loading-left"></span><span class="loading-right"></span></div></div>
</div>
</template><script>
export default {data: () => ({loading: false}),methods: {start () {this.loading = true},finish () {this.loading = false}},mounted () {this.$nextTick(() => {this.$nuxt.$loading.start()setTimeout(() => this.$nuxt.$loading.finish(), 3000)})}
}
</script><style scoped>
.loading-outer {width: 100vw;height: 100vh;position: fixed;top: 0;bottom: 0;background: #fff;z-index: 9999999;text-align: center;
}.loading-inner {width: 480px;position: absolute;left: 50%;top: 50%;transform: translate(-50%, -50%);margin-top: -100px;
}.loading-logo {width: 237px;height: 50px;margin-bottom: 60px;
}.loading-right {float: left;width: 240px;height: 3px;background-color: #009140;animation: lineLeftAni 3s ease-in-out;
}.loading-left {float: right;width: 240px;height: 3px;background-color: #009140;animation: lineLeftAni 3s ease-in-out;
}@keyframes lineLeftAni {0% {width: 240px;}50% {width: 100px;}100% {width: 0px;}
}
</style>
13. 校验参数
如果校验失败,则自动跳转到错误页面
<script>
export default {validate({ params, query }) {return /^d+$/.test(params.id) // 入参id必须为一个数字}
}
</script>
14、Header、Footer等公共组件放哪?
大家都知道,vue-cli入口文件是app.vue,在nuxt开发当中则是./layout/default.vue
<template><div id="app"><!-- 公共头部组件 --><xxx-header></xxx-header><!-- 路由视图,相当于router-view --><nuxt/><!-- 公共底部组件 --><xxx-footer></xxx-footer></div>
</template>
15、配置插件
所有插件都写在/plugins目录下,这里以 vue-swiper 为例
plugins/vue-swiper.js

nuxt.config.js

16、使用Axios,并配置全局拦截器,处理跨域
starter-template模板,推荐使用@nuxtjs/axios、@nuxtjs/proxy,不需要在plugins配置
安装依赖
npm install @nuxtjs/axios @nuxtjs/proxy --save使用、处理跨域
// nuxt.config.js
module.exports = {modules: [ '@nuxtjs/axios' ], // 不需要加入@nuxtjs/proxyaxios: {proxy: true,prefix: '/api', // baseURLcredentials: true,},proxy: {'/api/': {target: 'http://127.0.0.1:2001', // 代理地址changeOrigin: true,pathRewrite: {'^/api': ''},},}
}
区分环境配置
modules: ['bootstrap-vue/nuxt',// 请求库'@nuxtjs/axios','@nuxtjs/proxy'],axios: Object.assign({// 基础配置baseURL: BASE_URL_MAP[buildEnv] || BASE_URL_MAP['dev']}, buildEnv === 'dev' ? {// 开发环境配置proxy: true, // 表示开启代理prefix: '/api/', // 表示给请求url加个前缀 /apicredentials: true // 表示跨域请求时是否需要使用凭证} : {}),proxy: (buildEnv === 'dev' ? {// 开发环境配置'/api': {target: BASE_URL_MAP.dev, // 目标接口域名changeOrigin: true, // 是否跨域pathRewrite: {'^/api/': '/' // 把 /api 替换成 /}}} : {}),在组件中使用axios
<script>export default {fetch ({ app }) {console.log(app.$axios)},asyncData ({ app }) {console.log(app.$axios)},created () {console.log(this.$axios)}}
</script>
到此为止,我们并不需要在 plugins 配置 axios,但是如果要设置全局拦截器,那么就要新建一个/plugins/axios.js
export default function (app) {let axios = app.$axios; // 基本配置axios.defaults.timeout = 10000axios.defaults.headers.post['Content-Type'] = 'application/x-www-form-urlencoded'// 请求回调axios.onRequest(config => {})// 返回回调axios.onResponse(res => {})// 错误回调axios.onError(error => {})
}
在 nuxt.config.js 中配置

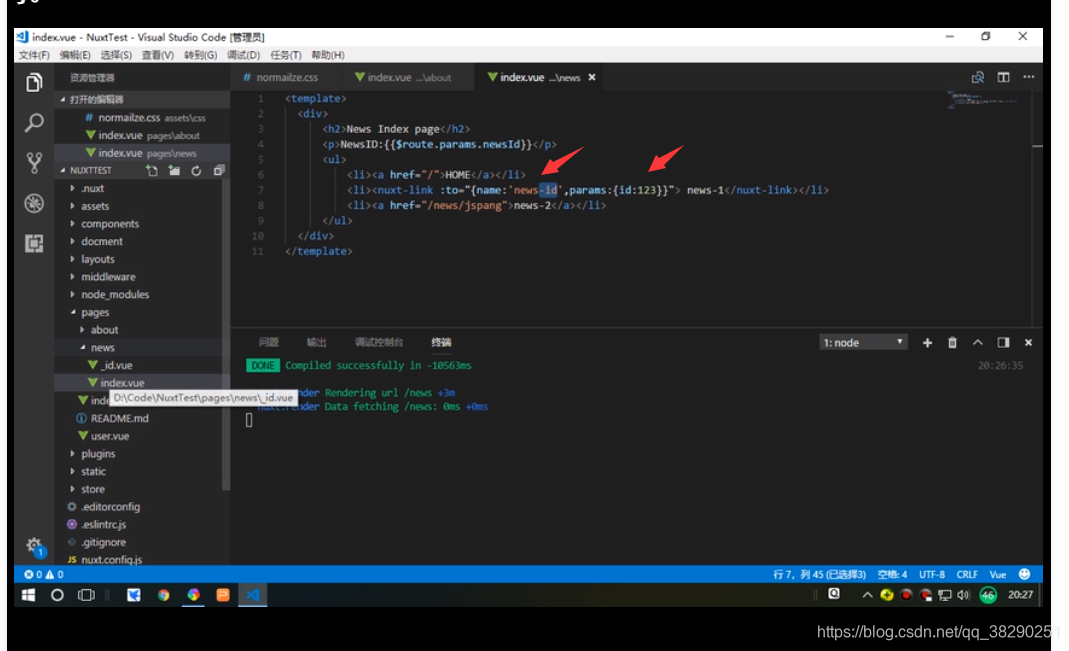
17、动态路由的Meta标签填充
游戏详情页面举例子,由于数据是异步获取的,我们需要把数据获取写在asyncData钩子,待数据获取成功才会渲染该页面组件
<script>
export default {async asyncData ({ app, params }) {let data = await app.$axios.get(`/appmsg/${params.id}`);return {keywords: data.keywords}},head () {return {meta: [{name: 'keywords',content: `${this.keywords},关键字内容默认`},]}}
}
</script>
18、使用Vuex
Vuex 的状态存储是响应式的。当 Vue 组件从 store 中读取状态的时候,若 store 中的状态发生变化,那么相应的组件也会相应地得到高效更新。
nuxt 自己集成了 Vuex,所以不需要安装,在/store目录下新建 js文件 即可使用
在根目录下的 store 文件夹下创建 js 文件即可(Nuxt使用模块化,js文件的文件名即为模块名),不需要使用 index.js文件(新版的使用 index.js 会出现错误)

user.js
export const state = () => ({userName: '小草莓'
})export const mutations = {SET_userName (state, value) {state.userName = value}
}export default {namespaced: true,state,mutations
}
19、注意事项
nuxt 的路由跳转不建议用 router-link ,推荐用 nuxt-link
nuxt 中没有keep-alive。由于是服务端渲染,所以不支持组件的keep-alive,那自然activated、deactivated这两个生命周期也没了