lk 代码流程
bootstrap2
bootstrap2 是一个 lk 线程,优先级为 16, 线程函数位于 kernel/main.c 文件中,其代码如下:
static int bootstrap2(void *arg) {dprintf(SPEW, "top of bootstrap2()\n");arch_init();// initialize the rest of the platformdprintf(SPEW, "initializing platform\n");platform_init();// initialize the targetdprintf(SPEW, "initializing target\n");target_init();dprintf(SPEW, "calling apps_init()\n");apps_init();return 0;
}
其中 arch_init 和 platform_init 在 msm8916 平台都为空函数,所以直接略过。只需要分析 target_init 和 app_init 即可。
target_init
target_init 函数位于 target/msm8916/init.c 文件中,其代码如下:
void target_init(void) {uint32_t base_addr;uint8_t slot;dprintf(INFO, "target_init()\n");spmi_init(PMIC_ARB_CHANNEL_NUM, PMIC_ARB_OWNER_ID);target_keystatus();target_sdc_init();if (partition_read_table()){dprintf(CRITICAL, "Error reading the partition table info\n");ASSERT(0);}#if LONG_PRESS_POWER_ONshutdown_detect();
#endif#if PON_VIB_SUPPORT/* turn on vibrator to indicate that phone is booting up to end user */vib_timed_turn_on(VIBRATE_TIME);
#endifif (target_use_signed_kernel())target_crypto_init_params();
}
上面的代码均参与了编译, LONG_PRESS_POWER_ON 和 PON_VIB_SUPPORT 均定义在 project/msm8916.mk 文件中。
spmi_init的作用是初始化 SPMI(system power management interface) 系统电源管理结构的控制器,太偏向于硬件,暂时过滤。target_keystatus的作用也很简单,获取并设置音量上键和音量下键的状态,而所有按键的状态都保存在全局数组key_bitmap中。-
targe_sdc_init的作用主要是初始化emmc,emmc是目前手机领域流行的存储设备,相当于 pc 端的 ssd 硬盘,这里涉及到一个比较重要的全局数据static struct mmc_device *dev:/** sdhci host structure, holding information about host* controller parameters*/ struct sdhci_host {uint32_t base; /* Base address for the host */uint32_t cur_clk_rate; /* Running clock rate */uint32_t timing; /* current timing for the host */bool tuning_in_progress; /* Tuning is being executed */uint8_t major; /* host controller minor ver */uint16_t minor; /* host controller major ver */bool use_cdclp533; /* Use cdclp533 calibration circuit */event_t* sdhc_event; /* Event for power control irqs */struct host_caps caps; /* Host capabilities */struct sdhci_msm_data *msm_host; /* MSM specific host info */ };/* mmc card register */ struct mmc_card {uint32_t rca; /* Relative addres of the card*/uint32_t ocr; /* Operating range of the card*/uint32_t block_size; /* Block size for the card */uint32_t wp_grp_size; /* WP group size for the card */uint64_t capacity; /* card capacity */uint32_t type; /* Type of the card */uint32_t status; /* Card status */uint8_t *ext_csd; /* Ext CSD for the card info */uint32_t raw_csd[4]; /* Raw CSD for the card */uint32_t raw_scr[2]; /* SCR for SD card */uint32_t rpmb_size; /* Size of rpmb partition */uint32_t rel_wr_count; /* Reliable write count */struct mmc_cid cid; /* CID structure */struct mmc_csd csd; /* CSD structure */struct mmc_sd_scr scr; /* SCR structure */struct mmc_sd_ssr ssr; /* SSR Register */ };/* mmc device config data */ struct mmc_config_data {uint8_t slot; /* Sdcc slot used */uint32_t pwr_irq; /* Power Irq from card to host */uint32_t sdhc_base; /* Base address for the sdhc */uint32_t pwrctl_base; /* Base address for power control registers */uint16_t bus_width; /* Bus width used */uint32_t max_clk_rate; /* Max clock rate supported */uint8_t hs200_support; /* SDHC HS200 mode supported or not */uint8_t hs400_support; /* SDHC HS400 mode supported or not */uint8_t use_io_switch; /* IO pad switch flag for shared sdc controller */ };/* mmc device structure */ struct mmc_device {struct sdhci_host host; /* Handle to host controller */struct mmc_card card; /* Handle to mmc card */struct mmc_config_data config; /* Handle for the mmc config data */ };static struct mmc_device *dev;这个全局变量中存储的就是
emmc的设备信息,后面的读取和写入都会用到。 -
partition_read_table的作用是读取分区表,不论是 MBR 还是 GPT 分区格式,读取后都存放在以下结构中:struct partition_entry {unsigned char type_guid[PARTITION_TYPE_GUID_SIZE];unsigned dtype;unsigned char unique_partition_guid[UNIQUE_PARTITION_GUID_SIZE];unsigned long long first_lba;unsigned long long last_lba;unsigned long long size;unsigned long long attribute_flag;unsigned char name[MAX_GPT_NAME_SIZE];uint8_t lun; };struct partition_entry *partition_entries; -
shutdown_detect是在开启了长按开机键开机的设置后才会生效,msm8916默认开启了此选项,到这里检测开机时间不足够长则关机,按照这里的代码理解,关机后,每次按下开机键,系统其实已经启动到shutdown_detect这个位置了,不过由于按键时间不长,所以没有屏幕没有点亮,系统没有完全启动。 -
vib_timed_turn_on的作用就是开启手机震动 4/1 秒,提示用户手机开启。 -
target_crypto_init_params在编译 lk 时添加VERIFIED_BOOT=1即可开启,它的作用是初始化加密解密引擎,用于解密内核。
app_init
app_init 函数位于 app/app.c 文件中,其代码如下:
/* app entry point */
struct app_descriptor;
typedef void (*app_init)(const struct app_descriptor *);
typedef void (*app_entry)(const struct app_descriptor *, void *args);/* app startup flags */
#define APP_FLAG_DONT_START_ON_BOOT 0x1/* each app needs to define one of these to define its startup conditions */
struct app_descriptor {const char *name;app_init  init;app_entry entry;unsigned int flags;
};void apps_init(void) {const struct app_descriptor *app;/* call all the init routines */for (app = &__apps_start; app != &__apps_end; app++) {if (app->init)app->init(app);}/* start any that want to start on boot */for (app = &__apps_start; app != &__apps_end; app++) {if (app->entry && (app->flags & APP_FLAG_DONT_START_ON_BOOT) == 0) {start_app(app);}}
}static void start_app(const struct app_descriptor *app) {thread_t *thr;printf("starting app %s\n", app->name);thr = thread_create(app->name, &app_thread_entry, (void *)app, DEFAULT_PRIORITY, DEFAULT_STACK_SIZE);if(!thr){return;}thread_resume(thr);
}
整个遍历 app 并启动的过程并不复杂,有趣的是 __apps_start 和 __apps_end 的定义,这两个变量符号在所有源文件中并不存在,而是在 arch/arm/*.ld 链接脚本中存在,这样类似的结构在前面 heap_init 中已经遇到过,区别在于 __apps_start 和 __apps_end 是自定义的两个符号。代表了自定义段 .apps 的开始位置和结束位置。也就是说所有的 app 都通过在特殊的段 .apps 中注册实现了一套插件系统,是一个十分精巧的设计。后续的任何新的 app 只需要使用以下两个宏声明即可注册到 .apps 段中:
#define __SECTION(x) __attribute((section(x)))
#define APP_START(appname) struct app_descriptor _app_##appname __SECTION(".apps") = { .name = #appname,
#define APP_END };
下面是 aboot app 声明的 app 的实际例子:
APP_START(aboot)
.init = aboot_init,
APP_END
宏展开后的实际效果如下:
struct app_descriptor _app_aboot ____attribute((section(".apps"))) = {.name = "aboot", .init = aboot_init};
这样通过遍历 .apps 段就可以获取 aboot 的描述信息,调用 aboot 的 init 函数了。这个是 app 的加载方式和过程,但是具体需要使用哪些 app 是在 project/msm8916.mk 文件中定义的, msm8916.mk 只使用 aboot app。
aboot
aboot 是 lk 的中的一个 app, 这里才可以算是真正的 android bootloader,负责加载,校验,解密 boot.img ,后续 kernel 的启动都是在这里完成。
aboot_init
aboot_init 是 通过 APP_START 注册的 aboot 入口函数, aboot 的所有功能都是由此开始。aboot_init 函数位于 app/aboot/aboot.c 文件中,由于 aboot_init 的代码流程较长,所以分为 4 个部分来分析。
-
init 部分init 部分的工作比较简单,主要的作用是加载一些基础数据,初始化开始屏幕等。
void aboot_init(const struct app_descriptor *app) {unsigned reboot_mode = 0;/* Setup page size information for nv storage */if (target_is_emmc_boot()){page_size = mmc_page_size();page_mask = page_size - 1;}else{page_size = flash_page_size();page_mask = page_size - 1;}ASSERT((MEMBASE + MEMSIZE) > MEMBASE);read_device_info(&device);read_allow_oem_unlock(&device);/* Display splash screen if enabled */
#if DISPLAY_SPLASH_SCREEN
#if NO_ALARM_DISPLAYif (!check_alarm_boot()) {
#endifdprintf(SPEW, "Display Init: Start\n");
#if ENABLE_WBC/* Wait if the display shutdown is in progress */while(pm_app_display_shutdown_in_prgs());if (!pm_appsbl_display_init_done())target_display_init(device.display_panel);elsedisplay_image_on_screen();
#elsetarget_display_init(device.display_panel);
#endifdprintf(SPEW, "Display Init: Done\n");
#if NO_ALARM_DISPLAY}
#endif
#endiftarget_serialno((unsigned char *) sn_buf);dprintf(SPEW,"serial number: %s\n",sn_buf);memset(display_panel_buf, '\0', MAX_PANEL_BUF_SIZE);//...
}
整个 init 部分的代码比较简单,流程大体如下:
-
获取分页大小,并保存到全局变量
page_size和page_mask中,msm8916中分页大小固定为 2048。 -
从
emmc中的aboot分区或deviceinfo分区获取device, 这里的device是一个全局变量,其结构如下:typedef struct device_info device_info;#define DEVICE_MAGIC "ANDROID-BOOT!" #define DEVICE_MAGIC_SIZE 13 #define MAX_PANEL_ID_LEN 64 #define MAX_VERSION_LEN 64struct device_info {unsigned char magic[DEVICE_MAGIC_SIZE];bool is_unlocked;bool is_tampered;bool is_verified;bool charger_screen_enabled;char display_panel[MAX_PANEL_ID_LEN];char bootloader_version[MAX_VERSION_LEN];char radio_version[MAX_VERSION_LEN]; };static device_info device = {DEVICE_MAGIC, 0, 0, 0, 0, { 0}, { 0},{ 0}};其中保存的信息在后期经常会用到,比如
device_info.is_unlocked就是 bootloader 是否解锁的标志位。 -
从
emmc中的config分区或frq分区获取is_allow_unlock标志位,一般都为允许,使用加密手段来限制解锁。 -
初始化开始屏幕信息和全局的屏幕信息缓存
display_panel_buf,大小为 128。 -
获取序列号并保存在全局变量
sn_buf中,序列号就存储在targe_sdc_init中初始化的dev变量中。
-
-
启动模式检测启动模式检测的功能是根据不同的按键状态和配置选择不同的启动模式,比如正常系统启动,recovery 启动等。
void aboot_init(const struct app_descriptor *app) {//.../** Check power off reason if user force reset,* if yes phone will do normal boot.*/if (is_user_force_reset())goto normal_boot;/* Check if we should do something other than booting up */if (keys_get_state(KEY_VOLUMEUP) && keys_get_state(KEY_VOLUMEDOWN)){dprintf(ALWAYS,"dload mode key sequence detected\n");if (set_download_mode(EMERGENCY_DLOAD)){dprintf(CRITICAL,"dload mode not supported by target\n");}else{reboot_device(DLOAD);dprintf(CRITICAL,"Failed to reboot into dload mode\n");}boot_into_fastboot = true;}if (!boot_into_fastboot){if (keys_get_state(KEY_HOME) || keys_get_state(KEY_VOLUMEUP))boot_into_recovery = 1;if (!boot_into_recovery &&(keys_get_state(KEY_BACK) || keys_get_state(KEY_VOLUMEDOWN)))boot_into_fastboot = true;}#if NO_KEYPAD_DRIVERif (fastboot_trigger())boot_into_fastboot = true;#endif#if USE_PON_REBOOT_REGreboot_mode = check_hard_reboot_mode();
#elsereboot_mode = check_reboot_mode();
#endifif (reboot_mode == RECOVERY_MODE){boot_into_recovery = 1;}else if(reboot_mode == FASTBOOT_MODE){boot_into_fastboot = true;}else if(reboot_mode == ALARM_BOOT){boot_reason_alarm = true;}//...
}
这部分的代码只是通过检测关机的方式,按键的状态来设定确定进入哪种模式的启动方式,但是不同的机型,对应的按键组合并不相同,所以只需要知道有几种启动模式即可。
msm8916有以下几种启动模式:- 普通模式
- 紧急下载模式
- 下载模式
- recovery 模式
- 闹钟启动模式
- fastboot 模式
以上几种模式常用的就只有 普通模式/recovery 模式/fastboot 模式 3 种,也是需要重点分析的 3 种。
-
非 fastboot 模式启动非 fastboot 模式启动就是 recovery 模式 或者 普通模式启动,这两者所使用的是同一套加载流程,所以可以归类为同一类。
void aboot_init(const struct app_descriptor *app){//...if (!boot_into_fastboot){if (target_is_emmc_boot()){if(emmc_recovery_init())dprintf(ALWAYS,"error in emmc_recovery_init\n");if(target_use_signed_kernel()){if((device.is_unlocked) || (device.is_tampered)){
#ifdef TZ_TAMPER_FUSEset_tamper_fuse_cmd();
#endif
#if USE_PCOM_SECBOOTset_tamper_flag(device.is_tampered);
#endif}}boot_linux_from_mmc();}else{recovery_init();
#if USE_PCOM_SECBOOTif((device.is_unlocked) || (device.is_tampered))set_tamper_flag(device.is_tampered);
#endifboot_linux_from_flash();}dprintf(CRITICAL, "ERROR: Could not do normal boot. Reverting ""to fastboot mode.\n");}//...
}
由于启动过程比较复杂,所以在后文继续分析。
-
fastboot 模式启动fastboot 模式是 android 定义的一套通信协议,可以指定参数写入 emmc 分区的方法,通俗的说就是刷机的接口。
void aboot_init(const struct app_descriptor *app){//.../* We are here means regular boot did not happen. Start fastboot. *//* register aboot specific fastboot commands */aboot_fastboot_register_commands();/* dump partition table for debug info */partition_dump();/* initialize and start fastboot */fastboot_init(target_get_scratch_address(), target_get_max_flash_size());
}
fastboot 和 recovery 以及 normal 等模式不同, fastboot 本身就是 lk 的一部分,负责对外的一个接口而已,并不是一个单独的系统,是依赖于 lk 存在的。fastboot 可以分为以下几个方面:
- fastboot 指令注册
- fastboot 监听启动
- fastboot 指令解析
按照这个分类来一步步分析整个 fastboot 的框架。
指令注册
fastboot 使用 aboot_fastboot_register_commands 来注册指令。aboot_fastboot_register_commands 函数位于 app/aboot/aboot.c 文件中,其代码如下:
/* register commands and variables for fastboot */
void aboot_fastboot_register_commands(void) {int i;struct fastboot_cmd_desc cmd_list[] = {/* By default the enabled list is empty. */{
   "", NULL},/* move commands enclosed within the below ifndef to here* if they need to be enabled in user build.*/
#ifndef DISABLE_FASTBOOT_CMDS/* Register the following commands only for non-user builds */{
   "flash:", cmd_flash},{
   "erase:", cmd_erase},{
   "boot", cmd_boot},{
   "continue", cmd_continue},{
   "reboot", cmd_reboot},{
   "reboot-bootloader", cmd_reboot_bootloader},{
   "oem unlock", cmd_oem_unlock},{
   "oem unlock-go", cmd_oem_unlock_go},{
   "oem lock", cmd_oem_lock},{
   "oem verified", cmd_oem_verified},{
   "oem device-info", cmd_oem_devinfo},{
   "preflash", cmd_preflash},{
   "oem enable-charger-screen", cmd_oem_enable_charger_screen},{
   "oem disable-charger-screen", cmd_oem_disable_charger_screen},{
   "oem select-display-panel", cmd_oem_select_display_panel},
#if UNITTEST_FW_SUPPORT{
   "oem run-tests", cmd_oem_runtests},
#endif
#endif};int fastboot_cmds_count = sizeof(cmd_list)/sizeof(cmd_list[0]);for (i = 1; i < fastboot_cmds_count; i++)fastboot_register(cmd_list[i].name,cmd_list[i].cb);/* publish variables and their values */fastboot_publish("product",  TARGET(BOARD));fastboot_publish("kernel",   "lk");fastboot_publish("serialno", sn_buf);/** partition info is supported only for emmc partitions* Calling this for NAND prints some error messages which* is harmless but misleading. Avoid calling this for NAND* devices.*/if (target_is_emmc_boot())publish_getvar_partition_info(part_info, ARRAY_SIZE(part_info));/* Max download size supported */snprintf(max_download_size, MAX_RSP_SIZE, "\t0x%x",target_get_max_flash_size());fastboot_publish("max-download-size", (const char *) max_download_size);/* Is the charger screen check enabled */snprintf(charger_screen_enabled, MAX_RSP_SIZE, "%d",device.charger_screen_enabled);fastboot_publish("charger-screen-enabled",(const char *) charger_screen_enabled);snprintf(panel_display_mode, MAX_RSP_SIZE, "%s",device.display_panel);fastboot_publish("display-panel",(const char *) panel_display_mode);fastboot_publish("version-bootloader", (const char *) device.bootloader_version);fastboot_publish("version-baseband", (const char *) device.radio_version);
}
代码的逻辑比较简单,主要分为两个部分的注册:
-
fastboot指令注册。fastboot的指令使用了一个struct fastboot_cmd_desc类型的局部数组来保存,fastboot_cmd_desc的结构如下:/* fastboot command function pointer */ typedef void (*fastboot_cmd_fn) (const char *, void *, unsigned);struct fastboot_cmd_desc {char * name;fastboot_cmd_fn cb; };这个结构包含了
fastboot的指令字符串和处理函数,处理函数使用了统一的函数形式fastboot_cmd_fn来定义。msm8916中一共定义了以下 16 条指令和处理函数:
| command | handler |
|---|---|
| flash: | cmd_flash |
| erase: | cmd_erase |
| boot | cmd_boot |
| continue | cmd_continue |
| reboot | cmd_reboot |
| reboot-bootloader | cmd_reboot_bootloader |
| oem unlock | cmd_oem_unlock |
| oem unlock-go | cmd_oem_unlock_go |
| oem lock | cmd_oem_lock |
| oem verified | cmd_oem_verified |
| oem device-info | cmd_oem_devinfo |
| preflash | cmd_preflash |
| oem enable-charger-screen | cmd_oem_enable_charger_screen |
| oem disable-charger-screen | cmd_oem_disable_charger_screen |
| oem select-display-panel | cmd_oem_select_display_panel |
| oem run-tests | cmd_oem_runtests |
| getvar: | cmd_getvar |
| download: | cmd_download |
有了这个数组后,就可以使用 fastboot_register 函数将指令注册到全局链表 cmd_list 中, 其结构如下:
struct fastboot_cmd {struct fastboot_cmd *next;const char *prefix;unsigned prefix_len;void (*handle)(const char *arg, void *data, unsigned sz);
};static struct fastboot_cmd *cmdlist;
fastboot_register 函数位于 app/aboot/fastboot.c 文件中, 其代码如下:
void fastboot_register(const char *prefix,void (*handle)(const char *arg, void *data, unsigned sz)) {struct fastboot_cmd *cmd;cmd = malloc(sizeof(*cmd));if (cmd) {cmd->prefix = prefix;cmd->prefix_len = strlen(prefix);cmd->handle = handle;cmd->next = cmdlist;cmdlist = cmd;}
}
作用只是将将要注册的指令的 指令字符串 和 处理函数 存放到 cmd_list 链表中,也就是说 fastboot 所有的指令都可以通过遍历链表而得到。
1. fastboot 数据注册。fastboot 模式还保存了一些主要的设备和厂商信息,这些信息都统一由 fastboot_publish 来注册,注册的信息和指令一样,存储在一个全局链表 varlist 中, varlist 的结构如下:
struct fastboot_var {struct fastboot_var *next;const char *name;const char *value;
};static struct fastboot_var *varlist;
这个结构比较简单,只有名称和对应的数据,和指令一样的道理,通过遍历 varlist 就可以找到全部的 数据 , msm8916 支持的数据如下。
| name | value |
|---|---|
| product | msm8916 |
| kernel | lk |
| serialno | [serial number] |
| [system partition size] | [system partition response size] |
| [system partition type] | [system partition response type] |
| [userdata partition size] | [userdata partition response size] |
| [userdata partition type] | [userdata partition response type] |
| [cache partition size] | [cache partition response size] |
| [cache partition type] | [cache partition response type] |
| max-download-size | SCRATCH_SIZE |
| charger-screen-enabled | |
| display-panel | |
| version-bootloader | [bootloader version] |
| version-baseband | [radio version] |
| version | 0.5 |
通过上面的两个步骤后, fastboot 的所有 指令 和 数据 就注册完成了,接下来的需要启动 fastboot 对 USB 设备的监听,以接送 fastboot 命令。
监听启动
fastboot 在 fastboot_init 函数中设置 usb 监听的线程。fastboot_init 函数位于 app/aboot/fastboot.c 文件中,删除了一些未编译入 msm8916 的代码后,其代码如下:
int fastboot_init(void base, unsigned size){ char sn_buf[13]; thread_t thr; dprintf(INFO, "fastboot_init()\n");download_base = base; download_max = size;/ target specific initialization before going into fastboot. / target_fastboot_init();/ setup serialno / target_serialno((unsigned char *) sn_buf); dprintf(SPEW,"serial number: %s\n",sn_buf); surf_udc_device.serialno = sn_buf;if(!strcmp(target_usb_controller(), "dwc")) {#ifdef USB30_SUPPORT //...#else dprintf(CRITICAL, "USB30 needs to be enabled for this target.\n"); ASSERT(0);#endif } else { / initialize udc functions to use the default chipidea controller / usb_if.udc_init = udc_init; usb_if.udc_register_gadget = udc_register_gadget; usb_if.udc_start = udc_start; usb_if.udc_stop = udc_stop;usb_if.udc_endpoint_alloc = udc_endpoint_alloc;usb_if.udc_request_alloc = udc_request_alloc;usb_if.udc_request_free = udc_request_free;
usb_if.usb_read = hsusb_usb_read;usb_if.usb_write = hsusb_usb_write;
}/ register udc device / usb_if.udc_init(&surf_udc_device);event_init(&usb_online, 0, EVENT_FLAG_AUTOUNSIGNAL); event_init(&txn_done, 0, EVENT_FLAG_AUTOUNSIGNAL);in = usb_if.udc_endpoint_alloc(UDC_TYPE_BULK_IN, 512); if (!in) goto fail_alloc_in; out = usb_if.udc_endpoint_alloc(UDC_TYPE_BULK_OUT, 512); if (!out) goto fail_alloc_out;fastboot_endpoints[0] = in; fastboot_endpoints[1] = out;req = usb_if.udc_request_alloc(); if (!req) goto fail_alloc_req;/ register gadget / if (usb_if.udc_register_gadget(&fastboot_gadget)) goto fail_udc_register;fastboot_register("getvar:", cmd_getvar); fastboot_register("download:", cmd_download); fastboot_publish("version", "0.5");thr = thread_create("fastboot", fastboot_handler, 0, DEFAULT_PRIORITY, 4096); if (!thr) { goto fail_alloc_in; } thread_resume(thr);usb_if.udc_start();return 0;fail_udc_register: usb_if.udc_request_free(req);fail_alloc_req: usb_if.udc_endpoint_free(out);fail_alloc_out: usb_if.udc_endpoint_free(in);fail_alloc_in: return -1;}
fastboot_init 的代码可以分为以下 3 个流程:
1. usb_if(usb controller interface) 初始化。
2. usb_if 绑定。
3. fastboot 线程启动。
usb_if 初始化
usb_if 是一个全局变量,这个阶段就是为这个结构体赋予一些需要的值,方便后面使用。 usb_if 的结构如下:
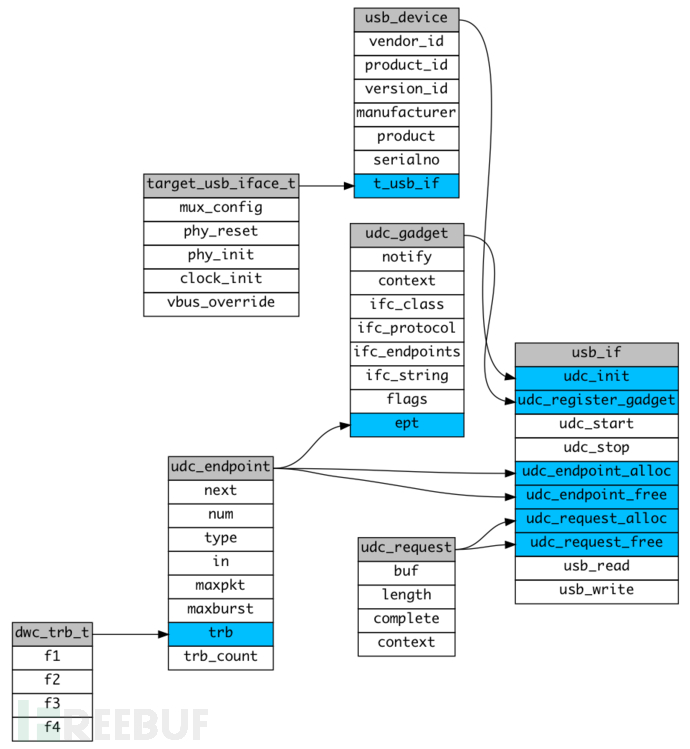
/ USB Device Controller Transfer Request /struct udc_request { void buf; unsigned length; void (complete)(); void *context;};/ TRB fields /typedef struct{ uint32_t f1; uint32_t f2; uint32_t f3; uint32_t f4;} dwc_trb_t;struct udc_endpoint { struct udc_endpoint next; uint8_t num; uint8_t type; uint8_t in; uint16_t maxpkt; uint32_t maxburst; / max pkts that this ep can transfer before waiting for ack. */dwc_trb_t trb; / pointer to buffer used for TRB chain / uint32_t trb_count; / size of TRB chain. */};struct udc_gadget { void (notify)(struct udc_gadget gadget, unsigned event); void *context;unsigned char ifc_class; unsigned char ifc_subclass; unsigned char ifc_protocol; unsigned char ifc_endpoints; const char *ifc_string; unsigned flags;struct udc_endpoint **ept;};/ Target helper functions exposed to USB driver /typedef struct { void (mux_config) (); void (phy_reset) (); void (phy_init) (); void (clock_init) (); uint8_t vbus_override;} target_usb_iface_t;struct udc_device { unsigned short vendor_id; unsigned short product_id; unsigned short version_id;const char manufacturer; const char product; const char serialno; target_usb_iface_t t_usb_if;};typedef struct{ int (udc_init)(struct udc_device devinfo); int (udc_register_gadget)(struct udc_gadget gadget); int (udc_start)(void); int (udc_stop)(void);struct udc_endpoint (udc_endpoint_alloc)(unsigned type, unsigned maxpkt); void (udc_endpoint_free)(struct udc_endpoint ept); struct udc_request (udc_request_alloc)(void); void (udc_request_free)(struct udc_request req);int (usb_read)(void buf, unsigned len); int (usb_write)(void buf, unsigned len);} usb_controller_interface_t;usb_controller_interface_t usb_if;
其结构比较多,可以用以下关系图表示。
fastboot_init 初始化 usb_if 的代码如下:
int fastboot_init(void base, unsigned size){ char sn_buf[13]; thread_t thr; dprintf(INFO, "fastboot_init()\n");download_base = base; download_max = size;/ target specific initialization before going into fastboot. / target_fastboot_init();/ setup serialno / target_serialno((unsigned char *) sn_buf); dprintf(SPEW,"serial number: %s\n",sn_buf); surf_udc_device.serialno = sn_buf;if(!strcmp(target_usb_controller(), "dwc")) {#ifdef USB30_SUPPORT //...#else dprintf(CRITICAL, "USB30 needs to be enabled for this target.\n"); ASSERT(0);#endif } else { / initialize udc functions to use the default chipidea controller / usb_if.udc_init = udc_init; usb_if.udc_register_gadget = udc_register_gadget; usb_if.udc_start = udc_start; usb_if.udc_stop = udc_stop;usb_if.udc_endpoint_alloc = udc_endpoint_alloc;usb_if.udc_request_alloc = udc_request_alloc;usb_if.udc_request_free = udc_request_free;
usb_if.usb_read = hsusb_usb_read;usb_if.usb_write = hsusb_usb_write;}/ register udc device / usb_if.udc_init(&surf_udc_device);//...}
1. 初始化了两个全局变量 download_base 和 download_size, 这块空间是 fastboot 刷入系统时的缓冲区,在 msm8916 平台下, download 为 0×90000000, download_size 为 0×10000000。
2. 获取序列号并赋值给 surf_udc_device, 它的类型是 udc_device, surf_udc_device 的定义如下:
static struct udc_device surf_udc_device = { .vendor_id = 0x18d1, .product_id = 0xD00D, .version_id = 0x0100, .manufacturer = "Google", .product = "Android",};
3. 初始化 usb_if 中的各控制函数,由于 msm8916 并没有定义 USB30_SUPPORT 宏,也就是说不知道 usb3.0,所以使用的默认的控制函数。这些控制函数的作用就是为了和 usb 主机交换数据,具体的底层通讯协议和实现涉及 usb 设计和硬件知识,这里暂不分析,只需要知道整个逻辑的入口点是在 fastboot_gadget.notify 函数中即可。fastboot_gadget.notify 对应的函数是 fastboot_notify, 该函数位于 app/aboot/fastboot.c 文件中,其实现如下:
static void fastboot_notify(struct udc_gadget *gadget, unsigned event){ if (event == UDC_EVENT_ONLINE) { event_signal(&usb_online, 0); }}
当有 usb 包发送到手机时这个函数就会被中断触发, fastboot_notify 函数的作用是发送 usb_online 的信号,凡事接收这个信号的函数就会被调用。
usb_if 绑定
usb_if 初始化完成后,需要设置通信的渠道,和响应命令的方法,这一部分的代码的主要作用就是进行这些方法的设定。
int fastboot_init(void *base, unsigned size){ / register udc device / usb_if.udc_init(&surf_udc_device);event_init(&usb_online, 0, EVENT_FLAG_AUTOUNSIGNAL); event_init(&txn_done, 0, EVENT_FLAG_AUTOUNSIGNAL);in = usb_if.udc_endpoint_alloc(UDC_TYPE_BULK_IN, 512); if (!in) goto fail_alloc_in; out = usb_if.udc_endpoint_alloc(UDC_TYPE_BULK_OUT, 512); if (!out) goto fail_alloc_out;fastboot_endpoints[0] = in; fastboot_endpoints[1] = out;req = usb_if.udc_request_alloc(); if (!req) goto fail_alloc_req;/ register gadget / if (usb_if.udc_register_gadget(&fastboot_gadget)) goto fail_udc_register;//...fail_udc_register: usb_if.udc_request_free(req);fail_alloc_req: usb_if.udc_endpoint_free(out);fail_alloc_out: usb_if.udc_endpoint_free(in);fail_alloc_in: return -1;}
-
创建了两个事件,
usb_online和txn_done,usb_online是响应 usb 上线的事件,然后等待处理命令,txn_done则是在请求 usb 操作时等待返回的信号,由req_complete函数发送此信号。 -
使用 usb 控制函数给出的接口创建以下 3 个全局变量:
- static struct udc_endpoint in
in变量是在usb_write对应的函数中使用,作为 usb 入口端点。 - static struct udc_endpoint out
out变量是在usb_read对应的函数中使用,作为 usb 出口端点。 - static struct udc_request *req
req作为请求 usb 数据操作,相当于一个 usb 数据包。
- static struct udc_endpoint in
- 将
fastboot_gadget注册到 usb 中,fastboot_gadget的notify函数是整个指令处理流程的入口点。
fastboot 线程启动
这一部分比较简单,主要的功能就是启动一个线程等待 fastboot 的指令传入,并且启动 udc。
int fastboot_init(void *base, unsigned size){ //...fastboot_register("getvar:", cmd_getvar); fastboot_register("download:", cmd_download); fastboot_publish("version", "0.5");thr = thread_create("fastboot", fastboot_handler, 0, DEFAULT_PRIORITY, 4096); if (!thr) { goto fail_alloc_in; } thread_resume(thr);usb_if.udc_start();return 0; //..}
1. 新注册了以下两条指令 getvar: 和 download:, 以及一条数据 version 。
2. 创建并启动 fastboot 线程,线程的功能就是等待 usb_online 事件,然后解析 fastboot 指令。
static int fastboot_handler(void *arg){ for (;;) { event_wait(&usb_online); fastboot_command_loop(); } return 0;}
3. 开启 udc 。
指令解析
fastboot 指令解析的过程是在 fastboot_command_loop 函数中完成的。fastboot_command_loop 函数位于 app/aboot/fastboot.c 文件中,其代码如下:
static void fastboot_command_loop(void){ struct fastboot_cmd *cmd; int r; dprintf(INFO,"fastboot: processing commands\n");uint8_t buffer = (uint8_t )memalign(CACHE_LINE, ROUNDUP(4096, CACHE_LINE)); if (!buffer) { dprintf(CRITICAL, "Could not allocate memory for fastboot buffer\n."); ASSERT(0); }again: while (fastboot_state != STATE_ERROR) {/* Read buffer must be cleared first. If buffer is not cleared,* the original data in buf trailing the received command is * interpreted as part of the command.*/memset(buffer, 0, MAX_RSP_SIZE);arch_clean_invalidate_cache_range((addr_t) buffer, MAX_RSP_SIZE);r = usb_if.usb_read(buffer, MAX_RSP_SIZE);if (r < 0) break;buffer[r] = 0;dprintf(INFO,"fastboot: %s\n", buffer);fastboot_state = STATE_COMMAND;for (cmd = cmdlist; cmd; cmd = cmd->next) { if (memcmp(buffer, cmd->prefix, cmd->prefix_len)) continue; cmd->handle((const char) buffer + cmd->prefix_len, (void) download_base, download_size); if (fastboot_state == STATE_COMMAND) fastboot_fail("unknown reason"); goto again;}fastboot_fail("unknown command");} fastboot_state = STATE_OFFLINE; dprintf(INFO,"fastboot: oops!\n"); free(buffer);}
指令解析的流程非常简单,分为以下两个:
- 申请并清零缓冲区,然后使用
usb_read接口获取 usb 数据。 - 遍历
cmdlist, 比对指令调用对应指令的处理函数。
参考资料
- What is eMMC Memory – software support | Reliance Nitro | Datalight
- eMMC NAND to Raw Flash Comparison – Root Cause Analysis | Datalight
- Using GNU C attribute