一、swagger的介绍
1. 前后端分离的特点前后端分离是的前端与后端之间的职责更加明确・ 后台: 负责业务处理・ 前端: 负责显示逻辑在这种情况下,前端和后端可以分别交付给专业的开发人员去做,所以是必须要定义前后端直接的对接接口,否则各自为是则项目无法集成,这时就需要一个文档来定义统一的接2. 在没有 swagger 之前在没有 swagger 之间,我们可以使用 word , excel 等功能来书写接口定义文档,但又有一个弊端,即: 在接口发送改变时需要及时的同步接口文档,否则实际的接口与接口文档不相符,则接口文件就失去了作用,甚至会起到反作用。3. swagger 的作用根据在代码中使用自定义的注解来生成接口文档,这个在前后端分离的项目中很重要。这样做的好处是在开发接口时可以通过swagger 将接口文档定义好,同时也方便以后的维护4. swagger 的优点・ 号称时最流行的 API 框架・ 接口文档在线生成,避免同步的麻烦・ 可以支持在线对接口执行测试・ 支持多语言
5、集成swagger
①、新建springboot项目
使用集成开发工具创建一个
springboot
工程(我在上一篇博客的基础上写)
②、
集成
swagger
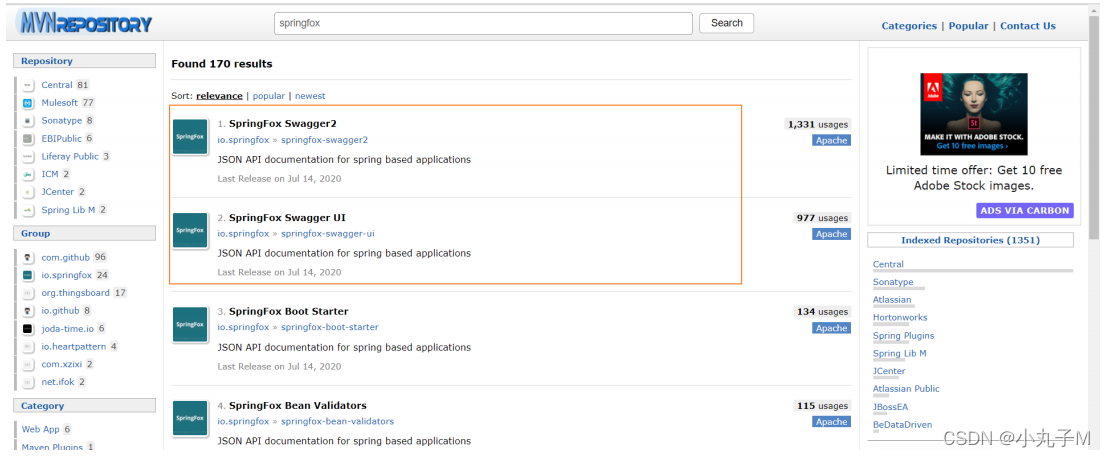
(1). 打开https://mvnrepository.com/search?q=springfox&__cf_chl_f_tk=Q6B.I0nVgxSaKl9ZtlljJ0qx.shGqrsOZ1OZ6NxN.ks-1646986792-0-gaNycGzNCL0
查找springbox,在pom.xml中导入如下图标出的依赖。
(2)导入pom依赖
<!-- https://mvnrepository.com/artifact/io.springfox/springfox-swagger2 --><dependency><groupId>io.springfox</groupId><artifactId>springfox-swagger2</artifactId><version>2.9.2</version></dependency><!-- https://mvnrepository.com/artifact/io.springfox/springfox-swagger-ui --><dependency><groupId>io.springfox</groupId><artifactId>springfox-swagger-ui</artifactId><version>2.9.2</version></dependency>③、编写swagger的配置类
(1)新建config包,新建SwaggerConfig 类
package com.mwy.config;import org.springframework.context.annotation.Bean;
import org.springframework.context.annotation.Configuration;
import org.springframework.web.bind.annotation.RestController;
import springfox.documentation.builders.ApiInfoBuilder;
import springfox.documentation.builders.PathSelectors;
import springfox.documentation.builders.RequestHandlerSelectors;
import springfox.documentation.service.ApiInfo;
import springfox.documentation.spi.DocumentationType;
import springfox.documentation.spring.web.plugins.Docket;
import springfox.documentation.swagger2.annotations.EnableSwagger2;@Configuration
@EnableSwagger2
public class SwaggerConfig {@Beanpublic Docket createRestApi(){return new Docket(DocumentationType.SWAGGER_2).apiInfo(apiInfo()).select().apis(RequestHandlerSelectors.basePackage("com.mwy.controller")).paths(PathSelectors.any()).build();}private ApiInfo apiInfo(){return new ApiInfoBuilder().title("Mi").description("商城").version("1.0").termsOfServiceUrl("https://www.mwy.com").build();}}
注意: 该配置类需要根据自己的项目修改,如以下配置・ paths 指定需要生成文档的 url 规则・ title 文档标题・ description 描述
(2)浏览器访问查看
④、开发一个controller用于测试
package com.mwy.controller;import com.mwy.pojo.User;
import com.mwy.service.IUserService;
import com.mwy.util.response.ResponseResult;
import io.swagger.annotations.Api;
import io.swagger.annotations.ApiImplicitParam;
import io.swagger.annotations.ApiOperation;
import org.springframework.beans.factory.annotation.Autowired;
import org.springframework.web.bind.annotation.RequestBody;
import org.springframework.web.bind.annotation.RequestMapping;
import org.springframework.web.bind.annotation.RequestMethod;
import org.springframework.web.bind.annotation.RestController;@RequestMapping("/user")
@RestController
@Api(tags = "用户操作类")
public class UserController {@Autowiredprivate IUserService userService;@ApiOperation(value = "登录方法")@ApiImplicitParam(value = "用户信息",required = true,name = "user",paramType = "boby")@RequestMapping(value = "/login",method = RequestMethod.POST )public ResponseResult<?> login(@RequestBody User user) {return userService.findUserByAccount(user);}}
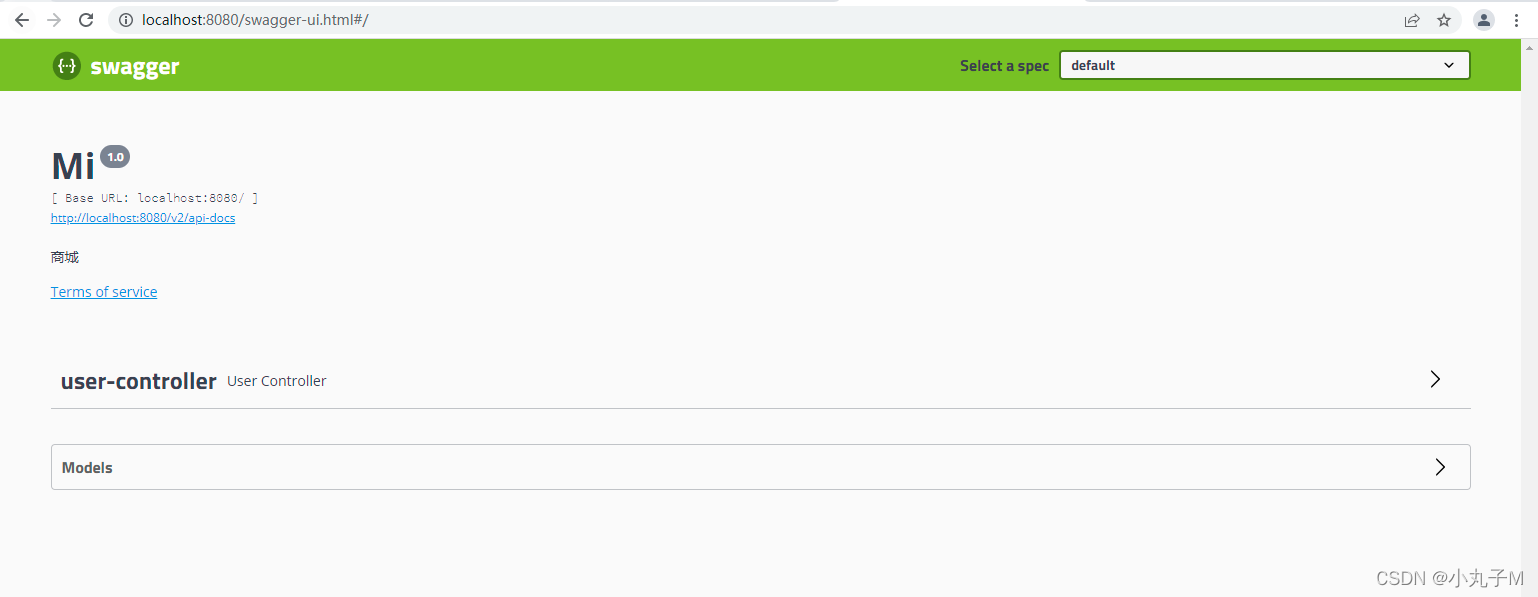
服务启动后,访问: http://localhost:8080/swagger-ui.html#/user-controller

说明集成成功
6、swagger常用注解
①、常用注解列表:
|
注解
|
位置
|
作用
|
参数 |
|---|---|---|---|
|
@Api
|
类 |
标识这个类是
swagger
的资源
|
tags
:说明该类的作用,
参数是个数组,可 以填多个。
|
|
value="
该参数没什么意义,
在UI
界面上不显示,所以不用配置"
|
|||
|
description = "
用户基本信
息操作
"
|
|||
|
@ApiOperation
|
方法 | 表示一个http请求的操作 |
value="
方法的用途和作
用
"
|
|
notes="
方法的注意事项和备注"
|
|||
|
tags
:说明该方法的作用,
参数是个数组,可以填多个。
|
|||
|
格式:
tags={"
作用
1","
作用2"}
|
|||
|
@ApiParam
|
方法、
参数
|
对参数使用说明(如:说明
或是否必填等)
|
value="
用户名
"
描述参
数的意义
|
|
name="name"
参数的变量名
|
|||
|
required=true
参数是否必选
|
|||
|
@ApiModel
|
类 |
表示对类进行说明,用于参
数用实体类接收,一般用在
DTO
上
|
description="
描述实体的作用"
|
|
@ApiModelPropert
|
方法、
字段
|
表示对model属性的说明 |
value="
用户名
"
描述参数的意义
|
|
name="name"
参数的变量
名
|
|||
|
required=true
参数是否必
选
|
|||
|
@ApiIgnore
|
类、
方法、
参数
|
表示这个方法或者类被忽略 | 无 |
|
@ApiImplicitParams
|
方法 | 包含多@ApiImplicitParam | |
|
@ApiImplicitParam
|
方法 | 表示单独的请求参数 | name="参数名称" |
|
value="
参数说明
"
|
|||
|
dataType="
数据类型
"
|
|||
|
paramType="query"
表示
参数放在哪里
|
header 请求参数的获取: @RequestHeaderquery 请求参数的获取: @RequestParampath (用于 restful 接口) 请求参数的获取: @PathVariablebody (不常用)form (不常用)
defaultValue="
参数的默认值
"
required="true"
表示参数是否必须传
|
更全面的信息可以参考官方说明文档: swagger-annotations 1.3.10 API
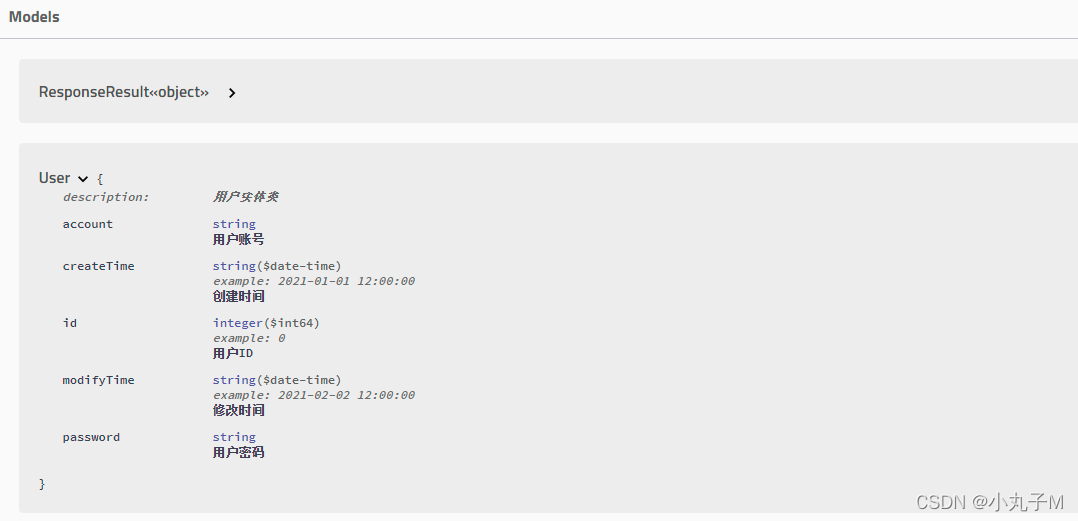
②、将用户实体类增加注解
package com.mwy.pojo;import com.fasterxml.jackson.annotation.JsonFormat;
import io.swagger.annotations.ApiModel;
import io.swagger.annotations.ApiModelProperty;
import lombok.AllArgsConstructor;
import lombok.Data;
import lombok.NoArgsConstructor;
import lombok.experimental.Accessors;
import org.springframework.format.annotation.DateTimeFormat;import javax.persistence.*;
import java.io.Serializable;
import java.time.LocalDateTime;@Data
@Table(name = "t_user")
@AllArgsConstructor
@NoArgsConstructor
@Accessors(chain = true)
@ApiModel(description = "用户实体类")
public class User implements Serializable {@Id@GeneratedValue(strategy = GenerationType.IDENTITY)@ApiModelProperty(value = "用户ID",name = "id",example = "0")private Long id;@ApiModelProperty(value = "用户账号",name = "account")private String account;@ApiModelProperty(value = "用户密码",name = "password")private String password;@ApiModelProperty(value = "修改时间",name = "modifyTime",example = "2021-02-02 12:00:00")@Column(name = "modify_time")@JsonFormat(pattern = "yyyy-MM-dd HH:mm:ss")@DateTimeFormat(pattern = "yyyy-MM-dd HH:mm:ss")private LocalDateTime modifyTime;@ApiModelProperty(value = "创建时间",name = "createTime",example = "2021-01-01 12:00:00")@Column(name = "create_time")@JsonFormat(pattern = "yyyy-MM-dd HH:mm:ss")@DateTimeFormat(pattern = "yyyy-MM-dd HH:mm:ss")private LocalDateTime createTime;}
结果: