微服务API文档管理-Swagger
- 一、项目中集成swagger
-
- 1. 导入swagger依赖
- 2. 配置swagger文档描述
- 3. 在线测试接口
- 二、Zuul中聚合多个服务Swagger
-
- 1. 配置swagger依赖
- 2. swagger聚合类代码清单
- 3. 启动项目测试
- 今天学习的内容是配置swagger管理项目api文档接口,Swagger支持API自动生成同步在线文档,不需要手动编写接口文档。swagger生成的文档支持在线测试。
一、项目中集成swagger
1. 导入swagger依赖
- 在cloud-common模块的pom文件中导入swagger依赖,因为各个微服务模块都需要使用swagger,所以统一在common模块配置。
<properties><springfox-swagger.version>2.9.2</springfox-swagger.version>
</properties>
<!-- springfox-swagger2 -->
<dependency><groupId>io.springfox</groupId><artifactId>springfox-swagger2</artifactId><version>${
    springfox-swagger.version}</version>
</dependency><dependency><groupId>io.springfox</groupId><artifactId>springfox-swagger-ui</artifactId><version>${
    springfox-swagger.version}</version>
</dependency>
- 其他服务的pom文件需要导入common模块的依赖
<dependency><groupId>jin.li.yun.com</groupId><artifactId>cloud-common</artifactId><version>1.0-SNAPSHOT</version>
</dependency>
2. 配置swagger文档描述
- 在cloud-common模块中的config中创建CommonBean类,配置swagger文档描述信息。

- 配置swagger文档描述信息代码清单
package jin.li.yun.com.common.config;import com.baomidou.mybatisplus.extension.plugins.PaginationInterceptor;
import com.baomidou.mybatisplus.extension.plugins.pagination.optimize.JsqlParserCountOptimize;
import lombok.extern.slf4j.Slf4j;
import org.springframework.beans.factory.annotation.Value;
import org.springframework.context.annotation.Bean;
import org.springframework.context.annotation.Configuration;
import springfox.documentation.builders.ApiInfoBuilder;
import springfox.documentation.builders.ParameterBuilder;
import springfox.documentation.builders.PathSelectors;
import springfox.documentation.builders.RequestHandlerSelectors;
import springfox.documentation.schema.ModelRef;
import springfox.documentation.service.ApiInfo;
import springfox.documentation.service.Contact;
import springfox.documentation.service.Parameter;
import springfox.documentation.spi.DocumentationType;
import springfox.documentation.spring.web.plugins.Docket;
import springfox.documentation.swagger2.annotations.EnableSwagger2;import java.util.ArrayList;
import java.util.List;
@Slf4j
@EnableSwagger2
@Configuration("ccb")
@SuppressWarnings("all")
public class CommonBean {
@Value("${spring.swagger.enable:true}")private boolean enableSwagger;@Beanpublic Docket api() {
ParameterBuilder tokenPar = new ParameterBuilder();List<Parameter> pars = new ArrayList<>();tokenPar.name("Authorization").description("令牌").modelRef(new ModelRef("string")).parameterType("header").required(false).build();pars.add(tokenPar.build());return new Docket(DocumentationType.SWAGGER_2).apiInfo(apiInfo()).enable(enableSwagger).select().apis(RequestHandlerSelectors.basePackage("jin.li.yun.com")).paths(PathSelectors.any()).build().globalOperationParameters(pars);}private ApiInfo apiInfo() {
return new ApiInfoBuilder().title("项目接口文档").description("项目描述").contact(new Contact("wangjiao", "", "")).version("2.0").build();}
}
@Slf4j
@RequestMapping(value = "/mini/user")
@RestController(value = "miniUserC")
@Api("MINI 用户API")
public class UserController {
@Resource private UserService service;@PostMapping("/auth-token")@ApiOperation("认证接口")public ApiResult authToken(@Valid @RequestBody UserLoginReq req) {
}
}
@Data
@AllArgsConstructor
@NoArgsConstructor
@ApiModel("用户登录信息请求")
public class UserLoginReq implements Serializable {
private static final long serialVersionUID = 1L;@NotBlank(message = "电话不能为空")@ApiModelProperty(value = "电话", example = "15675458912")private String tel;@NotBlank(message = "密码不能为空")@ApiModelProperty(value = "密码", example = "yyy23")private String password;public static UserLoginReq of() {
return new UserLoginReq();}
}
- 启动项目
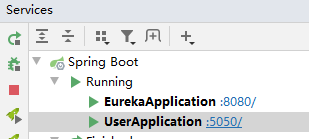
- 访问swagger地址:http://localhost:5050/user/swagger-ui.html

- 如果访问swagger地址出现如下页面:? Could not render e, see the console.
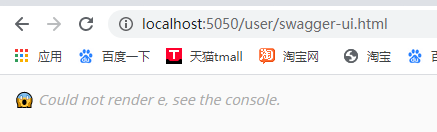
- 原因:@Value("spring.swagger.enable:false")修改成@Value("{spring.swagger.enable:false}")修改成@Value("spring.swagger.enable:false")修改成@Value("{spring.swagger.enable:true}")
3. 在线测试接口
- 点击【Try it out】按钮进行测试。填入参数,点击【Execute】进行提交测试

- 测试结果

二、Zuul中聚合多个服务Swagger
1. 配置swagger依赖
- 在Zuul中进行聚合操作的原因是不需要每次都去访问独立服务的文档,通过网关统一整合这些服务文档,方便使用。
- 在cloud-gateway模块的pom文件中导入Common模块的依赖;
<dependency><groupId>jin.li.yun.com</groupId><artifactId>cloud-common</artifactId><version>1.0-SNAPSHOT</version>
</dependency>
- 如果cloud-gateway模块没有导入Common模块依赖,则需要重新导入swagger依赖,且需要重新配置swagger文档描述信息CommonBean类,由于Common模块放置的都是公共使用的,所以不需要再重新去创建一遍了。
<properties><springfox-swagger.version>2.9.2</springfox-swagger.version>
</properties>
<!-- springfox-swagger2 -->
<dependency><groupId>io.springfox</groupId><artifactId>springfox-swagger2</artifactId><version>${
    springfox-swagger.version}</version>
</dependency><dependency><groupId>io.springfox</groupId><artifactId>springfox-swagger-ui</artifactId><version>${
    springfox-swagger.version}</version>
</dependency>
- 不用手动去整合所有服务信息,而是直接去读取eureka中的服务信息,只要是注册到eureka中的服务就都能整合进来;
- 在config中编写SwaggerConfig配置类,实现SwaggerResourcesProvider接口;
2. swagger聚合类代码清单
package jin.li.yun.com.config;import com.alibaba.fastjson.JSON;
import lombok.extern.slf4j.Slf4j;
import org.springframework.beans.factory.annotation.Autowired;
import org.springframework.beans.factory.annotation.Value;
import org.springframework.cloud.client.ServiceInstance;
import org.springframework.cloud.client.discovery.DiscoveryClient;
import org.springframework.context.annotation.Primary;
import org.springframework.stereotype.Component;
import springfox.documentation.swagger.web.SwaggerResource;
import springfox.documentation.swagger.web.SwaggerResourcesProvider;
import springfox.documentation.swagger2.annotations.EnableSwagger2;
import jin.li.yun.com.common.constant.Constant;import java.util.ArrayList;
import java.util.List;
import java.util.Optional;
@EnableSwagger2
@Component
@Primary
@Slf4j
public class SwaggerConfig implements SwaggerResourcesProvider {
@Autowired private DiscoveryClient discoveryClient;@Value("${spring.application.name}")private String applicationName;@Overridepublic List<SwaggerResource> get() {
List<SwaggerResource> resources = new ArrayList<>();discoveryClient.getServices().stream().filter(s -> !s.equals(applicationName)).forEach(name -> {
log.info("get:服务实例名称[names:{}]", name);String[] names = name.split(Constant.DEFAULT_STRING_SHORT_LINE);if (names.length == 2) {
name = names[1];log.info("get:服务实例名称取后缀[name:{}]", name);}Optional<ServiceInstance> instanceOptional =discoveryClient.getInstances(name).stream().findFirst();if (instanceOptional.isPresent()&& instanceOptional.get().getMetadata().containsKey("context-path")) {
String contextPath = instanceOptional.get().getMetadata().get("context-path");log.info("get:context-path[contextPath:{}]", contextPath);resources.add(swaggerResource(name, "/" + name + contextPath + "/v2/api-docs", "2.0"));} else {
resources.add(swaggerResource(name, "/" + name + "/v2/api-docs", "2.0"));}});return resources;}private SwaggerResource swaggerResource(String name, String location, String version) {
SwaggerResource swaggerResource = new SwaggerResource();swaggerResource.setName(name);swaggerResource.setLocation(location);swaggerResource.setSwaggerVersion(version);log.info("swaggerResource:[swaggerResource:{}]", JSON.toJSONString(swaggerResource));return swaggerResource;}
}
3. 启动项目测试
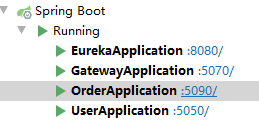
- 访问网关端口,5070是网关端口:http://localhost:5070/swagger-ui.html,可以在一个窗口切换不同服务,比较方便。

- 截取服务实例名称日志


:- 到这里,相信你已经get到了,赶快动手试试吧!!!
